CO
-
100/P2102
Series | User Manual
58
10.
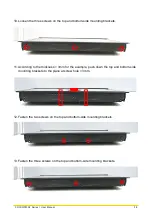
Loosen the three screws on the top and bottom-side mounting brackets.
11.
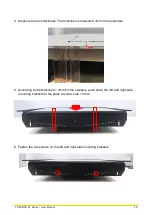
According to the thickness = 3mm for the example, push down the top and bottom-side
mounting brackets to the place at screw hole = 3mm.
12.
Fasten the two screws on the top and bottom-side mounting brackets.
13.
Fasten the three screws on the top and bottom-side mounting brackets.
Содержание CO-100/P2102 Series
Страница 11: ...CO 100 P2102 Series User Manual 11 Chapter 1 Product Introductions ...
Страница 18: ...CO 100 P2102 Series User Manual 18 Dimension CO W121C P2102 Unit mm CO W121C P2102E Unit mm ...
Страница 22: ...CO 100 P2102 Series User Manual 22 Chapter 2 Switches Connectors ...
Страница 23: ...CO 100 P2102 Series User Manual 23 2 1 Location of Switches and Connectors 2 1 1 Top View 2 1 2 Bottom View ...
Страница 32: ...CO 100 P2102 Series User Manual 32 Chapter 3 System Setup ...
Страница 52: ...CO 100 P2102 Series User Manual 52 7 Put back the cover and fasten the two screws ...
Страница 63: ...CO 100 P2102 Series User Manual 63 Chapter 4 BIOS Setup ...
Страница 82: ...CO 100 P2102 Series User Manual 82 Chapter 5 Product Application ...
Страница 85: ...CO 100 P2102 Series User Manual 85 ...
Страница 92: ...CO 100 P2102 Series User Manual 92 Reference Input Circuit Reference Output Circuit ...
Страница 93: ...CO 100 P2102 Series User Manual 93 Chapter 6 Optional Modules and Accessories Pin Definitions and Settings ...
Страница 99: ...CO 100 P2102 Series User Manual 99 2 Fasten the VESA mount screws to complete the VESA mounting ...


