background image

43

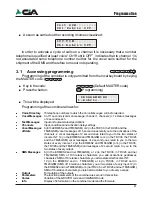
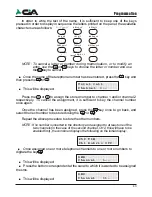
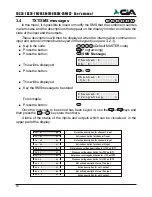
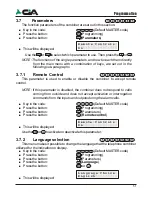
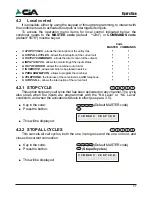
In order to write the text of the name, it is sufficient to keep one of the keys 

pressed in order to display in sequence the letters printed on the panel; the available 
characters are as follows:

NOTE: To cancel a letter or number during memorisation, or to modify an 

entry, use the  

 or  

 keys to choose the letter or number and use 

the  

 key to cancel it.

!

Once the name of the telephone number has been stored, press the  

   key and 

then press the  

 or  

.

!

This will be displayed:


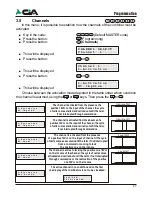
Press the  

 or  

 to assign the stored number to channel 1 and/or channel 2 

respectively.   To cancel the assignment, it is sufficient to key the channel number 
once again.

Once the channel has been assigned, press the    key once to go back, and 

select the next number to be stored using the    

   or    

Repeat the above procedure to store the other numbers.

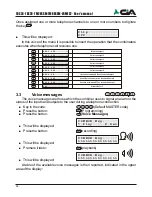
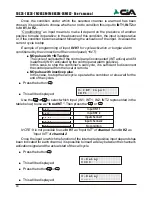
NOTE: 

If no number is inserted in the directory and assigned to at least one of the 

two channels (in the case of the second channel, CH2, this will have to be 
enabled first), the combiner displays the following on the initial display:


!

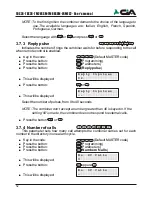
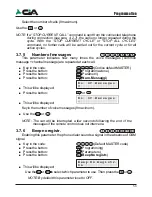
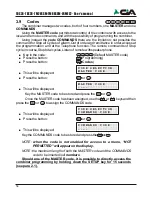
Once assigned one or more telephone channels to one or more numbers to 

digitare the key  

!

This will be displayed:


!

Press the button correspondent at the canal to which it is wanted to be assigned 

the sms.

!

This will be displayed:


V o c a l  c a l l
C h a n n e l    > - -

C h 1  R u b r i c  O f f 

2 5 ¥  T I M

S M S
C h a n n e l        > - -

S M S
C h a n n e l        > 1 -

Programmation

A B C a b c 2

D E F d e f 3

J K L j k l 5

M N O m n o 6

T U V t u v 8

W X Y Z w x y z 9

G H I g h i 4

P Q R S p q r s 7

? ! , . : ; ” ’ < = > ( ) 1

+ & @ / % $ _ 0

[spazio]

*

*

42

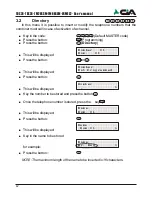
3.2


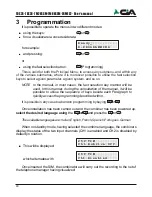
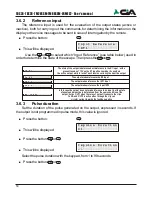
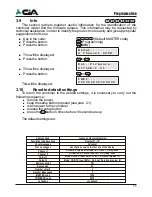
In this menu it is possible to insert or modify the telephone numbers that the 

combiner must call in case of activation of a channel.

!

Key in the code:


 (Default MASTER code)

!

Press the button:


 (Programming)

!

Press the button:


 (

Directory

)

!

This will be displayed


!

Press the button:


 or  

!

This will be displayed:


!

Press the button:


!

This will be displayed


!

Key the number to be stored and press the button  

!

Once the telephone number is stored, press the         key 

!

This will be displayed:


!

Press the button:


!

This will be displayed:


!

Key in the name to be stored

for example:


!

Press the button::


NOTE: The maximum length of the name to be inserted is 16 characters.

Directory

N u m b e r

0 1

N u m .

0 1

N u m b e r
N o t  P r o g r a m m e d

N u m b e r
                                            >

_

N a m e
N u m .  0 1

N a m e
  N u m . 0 1                        >

N a m e
M r .  R e d                      >

TDC26-TDC36-TM26GSM-TM66GSM-ERMES2- User’s manual

Содержание ERMES2

Страница 1: ...ITALIANO ENGLISH USER S MANUAL for circuits 619aMA 2 622aMA 2 xx xx GSM phone dialers with vocal messages TDC26 TDC36 TM26GSM TM66GSM ERMES2...

Страница 2: ...4 3 4 Text messages 46 3 5 Channels 47 3 6 Outputs 49 3 6 1 Mode 49 3 6 2 Reference input 50 3 6 3 Pulse duration 50 3 7 Parameters 51 3 7 1 Answerphone 51 3 7 2 Tone Detector 51 3 7 3 Tones Pulses 52...

Страница 3: ...ne ring call without answer from one phone number in SMS address book with automatic return of confirming ring Introduction 12Vdc 10 Remote ambient listening SMS messagges 128 char On display SMS mess...

Страница 4: ...her with the electronic key as with phone dial NOTE If you use only the phone dial is necessary to connect only the output C and NC of the Relay1 of the phone dial on Key terminals of the exchange Bur...

Страница 5: ...T2 Burglar central unit Net 230V 50Hz Black Red White This connection if used consents to send to one of inputs K1 K2 A positive one of reference in presence of main voltage 230 Vac Setting up in the...

Страница 6: ...1 TM600P Burglar central unit TM600P only ERMES 2 and TDC36 Voltage 230V 50Hz Sectioning switch This connection if used allows send to one of the inputs K1 K2 one positive of the reference in presence...

Страница 7: ...e of module GSM or has been inserted in wrong way Therefore TO TURN OFF THE PHONE DIALER and to proceed to the indicated insertion of the SIM card like in the previous paragraphs The red LED GSM on th...

Страница 8: ...on standby mode having selected the combiner language the combiners display the status of the two input channels CH1 is enabled and CH2 is disabled by default in rotation This will be displayed which...

Страница 9: ...tivations of the channels 2 vocal messages of 2 second ones relati to you to the two states of income INT 12 in the ERMES2 and TM66GSM or 4 in the TDC36 the TDC26 and the TM26GSM vocal messages of 2 s...

Страница 10: ...This will be displayed Key the number to be stored and press the button Once the telephone number is stored press the key This will be displayed Press the button This will be displayed Key in the nam...

Страница 11: ...ssigned press the key once to go back and select the next number to be stored using the or Repeat the above procedure to store the other numbers NOTE If no number is inserted in the directory and assi...

Страница 12: ...isplayed A table of the available voice messages is then reported indicated in the upper area of the display C l i p O f f C O M M O N M s g P l a y R e c _ _ _ _ _ _ _ _ C O M M O N M s g _ C O M M O...

Страница 13: ..._ _ _ _ _ _ _ Indication on the first line of the display Duration 16 sec 16 sec 16 sec Operating It is transmitted for first during one called of an alarm cycle It follows active the common message w...

Страница 14: ...it sendes in alarm case and the descriptions that appear on the display in order to indicate the state of the input and the outputs These descriptions will then be displayed when the interrogation co...

Страница 15: ...e 12Vcc on the input of the channel the cycle of calls comes started and carried out until the term if not interrupted through commandos The channel is activated from the presence of a positive 12Vcc...

Страница 16: ...el from the local or remote NO pulse with inactive pulse In this case to stop the call cycle operate the combiner or else wait for the end of the cycles Press the button This will be displayed Use the...

Страница 17: ...the state of the output is this result disactive and have not effect if result activated In other way the OFF command invert the output only if this result activated For estimate the condition of the...

Страница 18: ...ton or I n p u t R e f e r e n c e I N T 1 _ I m p u l s e D u r a t i o n 0 1 _ I m p u l s e D u r a t i o n _ I n t e r d e t t o I n K 1 I n t e r d e t t o N o I n p u t _ I n t e r d e t t o I n...

Страница 19: ...oes not respond to calls coming from outside and does not accept activation or interrogation commands from the inputs and outputs during the alarm calls Key in the code Default MASTER code Press the b...

Страница 20: ...ll be displayed Press the button or This will be displayed Select the number of pulses from 0 to 40 seconds NOTE The combiner don t accept a number greater than 40 is keyed in If the setting 00 is mad...

Страница 21: ...ione Press the button Parametri Press the button Num Messaggi This will be displayed Press the button or This will be displayed Key in the number of voice messages 9 maximum Use the or NOTE The call w...

Страница 22: ...amming Press the button Codes This will be displayed Press the button or This will be displayed Key the MASTER code to be stored and press the or Once the MASTER code has been assigned use the or keys...

Страница 23: ...setup button pressed see para 2 1 return power to the combiner release the setup button press the button 5 times before 10 seconds are up The default settings are M o d e l 2 C h a n n e l P S T N _ _...

Страница 24: ...The call attempt has not had answer 20 Occupied The called number turns out occupied or the call has been refused 20 Ship SMS Shipment of the SMS in course 20 And of call The telephone call is conclu...

Страница 25: ...biner out of order 7 IN SERVICE allows combiner to be placed in service 8 PROGRAMMATION allows to program the combiner 9 TELEPHONE the local use of the combiner as a GSM telephone 0 STOPCALL allows th...

Страница 26: ...ti theft system through the two devices indeed in this way the inversion of status of each of the relays provokes the connection or disconnection of the system This implies therefore that the activati...

Страница 27: ...her activations Any telephone call in progress at the time of the command will not be interrupted but continues as normal until its normal conclusion The other functions of the combiner remain operati...

Страница 28: ...code Press the button Telephone This will be displayed Select the telephone number Press the button or This will be displayed It is possible to hear the multi frequency tones or pulses generated by th...

Страница 29: ...mbiner does not receive a DTMF multi frequency tone for more than 3 minutes it interrupts the connection and cancels remote control Key in the code from the telephone Default MASTER code or Default MA...

Страница 30: ...of anti theft exchanges with input INT connected to the interrupted positive of the exchanges In this manner it is possible to know the output status for connection of the exchange by directly control...

Страница 31: ...ion of the combiner It will still be possible to connect to the combiner by remote if permitted by the programmed parameters and therefore be able to return the combiner to service or else command or...

Страница 32: ...o of directive WEEE and therefore he is not in they enforced some obligation of collection differentiated to fine life DECLARATION OF CONFORMITY The CIA logos is registered by HiLTRON Srl Quality mana...

Отзывы: