


c.
From the main menu of the Control Panel, select Applications > Station
Manager.
d.
Under the File Station tab, ensure the option for Enable File Station is
selected. If the option is not selected, click the checkbox and click Apply.
e.
Click the link for Regular login.
4. In the File Station manager, select the Content folder.
5. In the right pane, select all content folders previously loaded for use with the Christie NAS-S2.
By default, content files are stored in the
cinemalib
folder.
6. Go to the More Action menu.
7. Select Delete.
8. In the confirmation dialog, click OK.
The system deletes the folder, including any content files previously ingested for use with the
Christie IMB-S2. The Christie NAS-S2 is now ready to receive content for the GDC IMB.
Configuring the ETH1 port on the GDC IMB
Connect the Christie NAS-S2 to IMB Ethernet 1 port on the GDC IMB.
On the Christie NAS-S2, Ethernet 1 port has a default IP address of 192.168.1.101. The following steps
assume that you are using the updated IP address of 10.10.10.101.
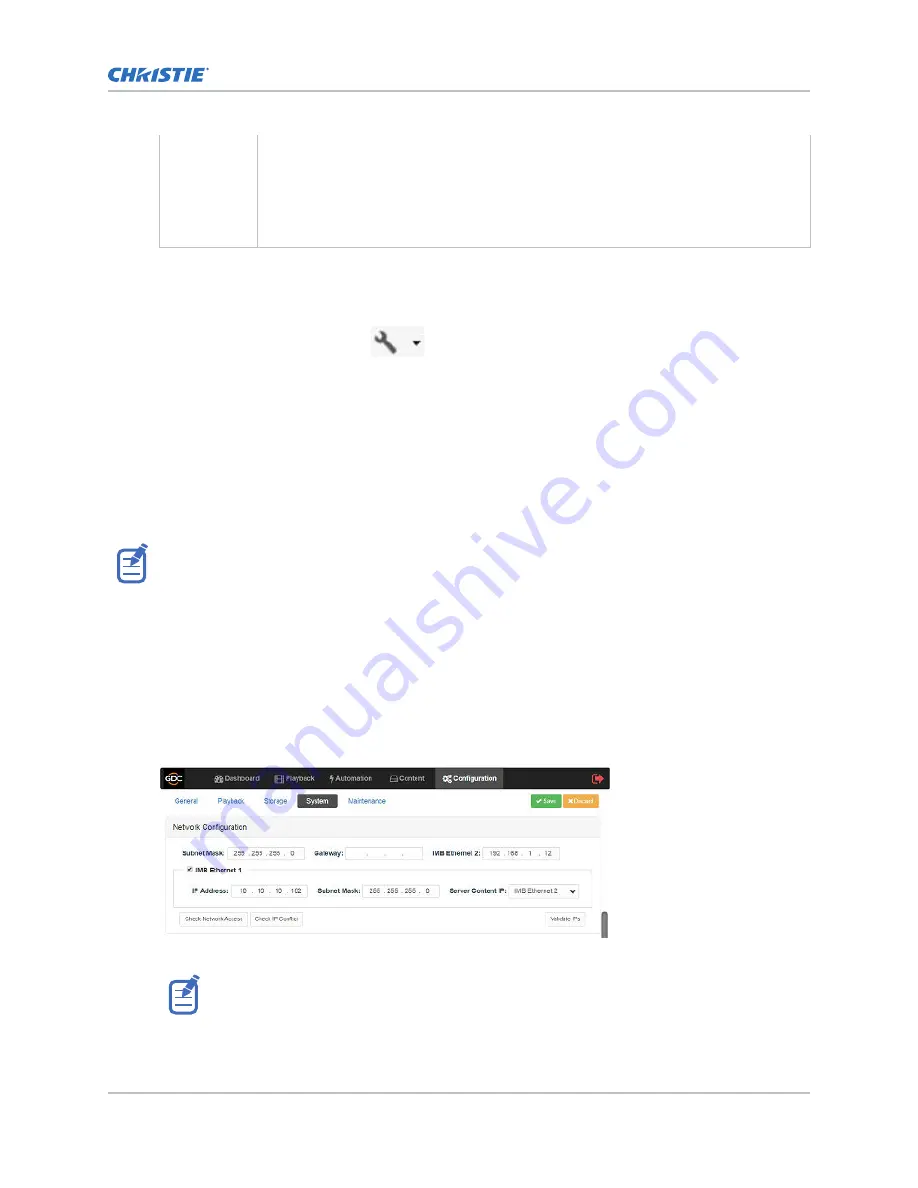
1. Using a Maintenance user level, log into the GDC Server web interface.
2. Click the Configuration tab.
3. Click the System tab.
4. Under IMB Ethernet 1, configure an IP address compatible with the IP address of the Christie
NAS-S2.
The IP address of the IMB Ethernet 1 port must be different than the IP address of the Christie
NAS-S2, but must be on the same subnet (for example, 10.10.10.102).
5. In the Server Content IP list, select IMB Ethernet 2.
6. To save the configuration, click Save.
To connect to the theater management network, use IMB Ethernet 2 port on the GDC IMB.
Configuring Christie NAS-S2 for GDC SR-1000 IMB
Christie NAS-S2 Configuration for GDC IMB Instruction Sheet
4
020-102909-02 Rev. 1 (01-2019)
Copyright
©
2019 Christie Digital Systems USA, Inc. All rights reserved.


