background image

J Series 2.0, 2.4, and 3.0 kW Setup Guide

2-1

020-100751-01  Rev. 1   (10-2011)

2 Installation and Setup

This section explains how to install, connect and optimize the projector for delivery of superior image 
quality. Illustrations are graphical representations only and are provided to enhance the understanding of 
the written material. 

2.1

Projector Quick Setup and Installation

The following instructions are for those preferring a quick setup. Refer to the remaining subsections for 
detailed setup instructions.


 Always power down the projector and disconnect all power sources before servicing or 

cleaning.

 Refer to Safety Warnings and Guidelines in 

4 Maintenance

.

STEP 1 - Installing a Projection Lens

The projection lens, shipped separately from the projector, must be installed prior to setting up the projector. 

 Remove the lens plug from the lens opening in the projector before installing the lens. 

Retain  the  lens  plug  for  projector  transportation  to  protect  the  optical  components 
from dust and debris.

IMPORTANT! 

The lens seals the projector, preventing contaminants from entering the interior of the 

projector. Never operate a projector without a lens.

LENS INSTALLATION

IMPORTANT! 

Remove the rear lens cap from the lens. Keep the front lens cap on the lens to protect it 

during installation.

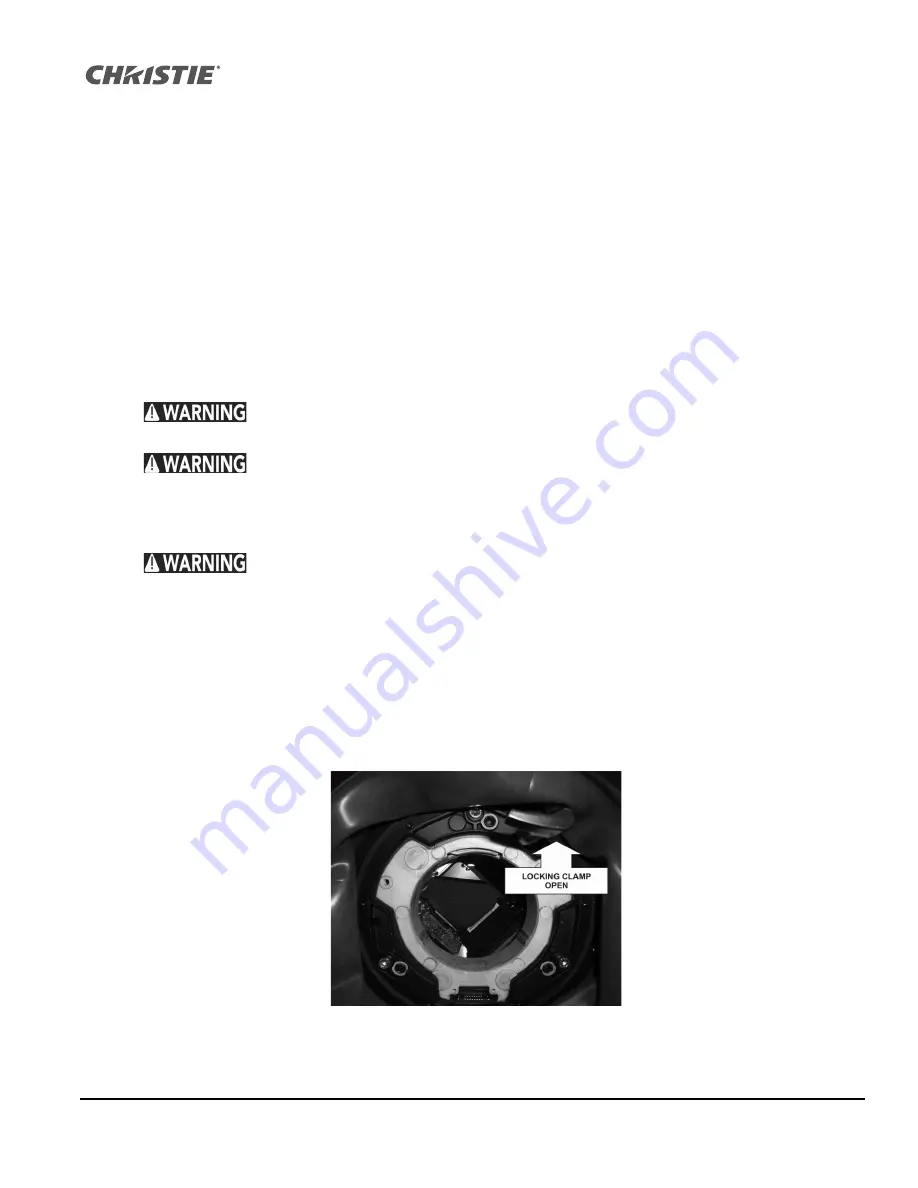
1. Rotate the lens clamp clockwise to the OPEN position, see 

Figure 2-1

.

F

IGURE 

2-1 

Содержание J Series

Страница 1: ...J Series 2 0 2 4 and 3 0 kW S e t u p G u i d e 020 100751 01 ...

Страница 2: ......

Страница 3: ...J Series 2 0 2 4 and 3 0 kW S e t u p G u i d e 020 100751 01 ...

Страница 4: ...ality materials and components that can be recycled and reused This symbol means that electrical and electronic equipment at their end of life should be disposed of separately from regular waste Please dispose of the product appropriately and according to local regulations In the European Union there are separate collection systems for used electrical and electronic products Please help us to cons...

Страница 5: ...2 10 2 2 5 Projector Communications 2 11 3 Operation 3 1 Using the Remote Keypad or Built In Keypad 3 1 3 1 1 Remote Keypad Commands 3 4 3 2 Navigating the Menus 3 8 3 3 Alarms 3 12 4 Maintenance 4 1 Lamp and Filter Replacement 4 1 4 2 Liquid Coolant Module Maintenance 4 5 4 2 1 Liquid Cooler P N 003 100668 XX 4 5 5 Troubleshooting 5 1 Power 5 1 5 1 1 Projector Does Not Power ON 5 1 5 2 Lamp 5 1 5...

Страница 6: ...ty Appears to Drift from Good to Bad Bad to Good 5 4 5 7 11 Display has Suddenly Frozen 5 5 5 7 12 Colors in the Display are Inaccurate 5 5 5 7 13 Display is Not Rectangular 5 5 5 7 14 Display is Noisy 5 5 5 8 Web Interface 5 6 5 8 1 After upgrading the projector software the Web pages do not display correctly 5 6 5 8 2 A backup or Interrogator file cannot be saved 5 6 7 Specifications 7 1 Feature...

Страница 7: ...tor contact your dealer In most cases servicing is performed on site If you have purchased the projector fill out the information below and keep with your records Table 1 1 Dealer Dealer or Christie Sales Service Contact Phone Number Projector Serial Number Purchase Date Installation Date The serial number can be found on the license label located on the back of the projector Table 1 2 Ethernet Se...

Страница 8: ...m ILS Motorized lens mount for all models Auto setup feature Integrated ChristieNET Networking ability through RS 232 and RS 422 connectors Status LED display on built in keypad for easy projector status monitoring Control with remote keypad wired remote or built in keypad Four input slots for Optional Input Modules Refer to 7 Specifications for a complete list of technical specifications Table 1 ...

Страница 9: ...istie accredited service technician WARNING Projector must be operated in an environment that meets operating specifications as listed in 7 Specifications 1 2 2 AC Power Precautions WARNING Use only the AC power cord supplied Do not attempt operation if the AC supply and cord are not within the specified voltage and power range Refer to the license label on the back of the projector or 7 Specifica...

Страница 10: ...Never attempt to access the lamp while the lamp is ON After turning the lamp OFF it is crucial that you wait at least 5 minutes before handling the lamp This provides sufficient time for the lamp cooling fans to properly cool the lamp For all other precautions critical for safe removal and replacement of the lamp refer to 4 1 ...

Страница 11: ...vicing or cleaning Refer to Safety Warnings and Guidelines in 4 Maintenance STEP 1 Installing a Projection Lens The projection lens shipped separately from the projector must be installed prior to setting up the projector Remove the lens plug from the lens opening in the projector before installing the lens Retain the lens plug for projector transportation to protect the optical components from du...

Страница 12: ...mount opening without turning Press using your hand as shown in Figure 2 2 NOTE When installing the lens ensure that the lens is not inserted at an angle as this can cause damage FIGURE 2 2 3 Remove the front lens cap 4 While holding the lens flat against the lens mount rotate the lens clamp clockwise to lock the lens assembly in place See Figure 2 3 FIGURE 2 3 5 For added stability such as motion...

Страница 13: ...el the projector adjust the height of the feet For more detailed instructions on positioning the projector refer to 2 2 1 later in this section STEP 3 Connecting a Source Located at the back of the projector is the input panel where all source connections are made Each input is clearly labeled for easy identification Depending on the type of option card installed connect your source using the appr...

Страница 14: ...to 4 Sy and Chroma C connected to 6 Sc NOTE Must be grouped as 1 S Video 1 CVBS DMX512 Interface Card has two 5pin XLR connectors 1 input male and 1 output female If there is active communications on the DMX512 Interface card the power LED will blink between low intensity and high intensity STEP 4 Connecting the Line Cord IMPORTANT Use the line cord provided with the projector NOTE Voltage and cur...

Страница 15: ...pin from the bracket surrounding the AC receptacle at the AC inlet of the projector by pressing down on the button on the end of the locking pin and then pull upwards on the pin to remove it as shown in Figure 2 6 FIGURE 2 6 2 Open the cap on the AC plug and line up the slot on the plug with the pin on the receptacle See Figure 2 7 FIGURE 2 7 ...

Страница 16: ...tus indicators at the rear of the projector will be solid amber The projector has reached standby and is ready for use when The LCD displays Standby mode The Status LED is solid amber The Lamp LED is off To turn on the projector do one of the following Press and hold the power button on either the built in keypad or the remote control Press the power button twice quickly on either the built in key...

Страница 17: ...ng mount 104 104001XX This mounting is recommended for fixed installations and for those that want the projector out of plain view or have limited amount of space for the projector and audience For more information contact your dealer Use only the Christie approved ceiling mount kit designed for your projector Refer to the installation instructions and safety guidelines provided in the kit 2 2 2 B...

Страница 18: ...ng With the framing pattern on screen double check projector leveling so the top edge of the image is parallel to the top edge of the screen 6 Throw Distance Ensure the projector is positioned in the throw distance range for the particular lens Folded Optics In rear screen applications where space behind the projector is limited a mirror may be used to fold the optical path see Figure 2 9 The posi...

Страница 19: ...2 Adjust until the cross hair image is in focus with minimal flare 6 Adjust cross hair pattern II by adjusting the appropriate cap screw see Figure 2 12 Adjust until the cross hair image is in focus with minimal flare 7 Adjust cross hair pattern III by adjusting the appropriate cap screw see Figure 2 12 Adjust until the cross hair image is in focus with minimal flare 8 Repeat step 5 6 and 7 as req...

Страница 20: ...mote Keypad Built In Keypad Press and hold POWER OR Press POWER twice OR Press POWER once then immediately press the DOWN key NOTE For Step 2 and 3 if the second key is not pressed immediately a confirmation window will appear The second key press must be pressed within 1 second of the window appearing NOTE After powering down the Status LEDs cycle and the LCD displays the message Cooling Down unt...

Страница 21: ...en Projector communication in progress Status 3 Off AC power is off Yellow AC is present but projector is in standby Green Projector is powered up and operating normally Flashing Red Error has occurred Details are displayed on the status display Shutter 4 Green Shutter is open Yellow Shutter is closed NOTE A condition occurs on the first power on after a software upgrade and is indicated by all th...

Страница 22: ......

Страница 23: ... Keypad located at the rear of the projector See Figure 3 2 While each of the keypads provides complete control of the projector they differ slightly in their arrangement of keys and in what functions can be accessed directly with a key press rather than requiring use of the menu system You may find one keypad more convenient than another for your specific installation and application Guide to Key...

Страница 24: ...3 2 J Series 2 0 2 4 and 3 0 kW Setup Guide 020 100751 01 Rev 1 10 2011 Section 3 Operation Remote Keypad FIGURE 3 1 REMOTE KEYPAD ...

Страница 25: ...uilt in Keypad FIGURE 3 2 The built in keypad has a LCD status display window which displays all states of the keypad controls The LCD displays status information when the projector is powering up Warm up Lamp is warming up and when the projector is cooling down Cool down Lamp is cooling down The display shows the state of the keys menu structure and menu items Overview of LED and Key States The L...

Страница 26: ... ON OFF Press and hold POWER for two seconds or press twice quickly to turn the projector ON or OFF Or press and release POWER followed immediately by UP ARROW KEY ON or DOWN ARROW KEY OFF to guarantee the correct action useful if you are unsure of the present state NOTES 1 After powering down the lamp cooling fan remains on for approximately five minutes to cool the lamp 2 Avoid turning the proje...

Страница 27: ...ak white in your images Use LEFT RIGHT ARROW KEY until you reach the desired level of contrast for best results start low and increase so that whites remain bright but are not distorted or tinted and that light areas do not become fully white i e crushed Conversely low contrast causes dim images Bright Increases or decreases the black level in the image Use LEFT RIGHT ARROW KEY until you reach the...

Страница 28: ...OTE With OSD on you can still hide error messages and slide bars by disabling these options in the Menu Preferences menu Shutter Press and hold SHUTTER for two seconds to toggle the internal mechanical shutter blade closed or open with a single keystroke Or press and release SHUTTER followed immediately by UP ARROW KEY closed or DOWN ARROW KEY open to guarantee the correct state useful if you are ...

Страница 29: ...ans that connected projector is listening if there is no checkmark you are communicating with a different projector To control a specific projector with the keypad press PROJ and then enter the three digit number assigned to the projector you want to use If you switch to a projector other than the one you are currently using the checkmark will disappear To broadcast to multiple projectors press PR...

Страница 30: ...remote keypad for the LASER key to work 3 2 Navigating the Menus Main Menu Most of the projector controls are accessed from within the projector menu system There are several groups of related functions with each group selectable from the Main menu as shown at right Press MENU at any time to display this Main menu On the remote keypad enter the number correspond ing to the function menu you wish t...

Страница 31: ...ghlight to the option desired and press LEFT RIGHT ARROW KEY to adjust immediately You can bypass the menus entirely and use a single key to immediately access an adjustment during your presentation applies only to options having their own key such as Contrast Brightness Gamma etc For blind access hide the entire menu system see OSD key above and access using the proper sequence of key presses Sli...

Страница 32: ...ghlight and use RIGHT ARROW KEY to check and LEFT ARROW KEY to un check If a check box is numbered enter its number to immediately toggle the check box Pull down lists To see a pull down list of options available for a given parameter Highlight the list and press ENTER or Enter the menu option number Use the UP ARROW KEY or DOWN ARROW KEY to navigate up and down within the list Press ENTER to sele...

Страница 33: ...onvert a capital letter into a lower case letter position on the letter and press FUNC followed by the DOWN ARROW KEY Add or Delete a Character or Space To insert a space at the cursor location press FUNC then the RIGHT ARROW KEY To delete a highlighted character or space press FUNC then the LEFT ARROW KEY Delete all Characters Press FUNC followed by ENTER Press Enter When Finished To accept edits...

Страница 34: ... A critical alarm is generated when a condition occurs that could prevent the projector from operating and could cause damage to the projector This may cause the projector to shut down automatically An example would be a fan not running Alarms are displayed on the projector LCD in the Status Menu of the ODS if active in the Web User Interface NOTE When an alarm is displayed in the LCD the built in...

Страница 35: ... the correct wattage lamp supplied by Christie See Table 4 1 Read the lamp replacement procedure in its entirety before proceeding A Christie accredited service technician must perform lamp replacement Cool the lamp completely then lift the lamp by the handle only Do not touch the glass window of the lamp Fingerprints left on the surface can lead to an intense accumulation of heat called a hotspot...

Страница 36: ...he lamps to cool before handling 3 REMOVE THE LAMP MODULE Protective gear required Wear a face shield Using a 2 Phillips screwdriver loosen the two 2 lock screws securing the lamp door which is located at the rear of the projector below the Input panel See Figure 4 1 FIGURE 4 1 Projector Part Number Projector Model Lamp Type Lamp Filter Kit Required Roadster S 18K J 132 013116 xx 2 4 kW 03 900518 ...

Страница 37: ... module Figure 4 3 and pull lamp module off of electrical terminal by pulling on the insertion removal handle Carefully pull on the lamp module handle to remove the lamp If the lamp is to be discarded follow safe disposal recycling procedures FIGURE 4 3 6 RECORD THE SERIAL NUMBER OF THE NEW LAMP In the lamp menu select CHANGE LAMP This will prompt for the old lamp serial number if previously not e...

Страница 38: ...n you removed the old lamp module until the resistance increases NOTE A slightly harder push may be required to ensure it is fully seated Lamp alignment marks are provided to indicate the fully seated position FIGURE 4 4 8 SECURE THE INSERTION REMOVAL LEVER Secure the insertion removal lever by threading the know into the threaded block by hand or using a Phillips screwdriver See Figure 4 5 FIGURE...

Страница 39: ...ore removing or installing a filter turn off the projector and allow it to cool for 5 minutes before unplugging 2 REMOVE FILTER DOOR Loosen the lock screw at the bottom of the filter door Lift the door away from the projector See Figure 4 6 FIGURE 4 6 3 REPLACE FILTER Remove the old filter and insert the new one NOTE The direction arrows on the outside edge of the filter Ensure the filter is insta...

Страница 40: ... cap and the air vent cap NOTE If refilling the liquid coolant module outside of the projector the level of coolant can be seen by looking through the liquid level window FIGURE 4 7 Remove the Liquid Coolant Module from the Projector Optional 1 Using a 6mm hex driver or Allen key remove the 2 bolts securing the top frame bracket Refer to Figure 4 8 LEFT 2 Disconnect the electrical connector by dep...

Страница 41: ...Section 4 Maintenance J Series 2 0 2 4 and 3 0 kW Setup Guide 4 7 020 100751 01 Rev 1 10 2011 FIGURE 4 8 LEFT RIGHT ...

Страница 42: ......

Страница 43: ...y initializing the display should show Please wait When finished initializing the display should show Standby mode 4 Check the LCD for any warnings or errors NOTE A condition occurs on the first power on after a software upgrade and is indicated by all the following The Status LEDs are cycling green The LCD displays the warning Image Processor Upgrading The LED on the Image Processor card flashes ...

Страница 44: ...ck if IR signals are received by the projector Pressing any key on the remote control towards the front or rear sensor the Status LED will blink regardless if any command is executed If the LED does not blink restart the projector 3 Ensure the remote keypad is enabled If the projector is powered using the built in keypad open the OSD menu and go to the Main Menu Configuration Communication submenu...

Страница 45: ...es 5 7 Displays 5 7 1 The projector is on but there is no display 1 Was a lens cover accidently left on Remove lens cover 2 On the LCD display check that the shutter is open This will also be indicated by the shutter LED being green 3 Is the correct input selected Check cable connections 4 Check if menus appear on the screen 5 Can you access test pattern Ensure a full black test pattern has not be...

Страница 46: ...only once 3 The source if analog may need a different sync tip clamp location 5 7 6 The Upper Portion of the Display is Waving Tearing or Jittering This can occur with video or VCR sources Check your source 5 7 7 Portions of the Display are Cut Off or Warped to the Opposite edge Resizing may need adjustment Adjust until entire image is visible and centered 5 7 8 Display Appears Compressed Vertical...

Страница 47: ...s Not Rectangular 1 Check leveling of the projector Ensure the lens surface and screen are parallel to one another 2 Is the vertical offset correct Make the necessary adjustments to the vertical offset on the lens mount 5 7 14 Display is Noisy 1 Display adjustment at the input source may be required Adjust pixel tracking phase and filter Noise is particularly common on YPbPr signals from a DVD pla...

Страница 48: ...tor 5 8 2 A backup or Interrogator file cannot be saved After performing a backup of Interrogator you may be prompted from a pop up window before saving the file If you have not specifically set Internet Explorer to automatically open save the file without prompting and if pop up windows have been disabled by enabling the pop up blocker then you will not be able to save the file Disable the pop up...

Страница 49: ...Section 5 Troubleshooting J Series 2 0 2 4 and 3 0 kW Setup Guide 5 7 020 100751 01 Rev 1 10 2011 Using the Internet Option window select Local intranet then click Custom Level Repeat Step 3 FIGURE 5 1 ...

Страница 50: ......

Страница 51: ...nput Source Signal Compatibility 7 2 1 Analog Only Input 7 3 Control Signal Compatibility 7 3 1 Projector Control Filter media types Dust filter Fog filter Filter access Service interchangeable via access panel Ushio Xenon bubble lamp system Lamps are accessed from the rear of the projector Analog Only Input Twin HDMI Input Dual Link DVI Input Video Decoder Input Dual SD HD SDI Input DMX512 Interf...

Страница 52: ...10AWG type SJT with plug NEMA L6 30P 30A 2400W 12AWG type SJT with plug NEMA 6 20P 20A 1900W 12AWG type SJT with plug NEMA 6 20P 20A Inrush Current All 60 A max Maximum Power Consumption 3000W 4000W 2400W 3200W 1900W 2800W Type Lamp Model Bubble Lamp Power 3000W 2000 min 3000 max software adjustable 2400W 1500 min 2400 max software adjustable 2000W 1200 min 1900 max software adjustable Rated lamp ...

Страница 53: ...ink DVI Input 108 312101 XX X X Video Decoder Input 108 310101 XX X X Dual 3G HD SD SDI Input Card 108 313101 XX X X Twin HDMI Input 108 311101 XX X X DMX512 Interface 108 314101 XX X X Dust Filter X X Fog Filter X Lens ILS 0 73 1SX 0 67 1HD 118 100110 XX X Lens ILS 1 25 1 6SX 1 16 1 49HD 118 100111 XX X Lens ILS 1 5 2 0SX 1 4 1 8HD 118 100112 XX X Lens ILS 2 0 2 8SX 1 8 2 6HD 118 100113 XX X Lens...

Страница 54: ... 2 Environmental The product must conform to EU Directive 2002 95 EC on the restriction of the use of certain hazardous substances RoHS in electrical and electronic equipment and the applicable official amendment s EU Regulation EC No 1907 2006 on the registration evaluation authorization and restriction of chemicals REACH and the applicable official amendments EU Directive 2002 96 EC on waste and...

Страница 55: ...tions to include CCC KC PSE c tick Gost R South Africa International packaging recycling mark requirements EU Directive 94 62 EC on packaging and packaging waste China packaging recycling mark standard GB18455 2001 Korea extended producer responsibility EPR separate discharge mark system under the act on the promo tion of resource saving and recycling 2003 United States society of the plastics ind...

Страница 56: ......

Страница 57: ...ternal I O devices to the projector There are 7 GPIO pins available on the 9pin D Sub GPIO connector which are configurable via RS 232 commands The other two pins are reserved for ground and power see table below for pin identification Table A 1 GPIO Pin GPIO PINS PIN SIGNAL Pin 1 12V 200mA Pin 2 GPIO 2 Pin 3 GPIO 4 Pin 4 GPIO 6 Pin 5 Ground Pin 6 GPIO 1 Pin 7 GPIO 3 Pin 8 GPIO 5 Pin 9 GPIO 7 The ...

Страница 58: ...in the high state is 3 3V A low state or value of 0 will be read on an input pin if the circuit attached to the pin is open A high state or value of 1 will be read on an input pin if the circuit attached to the pin is shorted to ground This corresponds to a switch closing event Example 1 Turn room lighting on when the projector is turned off Assumes a control automation unit is configured to turn ...

Страница 59: ......

Страница 60: ...s ph 714 236 8610 Canada Kitchener ph 519 744 8005 United Kingdom ph 44 118 977 8000 France ph 33 0 1 41 21 00 36 Germany ph 49 2161 664540 Eastern Europe ph 36 0 1 47 48 100 Middle East ph 971 0 4 299 7575 Spain ph 34 91 633 9990 Singapore ph 65 6877 8737 Beijing ph 86 10 6561 0240 Shanghai ph 86 21 6278 7708 Corporate offices Worldwide offices ...

Отзывы: