Freeze-dryer Beta 1-8 LSCbasic
Freeze-dryer Beta 2-8 LSCbasic
11 Appendix
Version 03/2018, Rev. 1.5 of 09/03/2020
• sb-dc
89 / 107
Translation of the original operating manual
4
Switch the unit on 20 to 30 minutes prior to the start of the drying
process in order to let the vacuum pump warm up.
5
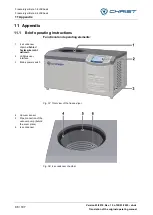
Place the plate rack on the base plate.
6
Transport the frozen samples as quickly as possible from the deep-
freeze to the freeze-dryer and place them on the shelves.
NOTE
Recommendation: Store the product vessels on the aluminium shelves or,
if possible, the entire rack with the shelves in the deep- freeze. The
advantage is that due to the higher cold storage capacity of the aluminium
material, the product will remain frozen for a longer period of time so that
the sample will not thaw.
7
nstall the drying chamber. Prior to doing so, check whether the O-ring
is completely free of dirt particles. The ground-in stopper of the acrylic
glass bell must be greased with high-vacuum grease.
8
Ensure that all of the valves of the acrylic glass bell are closed.
9
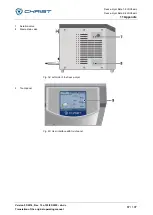
Ensure that the aeration valve is closed.
10
Ensure that the condensate drain valve is closed.
11
Start the main drying process either by opening the manual shut-off
valve or by waiting for the electromagnetic valve to open. Vacuum is
applied to the chamber and the freeze-drying process commences.
NOTE
The vacuum pump always runs with maximum power. With this type of
freeze-dryer, the power of the vacuum pump cannot be controlled.
12
The operating panel displays the vacuum, the ice condenser
temperature, and the current operating mode.
13
The end of the process is reached when the ice condenser is no longer
loaded and when it again reaches a final temperature of approximately -
50°C to -54°C. The pressure decreases as a function of the ice
condenser temperature.
14
Switch the vacuum pump off and aerate the drying chamber via the
condensate drain valve or via a rubber valve.
15
Switch the unit off by actuating the mains power switch and take the
product out of the freeze-dryer.
16
Switch the unit on again and start the defrosting process (button
"Operating mode: select/start"
– "Defrosting”).
CAUTION
Ensure that no water gets into the pipe connection of the vacuum pump or
vacuum sensor.
17
Drain the defrosting water via the condensate drain valve on the left-
hand side of the unit. To do so, connect a hose to the hose connector
and collect the defrosting water in a suitable vessel.
18
Keep the freeze-dryer open (i.e. without the lid or drying chamber) when
it is not in use so that moisture can evaporate. This increases the
service life of the vacuum sensor.

