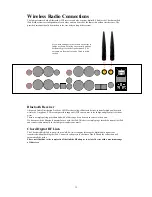
Chord Indigo Digital Preamplifier Скачать руководство пользователя страница 12


12 

Front Panel  

The front panel is the main control centre for the Indigo. It features the multifunction display, control buttons, 
volume control, headphone output socket and two USB ports. It also has the iPod dock where you can connect to 
play music, charge and synchronise any of the current generation of iPods or iPhones.  


Headphones  

The Indigo features a ¾ inch headphone socket on the front panel. Simply connect your headphones and then use 
the volume control to adjust the level. You may also wish to mute the connected  preamplifier or power amplifier 
you are using with the Indigo. 
 

USB Hub 

On the front panel are two additional USB ports to use with a connected computer. To use these the rear USB port 
must be connected to a computer. You can then plug any USB peripheral into the front panel connectors and use 
the device as though it was connected to your computer. For instance you may wish to connect an external hard 
drive to transfer files, or an MP3 player to charge or synchronise or an additional keyboard or mouse to control 
your computer. 


Ipod Dock 

To use the iPod dock carefully align the connector in the dock to the same connector on the bottom of the iPod and 
push it fully down. The iPod will automatically start charging. The dock supports both the analogue line level 
outputs from the iPod and also the digital connection if you are using the Chord modified iPod. These outputs can 
be selected using the front panel or remote control.  
If you have the rear USB connection connected to your computer you can also synchronise your iPod with iTunes 
to transfer music. Press and hold the IP button on the front panel to activate IPROG mode before inserting the 
iPod. Press and hold the IP button again to switch off this function. 
 

Caution: If you are synchronizing your iPod using the IPROG function you should always disconnect it via 
iTunes before removing it from the dock or switching off IPROG mode. Data loss or damage can occur if 
the synchronization process is interrupted. Only remove the iPod when the ‘Safe to disconnect’ message is 
displayed. 


Содержание Indigo Digital Preamplifier

Страница 1: ...Indigo Digital Preamplifier...

Страница 2: ...2...

Страница 3: ...RADIO CONNECTIONS 13 BLUETOOTH RECEIVER 13 CHORD DIGITAL RF LINK 13 EVERYDAY USE OF YOUR INDIGO 14 TURNING ON YOUR INDIGO 14 SELECT THE INPUT SOURCE 14 BLUETOOTH INPUT PAIRING PROCEDURE 15 FREQUENCY I...

Страница 4: ...Array DAC have been further complimented with improved power supply design and layout giving the very best digital to analogue conversion Digital inputs include SPDIF AES optical USB iPod and of cour...

Страница 5: ...rminal Connect the yellow green wire to the earth terminal If you need to fit a plug for US Canada Connect the white wire to the neutral terminal Connect the black wire to the live terminal Connect th...

Страница 6: ...ltages and energy levels Circuit designs that embody these components conform to applicable safety requirements Precautions must be taken to prevent accidental contact with power line potentials Do no...

Страница 7: ...to 260V AC 50 or 60Hz For optimum operation it is recommended that the Indigo is connected directly to the wall socket via the power cord provided AC Connector Powering up Press the rear panel switch...

Страница 8: ...ngths of cable with less deterioration of signal They are also less prone to interference than unbalanced inputs Balanced inputs have three pins and use Neutric XLR style connectors Pin 1 is earth pin...

Страница 9: ...D transport that features dual data 176 or 192KHz operation please connect both connectors so that the top connector connects to the top connector on the transport and the bottom to the bottom connect...

Страница 10: ...put Connections The Indigo features an analogue input for connection to a non digital source You can connect using balanced cables or RCA phono cables Connect your analogue source to the input shown A...

Страница 11: ...ine level outputs that are for connection to another preamplifier The top set of connectors marked as OUT V L and OUT V R are the volume controlled outputs for connection to a power amplifier WARNING...

Страница 12: ...o transfer files or an MP3 player to charge or synchronise or an additional keyboard or mouse to control your computer Ipod Dock To use the iPod dock carefully align the connector in the dock to the s...

Страница 13: ...ith a 30m range it can be used anywhere in the home We have provided a Bluetooth adapter for use with the iPod This device simply plugs into the bottom of the iPod and connects automatically to the In...

Страница 14: ...Optical digital input via rear panel TOSLink connectors Coax digital input via rear BNC connectors AES digital input via rear balanced XLR connectors USB digital input on rear panel Connect this to s...

Страница 15: ...tected on the digital inputs then the incoming sample frequency will be displayed briefly before reverting back to the chosen input Buffer Setting Press the BUFF button on the front panel to select th...

Страница 16: ...e infra red IR remote control signals as other Chord preamplifiers so if you wish to use it in conjunction with a preamplifier then you can disable the IR receiver so only the buttons and manual volum...

Страница 17: ...s a universal controller for all Chord products televisions and DVD players Full instructions can be found in the System Remote Manual supplied but for the purposes of controlling the Indigo the main...

Страница 18: ...to decrease the volume Mute Press the mute key to mute the Indigo To un mute Press the mute key again Controlling the iPod The Stealth remote control supplied with the Indigo has also been factory pro...

Страница 19: ...Agents Frequently asked questions why aren t any of the remote control buttons working Press the HIFI button to set up the remote control for Indigo functions The range of the Chord digital RF link o...

Страница 20: ...OUTPUT 1 x headphone jack socket USB HUB rear USB input must be connected to PC 2 x Front panel USB sockets 1 x iPod dock sync RAM BUFFER 3 Settings off minimum maximum PHASE SWITCH 2 Settings Positi...

Отзывы: