background image


Menu Operation 

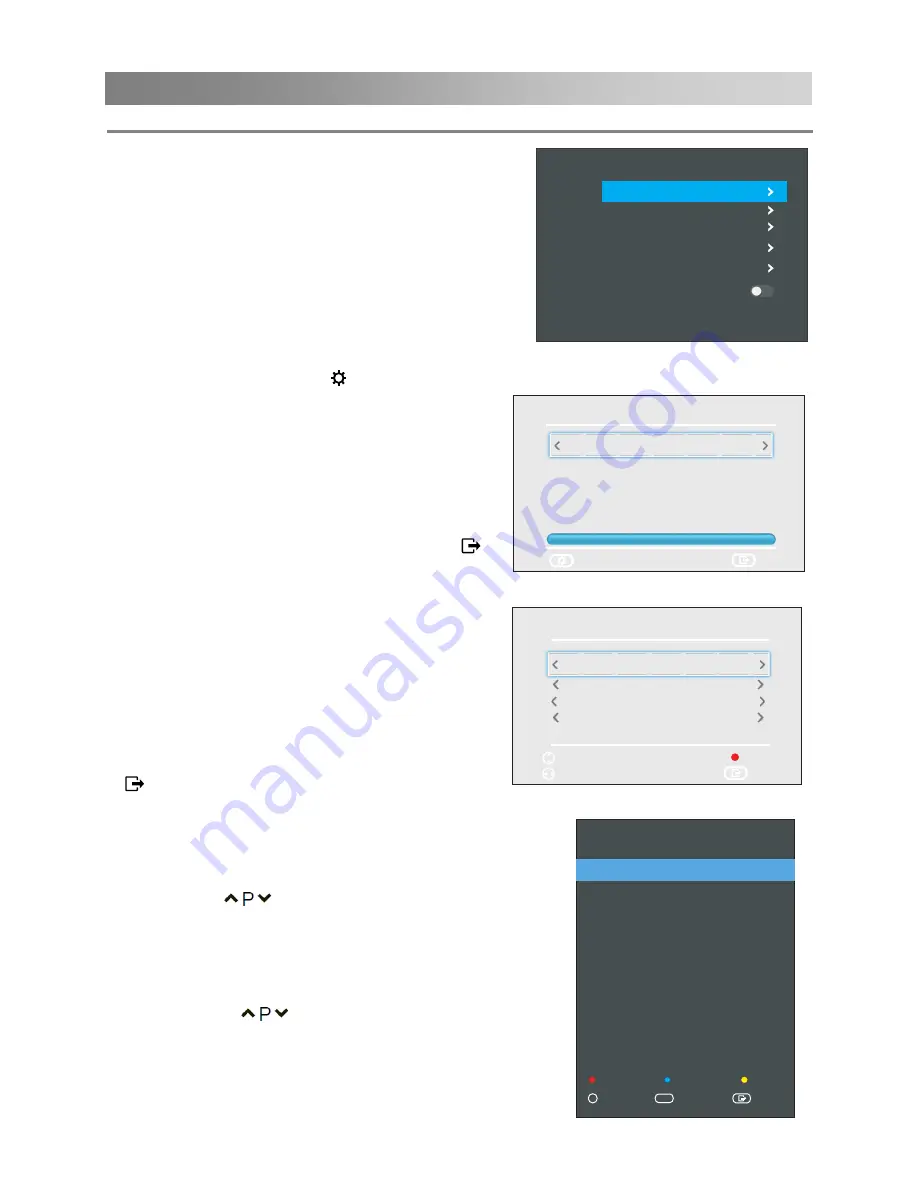
■ DTV


Manual


Tuning

Manual store for digital


channels.


1. Press the ◄/► button to select channel.   

2. Press the 

OK

 button to start channel tuning. 

When a channel is found, the searching 

process will stop; the channel will be saved with 

current channel number. Press the 

EXIT ( ) 

button to exit.


 ATV Manual Tuning: 

Manual store for ATV channels. 

Storage To 1: Store the searched channel to 1 

(you can adjust the channel number by◄/►).  

Current CH 1: Select the current channel. 

System: Set system for local programs. 

Search: Press the


◄ button to search down 

from the current frequency, and press the


► 

button to search up. 

Press the red button to save it. Press the 

EXIT 

( )

 to exit. 

ATV  Manual  Tuning

Storage To  1

Current CH 1

Search

Frequency 867875  KHz 

   Exit


   Adjust


System BG

   Save


   Move

 Channel Edit   

Press the▲/▼buttons select the Channel Edit,     

then press

  the

  OK 

button to enter sub-menu.


   1.

 Press the ▲/▼ button to select a channel.   

2.

 Press the 

  button to select the following or     

preceding page.   

Delete: 

Press the 

RED

 button to delete the channel. 

Skip: 

Press the 

BLUE 

button to skip the channel.   

(Your TV set will skip the channel automatically 

when using 

  to view the channels.) 

Move: 

Press the 

YELLOW

 button to set the channel 

to moving state, and then press the ▲/▼buttons to 

move it to the position you want to put. 

Favourite: 

Press the 

QMENU

 button to set the 

favorite channel. 

2  ADOM TV

6  ROCK TV

4  4KIDS

5  DOMINION TV

3  JOY NEWS

7  CINE PLUS

1  JOY PRIME

8  RESER VE2

9  OB TV

10  PENT TV

DTV

DTV

DTV

DTV

DTV

DTV

DTV

DTV

DTV

DTV

Favourite

QMENU

Select

OK

   Exit


Move

Delete


Skip

1/1

Channel Edit

16


Menu

Channel

Picture

Sound

Network

Option

Lock

Timer

Channel

Auto  Tuning

DTV  Manual  Tuning

ATV  Manual  Tuning


Channel 

Edit

Signal  Information

Dynamic Rescan

Configuring the Channel Menu


■ Auto tuning

Press the 

OK

 button to     

enter sub-menu.


– 

Tune Type:

 Press the ▲/▼ button to 

select tune type: DTV+ATV, DTV, ATV. 

– 

Country:

 Press the ▲/▼ button to 

select country. 

– 

Search:

 Press the 

OK/

► button to 

start the auto searching. 

Once the progress bar is full, the found 

channels will be stored and the unit 

will proceed to the search for DTV, TV, Radio and Data.

If you press the 

MENU (


button in TV searching, the Auto Tuning will skip to ATV 

searching as the suggestive picture shows.

DTV  Manual  Tuning

VHF CH 8

Press [OK] to search

Bad                      Normal                      Good

   Exit


   Back


DTV 
Radio 

Data

                           0
                           0
                           0

198500KHz

Содержание U55G6

Страница 1: ...U70G8...

Страница 2: ......

Страница 3: ...15 How to Navigate Menus 15 Configuring the Picture menu 17 Configuring the Sound menu 18 Configuring the Option menu 22 Configuring the Lock menu 26 Programme Guide 27 Channel List Favorite List 28 A...

Страница 4: ...on a circuit different from that to which the receiver is connected d Consult the dealer or experienced radio TV technician for help CAUTION Do not attempt to modify this product in any way without wr...

Страница 5: ...t the spread of fire keep candles or other open flames away from this product at all times 4 Ventilation When you install your TV maintain a distance of at least 4 inches between the TV and other obje...

Страница 6: ...he risk of fire 15 Replacement parts In case the product needs replacement parts make sure that the service person uses replacement parts specified by the manufacturer or those with the same character...

Страница 7: ...evision set is not overhanging the edge of the supporting furniture Not placing the television set on tall furniture for example cupboards or bookcases without anchoring both the furniture and the tel...

Страница 8: ...radiators heat registers stoves or other apparatus including amplifiers that produce heat 6 Clean only with a dry cloth Unplug this product from the wall outlet before cleaning Do not use liquid clean...

Страница 9: ...e normally or has been dropped 12 When a cart is used use caution when moving the cart apparatus combination to avoid injury from tip over Sudden stops excessive force and uneven floor surfaces can ca...

Страница 10: ...Main Unit Control 7 Front Panel 1 LED LCD display screen 2 Power indicator 3 Turns the unit on and off Opens the menu 4 5 Changes the channels 6 7 1 2 3 4 5 6 7 Adjust the volume...

Страница 11: ...rage device for multimedia file playback 8 NOTE Input Output connectivity options may change from model to model Back view controls and sockets DIGITAL AUDIO OUT Coaxial digital audio input socket 8 2...

Страница 12: ...When connecting please make reference to the interface name and the interface color to connect the signal cable The unit has a built in wireless network card and can directly receive network signals...

Страница 13: ...ed and you will need to replace the batteries Notes on Using Batteries The use of the wrong type of batteries may cause chemical leakage and or explosion Please note the following Always ensure that t...

Страница 14: ...de i Go to the index page 8 Skip to the beginning of the next in media mode Reveal the hidden information of some teletext pages 9 Reverse playback rapidly in media mode Enter subtitle mode or subpage...

Страница 15: ...evel up or down 23 SOURCE Select signal source and accesses the main scene interface 24 Press to select channels in ascending or descending order 25 COLOR BUTTONS Red green yellow blue key navigation...

Страница 16: ...ct the language to be used for menus and message and then press the OK button to go to the next step Select your country Press the buttons to select the country you are living in and then press the OK...

Страница 17: ...the on the panel of TV or on the remote control to adjust the volume If you want to switch the sound OFF press the You can release mute by pressing the or increase the volume Changing the Input Source...

Страница 18: ...s menu 5 Press the EXIT button exit from the menu NOTE When an item in MENU is displayed gray it means that the item is not available or cannot be adjusted Buttons on the TV have the same function as...

Страница 19: ...annel Your TV set will skip the channel automatically when using to view the channels Move Press the YELLOW button to set the channel to moving state and then press the buttons to move it to the posit...

Страница 20: ...the picture size which best corresponds to your viewing requirements Noise Reduction Reduces screen noise without compromising video quality Advanced OptionV Use the button to select Advanced Option...

Страница 21: ...pe This is an auxiliary audio function that provides an additional audio track for visually challenged persons This function handles the Audio Stream for the AD Audio Description when it is sent along...

Страница 22: ...m or router elsewhere in your house If you have a Dynamic Network you should use an ADSL modem or router that supports Dynamic Host Configuration Protocol DHCP Modems and routers that support DHCP aut...

Страница 23: ...t up automatically procedure 2 Set Network Config to Static 3 Press the button to highlight the field you want to change and then use the number buttons to input the network parameters such as IP Addr...

Страница 24: ...searches for available wireless networks When done it displays a list of the available networks 5 In the list of networks press the button to select a network and then press the OK button 6 On the Ple...

Страница 25: ...thenticate its MAC address and your TV can not connect To resolve this problem ask your ISP about the procedures required to connect devices other than a PC such as your TV to the Internet If your Int...

Страница 26: ...rage device Record List Shown the list of recorded programs Time Shift Size You can select the memory size for Time Shift function Recording There are two types of recording Instant Recording and Sche...

Страница 27: ...ress the OK button then press buttons to select PVR File System In DTV mode then press the OK button to go into submenu Press the buttons to select the Record list Use the buttons to select a recorded...

Страница 28: ...arge capacity storage devices the loading speed may be longer The recognition speed of a USB storage device may vary depending on the device When connecting or disconnecting the USB storage device ens...

Страница 29: ...hen the restore is complete the TV will enter standby mode This is an installation guide to help you to setup the TV Configuring the Lock Menu Lock System The feature can prevent unauthorized operatin...

Страница 30: ...to Sync is set to On Clock option become grey and can t be adjusted PROGRAMME GUIDE In DTV mode Press EPG button to display the Programme Guide menu This function let you know the detailed information...

Страница 31: ...re Mode You can select the type of picture which best corresponds to your viewing requirements Sound Mode You can select an audio type to suit your personal preferences Noise Reduction Reduces screen...

Страница 32: ...ct all options Press OK button to enter a small window for selection Press EXIT button to exit home interface Media Playback The media function of this unit enables you to read movable USB storage dev...

Страница 33: ...g the main interface of the media press the key to select the file types and press the down key or the OK key to enter the content selection interface of such types of files 2 When one file is selecte...

Страница 34: ...key to adjust the selected option or press the OK key to enter the menu of the next level Press the BACK key to return to the menu of the previous level and press the MENU key to directly close the pl...

Страница 35: ...the different play mode 5 Subtitle Press the OK key to enter the menu of the next level to select subtitles and adjust subtitle properties 6 Audio Track If video files have multiple audio tracks user...

Страница 36: ...Content Provider Please visit the content providers web site for specific information on their services For service that requires log in join the applicable service on the website using the PC and lo...

Страница 37: ...can double the size of the text to make it easier to read 1 Press the button to enlarge the top half of the page 2 Press the button again to enlarge the bottom half of the page 3 Press the button once...

Страница 38: ...ormal the image is muted during the product startup process Please contact your service center if the picture has not appeared after five minutes No or poor color or poor picture Adjust the color in m...

Страница 39: ...a while Wet a soft cloth in a mixture of lukewarm water and a little fabric softener or dish washing detergent Wring the cloth until it s almost dry and then use it to wipe the screen 2 Make sure the...

Страница 40: ...on Vertical Frequency HZ VGA 640 x 480 59 94 480i 720 x480i 59 94 60 576i 720 x 576i 50 480p 720 x480p 59 94 60 576p 720 x 576p 50 720p 1280 x 720p 50 59 94 60 1080i 1920 x 1080i 50 59 94 60 1080p 192...

Страница 41: ...ate 0Mbps MPEG 4SP ASP H 263 H 264 ts MPEG 2 H 264 mp4 MPEG 4SP ASP H 263 H 264 MPEG 1 MPEG 2 Max Resolution x Max data rate 40Mbps MUSIC mp3 MP3 Sample Rate 16K 48KHz Bit Rate 32K 320K bps m4a aac AA...

Страница 42: ......

Страница 43: ......

Отзывы: