


Chapter 3
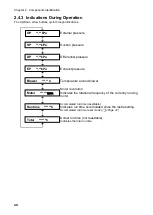
Operation
CMN034-002
原本
(Original instructions)
43
E
nglis
h
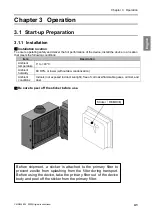
3.3
Registering Initial Pressures
Air volume reduction due to filter clogging is judged based on a registered initial differential pressure and
indicated as low air volume (WARN4). Register initial pressures through these steps:
1.
Perform the wiring and piping of the device.
2.
Start the device at a desired suction power level.
3.
Press and hold down the ENTER button for three seconds.
The display shows “Initial DP Get Y”, prompting confirmation to register/update initial pressures.
4.
To proceed with registration/update, press the ENTER button.
The device starts to acquire initial pressure.
If you do not want update, press the MODE SELECT button to return to normal operation.
5.
The device runs through a sequence of suction power levels 1 to 7, to automatically acquire the
differential pressure for each level.
While the device is acquiring initial pressures, the display alternates between the “Initial DP Check”
message and the “suction power level and differential pressure” values.
6.
When the registration completes, the display shows the “Initial DP Entry” message and the device
returns to normal operation.
IMPORTANT
•
Ensure that the filters are new.
•
Update registered initial pressures once again if piping is changed or all filters are
replaced (except for the exhaust filter) after registration of initial pressures.
•
If initial pressures are not registered, an “initial pressure unregistered” warning
(WARN6) appears.
•
The registered initial pressures can be cleared by holding down the OFF button for
three seconds when the device is in stop state.
⚫
Clearing registered initial pressures
1.
Hold down the OFF button for three seconds when the device is in stop state.
The display shows “Initial DP Clr Y”, prompting confirmation to clear registered initial pressures.
2.
To clear them, press the ENTER button.
If you do not want to clear them, press the MODE SELECT button to return to normal operation.
3.
When the clearing completes, the display shows the “Initial DP Clr” message and the device
returns to the stop state.
Содержание CBA-750AT3-HC-DSA-V1
Страница 5: ...1 CMN034 002 Translation of the original instructions 3 1 1 1 1 2 10 60 80 1 3 0 40 80 100 1 000...
Страница 6: ...1 4 1 4 2 OFF 1 5...
Страница 7: ...1 CMN034 002 Translation of the original instructions 5 1 6...
Страница 8: ...2 6 2 2 1 100V 200V T 220 230V CE 1 1 2 1 1 HEPA 1 2 3m 100V 1 200V T 1 220 230V CE 1 1 100 115V...
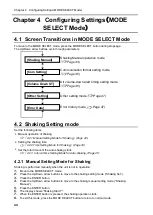
Страница 10: ...2 8 2 3 AT3 EL OLED No 1 7 2 4 9 4 14 1 1 1 1 OFF 3 3 3 13 ON ENTER 3 3 3 13 4 14 MODE SELECT 4 14...
Страница 12: ...2 10 2 4 3 OP kPa SP kPa DP kPa EP kPa Blower Runtime h 17 Total h Moter...
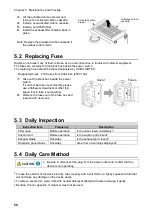
Страница 13: ...3 CMN034 002 Translation of the original instructions 11 3 3 1 3 1 1 0 40 80 RH REMOVE 1 1 1...
Страница 14: ...3 12 3 1 2 10 1 2 3 2 1 ON RS485 ID 2 AT3 ON 3 4 1 7 3 ON OFF 30 3 ON OFF 1 1 Ver ID...
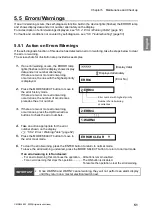
Страница 20: ...5 18 5 5 1 WARN2 1 5 1 1 1 1 1 2 2 1 3 1 4 2 1...
Страница 22: ...5 20 3 4 5 HEPA 6 5 2 1 Littell fuse 218 250V 10A 1 2 5 3 1 1 1 1 5 4...
Страница 26: ...6 24 6 6 1 6 1 1...
Страница 27: ...6 CMN034 002 Translation of the original instructions 25 1 5V 0 2V DC 1 2...
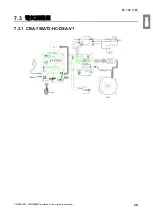
Страница 31: ...7 CMN034 002 Translation of the original instructions 29 7 3 7 3 1 CBA 750AT3 HC DSA V1...
Страница 32: ...30 12 7 2 7 2 28...
Страница 63: ...MEMO...


