


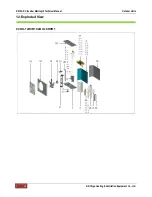


R410A DC Inverter Multi-split Technical Manual
Installation
57
GD Chigo Heating & Ventilation Equipment Co., Ltd.
2. Precaution on Installation
1) Measure the necessary length of the connecting pipe, and make it by the following way.
a. Connect the indoor unit at first, then the outdoor unit.
Bend the tubing in proper way. Do not harm them.
Specially Notice the pipe length/height/dimension of each capacity.
Maximum pipe length
Model
Max. Length
Max. Elevation
C2OU-14HVR1
30
10
C2OU-18HVR1
30
10
C3OU-21HVR1
45
10
C3OU-27HVR1
45
10
Piping sizes
Model
Liquid(mm/inch)
Gas(mm/inch)
C2OU-14HVR1
6.35(1/4”)
9.52(3/8”)
C2OU-18HVR1
6.35(1/4”)
9.52
(3/8”)
C3OU-21HVR1
6.35(1/4”)
9.52(3/8”)
C3OU-27HVR1
6.35(1/4”)
9.52
(3/8”)
CAUTIONS
Daub the surfaces of the flare pipe and the joint
nuts with frozen oil,and wrench it for 3~4 rounds
With hands before fasten the flare nuts.
Be sure to use two wrenches simultaneously
when you connector disconnect the pipes.
Tubing size
Tightening torque
Additional tightening torque
6.35
1500N.cm(153kgf.cm)
1600N.cm(163kgf.cm)
9.52
2500N.cm(255kgf.cm)
2600N.cm(265kgf.cm)
12.7
3500N.cm(357kgf.cm)
3600N.cm(367kgf.cm)
b. The stop valve of the outdoor unit should be closed absolutely (as original state). Every time you connect it,
first loosen the nuts at the part of stop valve, then connect the flare pipe immediately (in 5 minutes). If the
nuts have been loosened for a long time, dusts and other impurities may enter the pipe system and may
cause malfunction later. So please expel the air out of the pipe with refrigerant before connection.
c.
Expel the air after connecting the refrigerant pipe with the indoor unit and the outdoor unit. Then fasten the
nuts at the repair-points.
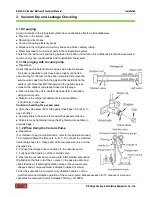
2) Locate The Pipe
a. Drill a hole in the wall (suitable just for the size of the wall conduit), then set on the fittings such as the wall
conduit and its cover.
b. Bind the connecting pipe and the cables together tightly with binding tapes. Do not let air in, which will
cause water leakage by condensation.
c.
Pass the bound connecting pipe through the wall conduit from outside. Be careful of the pipe allocation to
do no damage to the tubing.
3) Connect the pipes.


