background image

Black plate (29,1)

Chevrolet/GMC Express/Savana Navigation System (GMNA-Localizing-U.S./

Canada-7639741) - 2015 - crc - 4/28/14

Infotainment System

29

Playing from an iPod

®

This feature supports the following
iPod models:

.

iPod touch

®

(4th generation)

.

iPod touch (3rd generation)

.

iPod touch (2nd generation)

.

iPod touch (1st generation)

.

iPod classic

®

.

iPod with video

.

iPod nano

®

(6th generation)

.

iPod nano (5th generation)

.

iPod nano (4th generation)

.

iPod nano (3rd generation)

.

iPod nano (2nd generation)

.

iPod nano (1st generation)

.

iPhone 4

®

.

iPhone 3GS

.

iPhone 3G

.

iPhone

For proper operation, make sure the
iPod has the latest firmware from
Apple

®

. iPod firmware can be

updated using the latest iTunes

®

application.

For more information, see
www.apple.com/itunes.

Recording from the iPod to the HDD
is not supported. Media must be
recorded using a USB mass storage
device.

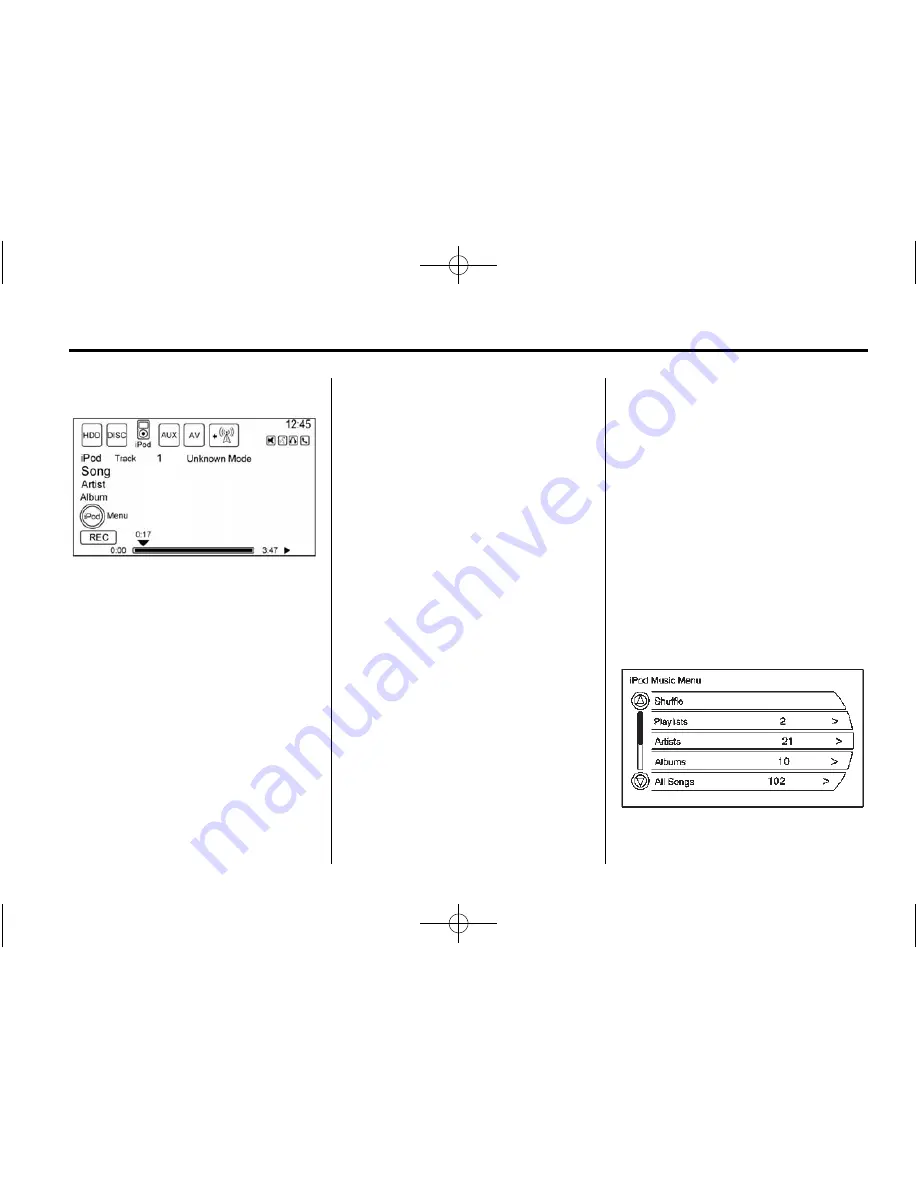
To connect and control an iPod,
connect one end of the standard
iPod USB cable to the iPod's dock
connector. Connect the other end to
the USB port in the center console.

iPod music information shows on
the radio

s display and begins

playing through the vehicle

s audio

system.

The iPod battery recharges
automatically while the ignition is on
or in the accessory position. When
the ignition is turned off while an
iPod is connected using the iPod
USB cable, the iPod battery stops
charging and the iPod automatically
turns off.

If the iPod is a model that is not
supported, it can still be listened to
in the vehicle by connecting it to the
auxiliary input jack using a standard
3.5 mm (1/8 in) stereo cable. See

Auxiliary Devices on page 34

.

iPod Menu

Содержание 2015 Express

Страница 1: ...2k15_misc_express_savana_23203679 A ai Modern Bridge Level 2 23321109 Spine Saddle Stitch Image set 60 Transparency Color Black Date 04 14 14 2015 ...

Страница 2: ...DD 22 Auxiliary Devices 34 Rear Seat Infotainment 34 Rear Seat Entertainment RSE System 34 Rear Seat Audio RSA System 40 Navigation 41 Using the Navigation System 41 Maps 45 Navigation Symbols 46 Destination 50 OnStar Destination Download 61 Configure Menu 63 Global Positioning System GPS 71 Vehicle Positioning 71 Problems with Route Guidance 72 If the System Needs Service 72 Map Data Updates 72 D...

Страница 3: ...Black plate 2 1 Chevrolet GMC Express Savana Navigation System GMNA Localizing U S Canada 7639741 2015 crc 4 28 14 ...

Страница 4: ...irst sold in Canada substitute the name General Motors of Canada Limited for Chevrolet Motor Division or GMC whenever it appears in this manual Keep this manual with the owner manual in the vehicle so it will be there if it is needed If the vehicle is sold leave this manual in the vehicle Canadian Vehicle Owners Propriétaires Canadiens A French language copy of this manual can be obtained from you...

Страница 5: ... for too long or too often while using the infotainment or navigation system could cause a crash You or others could be injured or killed Do not give extended attention to these tasks while driving Limit glances at the vehicle displays and focus your attention on driving Use voice commands whenever possible Use the navigation system to Plan a route Select a destination using various methods and ch...

Страница 6: ...ted and other functions accessed See instructions later in this section Every 50 times the vehicle is started and the navigation system is turned on the Caution screen appears After reading the caution select OK to load the map data information If OK is not selected all control buttons except for NAV Navigation and DEST Destination can be accessed When getting started set your preferences or delet...

Страница 7: ... 14 NAV Navigation NAV Navigation Menu The Navigation menu screen accesses the navigation system settings 1 Press NAV to view the navigation map screen The map and the vehicle s current location displays 2 Press NAV to change between a map audio split view or a full map view Config Menu Press MENU to display the Config Menu The Config Menu is used to change the screens for the radio navigation dis...

Страница 8: ...tion Previous Destinations Address Book Fav Route Preset Destinations and HDD music files Storing Radio Station Presets Up to 36 preset stations can be stored AM FM and SiriusXM if equipped can be mixed To store presets 1 Press O to turn the system on 2 If viewing a map screen press SRCE FAV or the source screen button 3 Select the band 4 Press 6 or 7 or turn the Multifunction knob to select the d...

Страница 9: ...reference for Fastest Shortest or Easiest The chosen route preference highlights See Destination on page 50 9 Press the Start Guidance screen button and the route is now ready to be started See Address Entry under Destination on page 50 Entering a Point of Interest POI To set a destination by entering a Point of Interest POI 1 Press O to turn the system on 2 A caution could appear Press OK to proc...

Страница 10: ...ailable for selection while driving 1 Press O to turn the system on 2 A caution could appear Press OK to proceed 3 Press DEST 4 Press one of the available preset destination screen buttons The system calculates the route 5 Select the route preference for Fastest Shortest or Easiest The system highlights the route 6 Press the Start Guidance screen button The route is now ready to be started See Pre...

Страница 11: ...n the buttons Radio AM FM Radio Playing the Radio Audio Source Menu O Power Volume 1 Press to turn the radio on or off 2 Turn to increase or decrease the volume The volume is adjusted for the current audio source active navigation voice guidance or voice prompts The steering wheel controls can also be used to adjust the volume See Steering Wheel Controls in the owner manual Also see Radio Settings...

Страница 12: ...the sound menu press MENU then select Tone Setting the Tone To adjust the bass treble and midrange using the sound menu Bass Press or to change the level Mid Midrange Press or to change the level Treble Press or to change the level Adjusting the Speakers To adjust the speaker balance Press and hold o for more sound from the left speakers or p for more sound from the right speakers The middle posit...

Страница 13: ...t sound quality for all seating positions Driver Select to adjust the audio to give the driver the best possible sound quality Rear Select to adjust the audio to give the rear seat occupants the best possible sound quality Surround Select to adjust the audio to give the best overall sound quality for all seating postions Radio Settings To access the Radio settings menu press MENU to display the Co...

Страница 14: ...OD screen button to display the DivX Video on Demand menu 2 Press the Registration Code screen button to display the Registration Code information display 3 Press the Deactivation option to unregister this device Finding a Station Select the band See Audio Source Menu previously in this section Turn the Multifunction knob to find a radio station To select a preset station press the corresponding p...

Страница 15: ...dio when listening to the radio The recording allows playback of content that was missed Timeshift stores up to 20 minutes of content After 20 minutes it removes the oldest content and continues recording new content When listening to a station for more than 20 seconds press J play pause to stop hearing the information through the speaker During this paused time timeshift keeps recording A status ...

Страница 16: ...me and number category name song title and artist display on the screen XM Categories XM stations are organized in categories Removing or Adding Categories 1 Turn the Multifunction knob until Radio displays Press the Multifunction knob to select Radio or press the Radio screen button to display more options within that feature 2 Select the Show Hide XM Categories screen button 3 Press the category...

Страница 17: ...nly one disc at a time Keep the loading slot free of foreign materials liquids and debris If a description label is needed try labeling the top of the disc using a marking pen Loading and Ejecting Discs To load a disc 1 Turn the ignition on 2 Insert a disc into the slot label side up The player pulls it in the rest of the way If the disc is damaged or improperly loaded there is an error and the di...

Страница 18: ...us track MENU Press this knob or touch the CD Menu on the screen to display the track list option then select the track from the list The system plays the selected track and returns to the CD screen CD Menu Press the CD Menu screen button to display the CD Music Menu Shuffle Plays the tracks randomly rather than in sequence Press again to stop shuffle A checkmark indicates shuffle is on Track List...

Страница 19: ...the DVD menu J Play Pause Press to start pause or resume play 6 Seek Next Forward 1 Press to seek to the next chapter 2 Press more than once to continue moving forward through the disc 3 Press and hold to fast forward through a disc When fast forward is active press again to change the speed Elapsed time displays 4 Press J to resume playing 7 Seek Previous Reverse 1 Press to seek to the beginning ...

Страница 20: ...d while the DVD is playing 2 Continue pressing to cycle through the available audio streams or languages depending on the DVD Subtitle 1 Select while a DVD is playing to view with subtitles on or off or to change the language of the subtitles 2 Continue pressing to cycle through the available subtitle languages and to turn subtitles off depending on the DVD playing Pan Scan Pan Scan is a method of...

Страница 21: ... disc Recorded on a CD R or CD RW with a maximum capacity of 700 MB When an MP3 is loaded in the player MP3 displays If a disc is already loaded but you are currently on a map screen or listening to a different audio source press SRCE to switch to the Disc source A track number appears on the display when each track starts to play To play a disc J Play Pause Use to start pause or resume play of a ...

Страница 22: ...r to view the list of all the songs in that folder There might be a delay before the list displays Select the song from the list and it begins to play Track List All Songs Select to view a list of all songs on the disc There might be a delay before the list displays Select a song from the list and it begins to play Songs are displayed based on the CD burning application folder and file structure u...

Страница 23: ...ot displayed or numbered No Folder When the CD only contains compressed audio files without any folders or playlists all files are located under the root folder File System and Naming The displayed song title is taken from the file s ID3 tag If a song title is not present in the ID3 tag the radio displays the file name as the track name Preprogrammed Playlists The radio recognizes preprogrammed pl...

Страница 24: ...gs 3 A confirmation displays Press the REC record screen button 4 Press All Songs to record all tracks A progress bar displays To record selected tracks from the disc 1 Load a CD until the CD screen displays 2 Press 6 or 7 or press CD Menu to select a song for recording 3 Press REC 4 A confirmation displays 5 Select the song name to record A progress bar displays Recording from a USB Device to the...

Страница 25: ...ode If the system is turned off during a CD or USB recording process it stops When the radio is turned back on the recording process does not resume automatically Playing Hard Disc Drive Content To operate hard drive functions while the HDD source is active use the following buttons or touch sensitive buttons J Play Pause Press to start pause or resume play of the current media source 6 Seek Next ...

Страница 26: ... in sequence More Like This Press to use Gracenote music recognition technology and related data to generate a list of songs similar to the current song Select a song from the list This feature is only available with songs recorded to the HDD from Audio CDs not MP3s and other compressed audio When recording CDs to the HDD there might be delays to build the list until all the files are compressed F...

Страница 27: ...e screen until the Saved to Favorites message displays To save an entire Artist Album or Genre to a FAV category preset 1 Press FAV until the correct FAV category appears 2 Press and hold a preset button on the bottom of the screen Playing HDD Favorites Favorites can be played two different ways Press FAV until the appropriate FAV HDD category displays Press a preset button at the bottom of the HD...

Страница 28: ...SB function J Play Pause Press to start pause or resume play of the current media source 6 Seek Next Forward 1 Press to seek to the next track 2 Press and hold to advance quickly through playback 3 Release the button to return to playing speed Elapsed time displays 7 Seek Previous Reverse 1 Press to seek to the beginning of the current or previous track If the track has been playing for fewer than...

Страница 29: ...o view the list of tracks stored on the USB 2 Select a track from the list Artists 1 Press to view the artists stored on the USB 2 Select an artist to view a list of all songs by the artist 3 Select a song from the list Once selected Artist Mode displays Albums 1 Press to view the albums stored on the USB 2 Select an album to view a list of all songs on the album 3 Select a song from the list Once...

Страница 30: ...ormation see www apple com itunes Recording from the iPod to the HDD is not supported Media must be recorded using a USB mass storage device To connect and control an iPod connect one end of the standard iPod USB cable to the iPod s dock connector Connect the other end to the USB port in the center console iPod music information shows on the radio s display and begins playing through the vehicle s...

Страница 31: ...ng played from a specific artist Albums 1 Press this button to view the albums stored on the iPod 2 Select an album name to view a list of all songs on the album 3 Select the desired song from the list Once a song has been selected Album Mode appears on the iPod main screen to show that music is being played from a specific album All Songs 1 Press this button to view a list of all songs stored on ...

Страница 32: ...he files on the iPod could be corrupted Audio Book The system can play back audio book content downloaded from www audible com by either burning it to a CD or recording it to a USB storage device Audible com is a provider of spoken word audio entertainment information and educational programming The use of the audible com playback feature requires that the audible com account be activated with the...

Страница 33: ...he files by 1 Press SRCE until the HDD source is selected 2 Enter the HDD Menu the HDD Music Menu displays Scroll down to the Audio Book option and select 3 The Audio Book screen displays a list of the available audio books for playback Select a book 4 Select a chapter to start playback 5 The audio book begins playback Selecting Another Audio Book To play a different audio book from the one select...

Страница 34: ...n to the Audio Book option 2 The Audio Book screen displays a list of the available audio books for playback Select a book 3 Select a chapter to start playback 4 The audio book begins playback Changing Chapters within an Audio Book To change chapters within an audio book While the audio book is playing press MENU The chapter list of the current book displays Select a chapter from the list To retur...

Страница 35: ... playing audio from the device over the vehicle speakers If an auxiliary device has already been connected but a different source is currently active press SRCE repeatedly to cycle through all of the available audio source screens or press the toggle page button until the AUX source screen is selected Rear Seat Infotainment Rear Seat Entertainment RSE System The vehicle might have rear seat displa...

Страница 36: ...vice connected to the A V jacks The headphones are used to listen to various multi media The wireless headphones have a power button channel 1 2 switch and volume control Turn the headphones off when not in use Press the power button to turn on the headphones A light on the headphones comes on If the light does not come on check the batteries Intermittent sound or static can also indicate weak bat...

Страница 37: ...0 or contact your dealer Battery Replacement To change the batteries 1 Loosen the screw to the battery door on the left side of the headphones 2 Slide the battery door open 3 Replace the two AAA batteries 4 Replace the battery door and tighten the screw Remove the batteries if the headphones are not going to be used for a long period of time Audio Video A V Jacks If available the A V jacks are on ...

Страница 38: ...o select the settings 3 Press z again to exit the setup menu Audio Output Audio from the DVD player or auxiliary inputs can be heard through the following Wireless Headphones Vehicle Speakers The RSE system transmits the audio signal to the wireless headphones if an audio signal is available See Headphones earlier in this section The front seat passengers are able to listen to playback from the A ...

Страница 39: ...DVD menu The DVD menu is different on every DVD Use the navigation arrows to move the cursor After making a selection press the enter button This button only operates when using a DVD n q p o Menu Navigation Arrows Use the arrow buttons to navigate through a menu r Enter Press to select the highlighted choice in any menu z Display Menu Press to adjust the brightness screen display mode and display...

Страница 40: ...ying Subtitles Press to turn ON OFF subtitles and to move through subtitle options when a DVD is playing AUX Auxiliary Press to switch the video display between the DVD player and an auxiliary source d Camera Press to change the camera angle on DVDs that have this feature when the DVD is playing Clear If Available Press this button within three seconds after inputting a numeric selection to clear ...

Страница 41: ...l disappear from the display when it is off Audio can be heard through wired headphones not included plugged into the jacks on the RSA If the vehicle has this feature audio can also be heard on Channel 2 of the wireless headphones To listen to an iPod or portable audio device through the RSA attach the iPod or portable audio device to the front auxiliary input if available on the front audio syste...

Страница 42: ... to the radio When a CD or DVD audio disc is playing press this button to go to the beginning of the CD or DVD audio This function is inactive with some radios if the front seat passengers are listening to the disc When a disc is playing in the CD or DVD changer press this button to select the next disc if multiple discs are loaded This function is inactive with some radios if the front seat passe...

Страница 43: ...und settings configure settings info screens map screen or audio screen Alpha Numeric Keyboard Letters of the alphabet symbols punctuation and numbers when available display on the navigation screen as alpha or numeric keyboard The alpha keyboard displays when data needs to be entered All characters are touch screen buttons Press to select À Ý Accent Alphabet To select letters with accent symbols ...

Страница 44: ...e recognition prompts by pressing or or by turning the Multifunction knob Press the Guidance Volume screen button to preview the selected sound level Voice Guidance Enable or disable voice guidance A checkmark indicates on Speech Confirmation Feedback Turn the speech confirmation feedback on or off A checkmark indicates on Route Preference Press Route Preference to change route options when a rout...

Страница 45: ...tions Back Track Mode When selected the back track feature is on See Back Track earlier in this section Weather Warning If Equipped When selected a pop up screen displays weather warnings Show 3 D Landmark When selected 3 D landmarks display on the map screen Road Learning If Equipped Press to display options such as Edit Learned Road and Enable Road Learning With Road Learning enabled the system ...

Страница 46: ...nd corner of the map screen to change the zoom level The map scale bar times out if the zoom level is not changed within a few seconds The scale ranges from 50 m 150 ft to 400 km 250 mi To change from English to metric see Driver Information Center DIC in the owner manual Scroll Features To scroll within the map press anywhere on the map screen and the scroll symbol displays Tap the map to center ...

Страница 47: ...irection of the vehicle on the map The destination symbol marks the final destination after a route has been planned The waypoint symbol marks a set waypoint and is numbered depending on how many have been set A waypoint is a stopover destination point added to the planned route The estimated time and distance to the destination are displayed If waypoints have been added to the current route each ...

Страница 48: ...e Heading up symbol but the map is in 3 D The No GPS symbol appears when there is no Global Positioning System GPS satellite signal These symbols indicate that the information shown on the right side of the map can be hidden to show a full screen map view This symbol indicates that a menu is available and displays on the left side of the screen Press this symbol or the Multifunction knob to access...

Страница 49: ...on the Map Screen While on route several options are available while viewing the map screen While on the Map screen press the Multifunction knob to display the menu on the left side See Navigation Symbols on page 46 to learn how to change the map view to North up Head up or 3 D view When this symbol is selected the distance and time remaining from the current vehicle position to the first waypoint...

Страница 50: ... 2 Select the new POI icon 3 The new icon is on the Show POI Icons menu List Displays a list of available POIs Clear Clears all selected POIs on the Show POI Icons menu Nearby Displays up to 200 of the selected POIs within 32 km 20 mi of the current vehicle position The POIs can be sorted by distance icon or type Hide Select to hide the POIs from view on the map To display go to the Map menu selec...

Страница 51: ...can be entered After an entry step is completed the checkmark moves to the next item Entering the city name first 1 Press DEST 2 If necessary enter the State Province name The last State Province is automatically recalled 3 Enter the city name The city field is automatically selected 4 Enter the street name This field is automatically selected Do not enter directional information or street type Us...

Страница 52: ...an incorrect character A list displays if four or fewer names are available If there are more than four there is a match counter with a number of available streets Press the List button to view the list and select the street 4 Select the city from the list or enter the city name 5 Enter the house number This field is automatically selected 6 Press OK The address information screen displays the add...

Страница 53: ...and the route is now ready to be started Entering a POI by City Name 1 Press DEST 2 Press the Point of Interest screen button 3 Press the Browse POI Categories screen button 4 Select the change location screen button 5 Enter the new state and city 6 Select a category then a sub category The available POI names will display 7 Select the POI name 8 If the POI is correct press Go The route is calcula...

Страница 54: ...lect the route preference for Fastest Shortest or Easiest 6 Press the Start Guidance screen button and the route is now ready to be started Address Book Choose a destination by selecting an address that has been stored in the address book 1 Press DEST 2 Press the Address Book screen button A list displays the address book entries 3 Select the destination from the list 4 Press Go on the confirmatio...

Страница 55: ...tination by selecting from one of six previously stored destinations If a destination is not set for one of the screen buttons the button dims and is not available to use See Previous Destinations later in this section for information on how to add a preset destination 1 Press DEST 2 Press one of the available Preset Destination screen buttons The screen buttons were stored with the name selected ...

Страница 56: ... route This is only available while driving on a route Turn List To view the list of maneuvers for the entire route select the Turn List screen button from the Route Menu screen Waypoints Up to three waypoints can be added to the current route between the start point and final destination The waypoints can be edited or deleted To add a waypoint 1 Press DEST 2 Press the Add Waypoint screen button T...

Страница 57: ...forward scroll arrow to go to the final destination These buttons display once the reverse forward scroll button has been selected j Pause Pauses the route preview while in reverse fast reverse forward or fast forward scroll S T Reverse or Forward Scroll Press the reverse scroll arrow to go to the start point Select the forward scroll arrow to go to the final destination Suspend Resume Guidance Pr...

Страница 58: ...f the information page To change the map icon of an address book entry 1 Press DEST 2 Press the Address Book screen button A list displays the address book entries 3 Select the address book entry to be changed 4 Press the Edit screen button 5 Press the Change Icon screen button 6 Select an icon from the list 7 Press OK to save changes To edit the name of an address book 1 Press DEST 2 Press the Ad...

Страница 59: ... the address book 1 Press DEST 2 Press the Address Book screen button 3 Select the address book entry to add as a Preset The Address Book Information screen displays 4 Press the Edit screen button located at the bottom of the screen 5 Press and hold one of the six preset screen buttons at the bottom of the screen until the text within the button changes 6 The name appears in that preset destinatio...

Страница 60: ...elete Favorite Route screen button The confirmation screen displays 2 Press Yes to delete the route and No to cancel from deleting the route Menu Screen Button Various navigation system settings are available through the Menu screen button Some options are only available after a route is planned 1 Press NAV to view the Map screen 2 Press the Menu screen button or the Multifunction knob Map Heading...

Страница 61: ...icle has driven on twice during one or more ignition cycles The vehicle must start on a known road in the database while driving to a known road tracing a path using the GPS information to create the learned road The learned road cannot be longer than 3 km 2 mi 2 When the road has been learned it becomes part of the map database The map database will use the learned road if necessary to route a sh...

Страница 62: ...ubscriber ask the OnStar call center to download a destination OnStar will send address information and location coordinates of the destination into the navigation system Using Destination Download If the navigation radio screen is turned off before a download the system automatically turns the screen on and displays a download confirmation message The radio remains on after the download The navig...

Страница 63: ...stination saves this download even if it is only partial information such as a phone number Press the Back screen button the navigation system cancels the OnStar destination download and returns to the previous screen The downloaded address is not added to the previous destinations Route Guidance Active If an OnStar destination is downloaded while route guidance is already active the system displa...

Страница 64: ...usXM NavTraffic If Equipped The navigation system might have a SiriusXM NavTraffic receiver It is a subscription service provided through SiriusXM Satellite Radio A service fee is required to receive the SiriusXM NavTraffic service Real time traffic information is provided to fully integrate the navigation system to display current traffic conditions for the chosen route A screen displays to indic...

Страница 65: ...n has three different condition displays No icon displays if there is no XM NavTraffic subscription or traffic events A single car icon displays if there are traffic events in the area but none are on route A multiple car icon displays if there are traffic events on the route It could take some time to sort the received information The list of traffic conditions displays in the order of distance f...

Страница 66: ...t to enable or disable the traffic function Show Traffic ICONS Select to display traffic icons on the map screen Also select what traffic information displays Traffic Flow Status Enables or disables the green yellow red and black arrows that display beside the roads and shows the traffic flow or extent of a traffic event Black indicates a closed road segment Red indicates significantly impaired tr...

Страница 67: ...te Select On Route to display all events ahead on the current active route No traffic events reported on route displays if there are none to report Name Select Name to display traffic events in alphabetical order Distance Select Distance to display traffic events in order of distance with the closest event shown first Traffic events update approximately every two minutes Scrolling to Traffic Event...

Страница 68: ...Weather Heavy rain snow or fog weather condition m Parking Available parking area l Information Special event general information or warning Traffic Event Information Use to display additional details of a traffic event This screen can display when Scrolling to an event on the map and then pressing INFO Selecting a traffic event listed on the Traffic Event List screen Approaching a traffic event B...

Страница 69: ...c prompts only navigation traffic maneuvers The current prompt playback cancels if RPT is pressed during a traffic voice prompt Traffic prompts are disabled during OnStar if equipped or Voice Recognition activity Alternate Route When Detour Available displays a possible quicker route is available and an alternate route can be selected to detour around the traffic condition Press Yes and a new rout...

Страница 70: ...er data is deleted when the vehicle is off for four hours Allow up to 15 minutes with a clear XM signal for new weather information to download During this time the screen will be blank Extended Forecast Select the Menu button by pressing the Multifunction knob to show the Weather Menu screen From this screen select the Extended Forecast screen button Weather Along the Route If a destination is se...

Страница 71: ...ay the other options Dimming Mode Auto Automatic Automatically adjust the screen background depending on exterior lighting conditions Day The map background brightens Night The map background darkens To change the overall brightness setting for the display use the vehicle interior lighting dimming control Setting the Clock To set the time 1 Press the Multifunction knob to enter the config setup me...

Страница 72: ...ing is true Signals are obstructed by tall buildings trees large trucks or a tunnel Objects are located on the rear shelf of the vehicle Satellites are being repaired or improved For more information if the GPS is not functioning properly see If the System Needs Service and Problems with Route Guidance Vehicle Positioning At times the position of the vehicle on the could be inaccurate due to one o...

Страница 73: ...eturning to the set waypoint if heading for a destination without passing through a set waypoint The route prohibits the entry of a vehicle due to a regulation by time or season or any other regulation which may be given Some routes might not be searched The route to the destination might not be shown if there are new roads if roads have recently changed or if certain roads are not listed in the m...

Страница 74: ... more information Voice Recognition The navigation system s voice recognition allows for hands free operation of the navigation system and the audio system features If the radio is off the only commands would be Hands Free and Help Navigation voice commands are not available until the OK button has been selected Voice recognition can be used when the ignition is on or when Retained Accessory Power...

Страница 75: ...g yes or no When the system does not recognize the command the system issues an error message such as pardon or command not recognized The system could also say voice recognition canceled If experiencing difficulty with the system recognizing a command confirm that the command is correct Try saying the command clearly or wait for a brief moment after the beep Background noise such as a climate con...

Страница 76: ...on system with a brief description of each The commands are listed with the optional words in brackets To use the voice commands see the instruction listed previously Display Commands Display set day mode display select day mode Instructs the system to switch the display to day mode Display set night mode display select night mode Instructs the system to switch the display to night mode Display se...

Страница 77: ... off the voice recognition feedback When feedback is ON the system responds to commands with a talk back phrase When feedback is OFF the system responds to commands with a chime Navigation voice guidance on navigation voice guidance off Instructs the system to turn on and off voice guidance prompts during route guidance Cancel Instructs the system to cancel the command Point of Interest POI Comman...

Страница 78: ...n using voice recognition After this command is stated the system displays a state abbreviation such as NY for New York If the destination to be entered is located in the displayed state then say the desired city name Otherwise say Change State and say the state name the search should take place in Then say the desired city name when prompted and say the desired street name and house number when p...

Страница 79: ...y pressing the desired choice or by saying the list number of the desired choice 4 The system asks the user to say the city name As shown earlier the radio can display a candidate list with the closest matches to the spoken city name Say the correct city name 5 Reply with the street name including the suffix Blvd Ave Rd etc when prompted The radio might display a candidate list with the closest ma...

Страница 80: ...ections earlier in this manual for information about instructions on how to store a voice tag in the system Navigation go to voice tag This command allows selection of a destination saved under the stored voice tag The system plays back the voice tag and asks to confirm by saying yes or no If a destination is set to Home say Navigation go to Home After the system plays back the voice tag and it is...

Страница 81: ...ow shop shops Navigation hide gas gas station gas stations Navigation hide dining restaurant restaurants Navigation hide ATM ATMs Navigation hide hotel hotels Navigation hide airport airports Navigation hide shop shops Destination and Guidance Commands Navigation go to preset destination number one Repeat numbers two through six Navigation delete destination route next waypoint Route used in conju...

Страница 82: ...contact list See Voice Pass Thru in this section See Storing and Deleting Phone Numbers in this section Warning When using a cell phone it can be distracting to look too long or too often at the screen of the phone or the infotainment system Taking your eyes off the road too long or too often could cause a crash resulting in injury or death Focus your attention on driving A Bluetooth system can us...

Страница 83: ...ll reject a call or cancel an operation Pairing A Bluetooth enabled cell phone must be paired to the Bluetooth system and then connected to the vehicle before it can be used See the cell phone manufacturer s user guide for Bluetooth functions before pairing the cell phone If a Bluetooth phone is not connected calls will be made using OnStar Hands Free Calling if equipped See OnStar in the owner ma...

Страница 84: ...te 6 Repeat Steps 1 5 to pair additional phones Listing All Paired and Connected Phones The system can list all cell phones paired to it If a paired cell phone is also connected to the vehicle the system responds with is connected after that phone name 1 Press and hold b g for two seconds 2 Say Bluetooth 3 Say List Deleting a Paired Phone If the phone name you want to delete is unknown see Listing...

Страница 85: ...Say the phone number or group of numbers you want to store all at once with no pauses then follow the directions given by the system to save a name tag for this number Using the Digit Store Command If an unwanted number is recognized by the system say Clear at any time to clear the last number To hear all of the numbers recognized by the system say Verify at any time 1 Press and hold b g for two s...

Страница 86: ...mber without pausing or say the name tag Once connected the person called will be heard through the audio speakers Using the Digit Dial Command The digit dial command allows a phone number to be dialed by entering the digits one at a time After each digit is entered the system repeats back the digit it heard followed by a tone If an unwanted number is recognized by the system say Clear at any time...

Страница 87: ...ay Three way call 3 Use the dial or call command to dial the number of the third party to be called 4 Once the call is connected press b g to link all callers together Ending a Call Press c x to end a call Muting a Call During a call all sounds from inside the vehicle can be muted so that the person on the other end of the call cannot hear them To mute a call press b g and then say Mute call To ca...

Страница 88: ... instructions Dual Tone Multi Frequency DTMF Tones The Bluetooth system can send numbers and the numbers stored as name tags during a call You can use this feature when calling a menu driven phone system Account numbers can also be stored for use Sending a Number or Name Tag During a Call 1 Press b g The system responds Ready followed by a tone 2 Say Dial 3 Say the number or name tag to send Clear...

Страница 89: ...se from Dolby Laboratories Dolby and the double D symbol are trademarks of Dolby Laboratories MP3PRO audio decoding technology licensed from Coding Technologies Fraunhofer IIS and Thompson DivX DivX Certified and associated logos are trademarks of Rovi Corporation or its subsidiaries and are used under license About DivX video DivX is a digital video format created by DivX LLC a subsidiary of Rovi...

Страница 90: ... other fees may apply Subscription fee is consumer only All fees and programming subject to change Subscriptions subject to Customer Agreement available at www siriusxm com SiriusXM service only available in the 48 contiguous United States and Canada Canada Some deterioration of service may occur in extreme northern latitudes This is beyond the control of SiriusXM Satellite Radio Explicit Language...

Страница 91: ... that is protected by U S patents and other intellectual property rights of Rovi Corporation Reverse engineering or disassermbly is prohibited This product uses the source code of T Kernel under T License granted by the T Engine Forum www t engine org The information in this manual supplements the owner manual This manual includes the latest information available at the time it was printed We rese...

Страница 92: ...ated information including name artist track and title information Gracenote Data from online servers or embedded databases collectively Gracenote Servers and to perform other functions You may use Gracenote Data only by means of the intended End User functions of this application or device You agree that you will use Gracenote Data the Gracenote Software and Gracenote Servers for your own persona...

Страница 93: ...ated to provide you with new enhanced or additional data types or categories that Gracenote may provide in the future and is free to discontinue its services at any time Gracenote disclaims all warranties express or implied including but not limited to implied warranties of merchantability fitness for a particular purpose title and non infringement Gracenote does not warrant the results that will ...

Страница 94: ...or interest in the DATABASE except for the license to use the DATABASE according and subject to the terms and conditions of this Agreement You shall not alter obscure or remove any copyright notices trademark notices or other restrictive legends relating to the DATABASE The DATABASE comprises confidential and proprietary information and materials of TomTom Accordingly you shall hold the DATABASE i...

Страница 95: ...R BUSINESS INTERRUPTION OR THE LIKE REGARDLESS OF WHETHER THE PARTY WAS ADVISED OF THE POSSIBILITY OF SUCH DAMAGES NOTWITHSTANDING ANYTHING TO THE CONTRARY CONTAINED HEREIN TOMTOM SHALL HAVE NO MONETARY LIABILITY TO THE UNDERSIGNED FOR ANY CAUSE REGARDLESS OF THE FORM OF ACTION UNDER OR RELATING TO THIS AGREEMENT WARNINGS The DATABASE comprises facts and information from government and other sourc...

Страница 96: ...ducts are a trade secret and a proprietary commercial product and not subject to disclosure If End User is an agency department or other entity of any State government the United States Government or any other public entity or funded in whole or in part by the United States Government then End User hereby agrees to protect the Licensed Products from public disclosure and to consider the Licensed P...

Страница 97: ...HER INFOGROUP OR SUPPLIER OF POI DATA SHALL NOT BE LIABLE FOR ANY INDIRECT CONSEQUENTIAL OR INCIDENTAL DAMAGES MADE OR ALLEGED IN CONNECTION WITH YOUR USE OF THE POI DATA END USER LICENSE AGREEMENT Personal Use Only You agree to use this information for solely personal non commercial purposes and not for service bureau time sharing or other similar purposes You may not modify the information or re...

Страница 98: ...tes territories and countries do not allow certain liability exclusions or damages limitations so to that extent the above may not apply to you Indemnity You agree to indemnify defend and hold DENSO and its licensors including their respective licensors suppliers assignees subsidiaries affiliated companies and the respective officers directors employees shareholders agents and representatives of e...

Страница 99: ...g and product packaging In addition End shall not modify or alter the color shape size and orientation of the Brand Icon Licensed Product as provided to End User without TomTom s prior written approval Licensee agrees that the use of Brand Icon Licensed Product subject to the terms and conditions set forth in this Agreement and that there may be additional third party terms conditions and restrict...

Страница 100: ...on 73 CD Eject 24 CD Menu 17 CD DVD Player 15 CD DVD Disc Commands 76 Cleaning the Display 10 Clearing the System 87 Config Menu 6 Configure Menu 63 D Database Coverage Explanations 73 Deleting Personal Information 7 Destination and Guidance Commands 77 Destination Download OnStar 61 Destination Navigation 50 Devices Auxiliary 34 Dimming Mode 70 Display 70 Driving on a Route 47 Dual Tone Multi Fre...

Страница 101: ... 72 Map End User License Agreement 92 Map Scales 45 Maps 45 Menu Configure 63 Menu Screen Button 59 Mixed Band Presets 13 MP3 20 Muting a Call 86 N Nav Navigation 63 NAV Navigation Menu 6 Navigation Destination 50 Symbols 46 Using the System 41 Navigation Audio System 11 Navigation Control Buttons 41 Navigation Settings 42 Navigation System Overview 5 O OnStar If Equipped Command 79 OnStar Destina...

Страница 102: ...t System 34 Rear Seat Audio RSA 40 Receiving a Call 86 Recording from a CD to the Hard Drive 23 Recording from a USB Device to the Hard Drive 23 Remote Control 37 Route Preview 56 S Satellite Radio 15 Scroll Features 45 Setting the Clock 70 SiriusXM NavTraffic If Equipped 63 SiriusXM Satellite Radio Service 15 Storing and Deleting Phone Numbers 84 Storing Preset Destinations 8 Storing Radio Statio...

Страница 103: ...zing U S Canada 7639741 2015 crc 4 28 14 i 4 INDEX V Vehicle Positioning 71 Video Screens 37 Voice Guidance 9 Voice Pass Thru 87 Voice Recognition 73 81 Voice Recognition Commands 75 Voice Recognition Help 74 Voice Tag Commands 79 X XM Categories 15 XM Weather If Equipped 69 ...

Отзывы: