


25
26
MODEL: RJ40-6-D-BLACK
MODEL: RJ40-6-D-BLACK
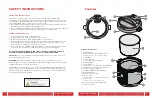
Cleaning and Maintenance
1. Unplug unit from outlet. Remove the base of the power cord from power cord port.
Wipe down housing with a damp cloth or paper towel.
2. Remove gasket from lid, as well as pressure regulator knob. Wash all removable
parts with a non-abrasive sponge and warm, soapy water. Gasket, measuring cup,
mixing spoon and ladle are top-rack dishwasher safe. Cooking pot is dishwasher safe.
Multi Cooker lid, pressure regulator knob and housing are NOT dishwasher safe. Dry
thoroughly.
TIP:
The gasket may be soaked in a mixture of equal parts water and white vinegar to
remove any residual smells.
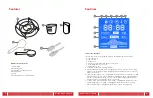
Operating Instructions
16. DELAY
• PRE-PROGRAMMED TIME:
30 minutes
• MAX TIME:
24 hours
• TO USE:
a. After selecting and setting any function, except Sauté, Yogurt and Sterliize, and
before pressing START, press the delay button until the hours value on the screen
begins to blink.
b. Set the hours using the - and + buttons.
c. Press the hours/minutes button until the minutes value blinks. Set the minutes using
the - and + buttons.
TIP:
Do not store foods that are prone to spoiling, like meat, fish or dairy, in the cooking pot
for long periods of time.
17. KEEP WARM
Multi Cooker automatically switches to Keep Warm when any of the functions, except
Sauté, Yogurt and Sterilize, finish. Heater remains on—at a lower temperature than the other
functions—for up to 99 hours and 50 seconds to keep foods at a food-safe temperature.
• PRE-PROGRAMMED TIMES:
Less = 10 hours Normal = 10 hours More = 10 hours
• MAX TIME:
99 hours and 50 seconds
• TO USE:
a. All functions, except Sauté, Yogurt and Sterilize, will automatically switch to Keep
Warm once programmed time expires.
b. The Keep Warm feature may also be set by pressing the KEEP WARM button until
the light above it illuminates. The Keep Warm feature may also be timed by using
the -, + and hours/minutes buttons.
Operating Instructions
14. YOGURT
Yogurt is made by first boiling milk, cooling it to 110°F and stirring in the desired yogurt
starter. Yogurt starters may be bought online, or 1 to 2 tablespoons of plain yogurt with live,
active cultures may be used.
The mixture then thickens and turns into yogurt by fermenting in a temperature-controlled
environment.
Once the desired level of tanginess is achieved, it is then cooled and refrigerated overnight.
• PRE-PROGRAMMED TIMES:
Less = 24 hours, Normal = 8 hours, More = boil
• TO USE:
a. Put the milk into the cooking pot and lock the lid in place.
b. Press the YOGURT button until the word “boiL” displays on the screen. Press START.
c. Open the lid and stir the milk. Allow milk to cool until it reaches 110°F. Stir in the
yogurt starter. Secure the lid and press the YOGURT button until the time displays on
the screen. If desired, use the - and + buttons to adjust the time. Press START.
d. Once the START button is selected, the Multi Cooker will beep three times and
00:00 will display on the screen. The selected cooking mode (Less, Normal or More)
will also display on the screen along with the cooking cycle indicator. The cooking
cycle indicator will display throughout the entire cooking process with the words
“Cooking” displayed below it. The display will then count up, indicating how long
the yogurt has been fermenting for.
e. When the programmed time elapses, the Multi Cooker will beep 10 times, indicating
it is done. "Yo gt" will display on the screen until the lid is opened.
f. Allow the yogurt mixture to cool to room temperature, then transfer it to the
refrigerator overnight so it can cool and thicken.
15. STERILIZE
• PRE-PROGRAMMED TIME:
30 minutes
• MAX TIME:
4 hours
• TO USE:
a. Put the steaming rack into the cooking pot. Add 1 cup of water. Put the desired items
to sterilize onto the steaming rack. Lock the lid into place. Set the pressure regulator
knob to the “Sealing” position.
b. Press the STERILIZE button. If desired, use the - and + buttons to adjust the cooking
time. Press START.
c. Once the START button is selected, the Multi Cooker will beep three times and the
word “On” will display on the screen. The selected cooking mode (Less, Normal or
More) will also display on the screen along with the cooking cycle indicator. The
cooking cycle indicator will display throughout the entire cooking process with the
words “Cooking” displayed below it.
d. When the programmed time elapses, the Multi Cooker will beep 10 times and then
switch OFF.
e. Always press CANCEL when you are done cooking to turn the Multi Cooker OFF.


