background image

14

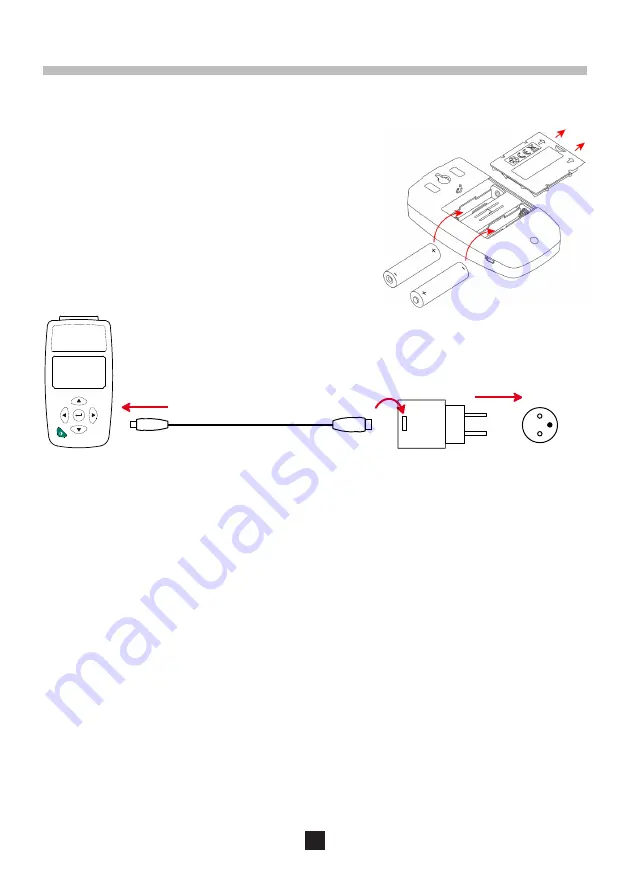
1. AKKUS EINLEGEN UND LADEN


„

Gerät umdrehen.

DEUTSCH

> 90 V

AC

< 264 V

AC

50 / 60 Hz


„

Batteriefachdeckel entfernen: Zum Öffnen in Pfeilrichtung 

bis zur Markierung verschieben und dann anheben.


„

Die  beiden  Akkus  einlegen,  dabei  die  Polarität 

berücksichtigen.


„

Legen  Sie  den  Batteriefachdeckel  wieder  an  und 

schrauben Sie ihn wieder zu.


„

Stecken Sie das Micro-USB-Kabel an das Gerät und den 

USB-Teil an das Netzteil.

2. DIE TASTEN VERWENDEN

Um eine Einstellung zu ändern, drücken Sie 

 , das erste editierbare Feld des Bildschirms wird invers 

dargestellt. Verwenden Sie die Tasten 




, um das Feld, das Sie bearbeiten wollen, auszuwählen 

und drücken Sie erneut 

 , um dieses Feld zu bearbeiten. Dann benutzen Sie die Tasten 

 und 

, um 

das Feld zu definieren. Wenn das Feld aus mehreren Zeichen besteht, verwenden Sie die Tasten 

 oder 

, um von einem Zeichen zum anderen zu springen. 

Zum Abschluss drücken Sie 

  zum Bestätigen.

Bei Zahlen werden nicht die einzelnen Ziffern geändert, sondern generell.

Beispielsweise, ausgehend von 0,00 auf 85,00: Gehen Sie an die erste Ziffer links vor der Null und 

drücken Sie dann auf 

. Die Ziffer wird auf 8 erhöht. Gehen Sie nun mit dem Cursor auf die zweite Ziffer 

und ändern Sie diese. usw.

Für eine Minuszahl gehen Sie an die erste Ziffer links vor der Null und drücken Sie dann auf 

. Die Ziffer 

springt auf 00,00, dann auf -10,00 und -20,00 usw.

Zum Abschluss drücken Sie 

  zum Bestätigen.

Содержание L452

Страница 1: ...registreur de données Data logger Data Logger Registratore Registrador FR Guide de démarrage rapide GB Quick start guide DE Schnellstart Anleitung IT Guida di utilizzo rapido ES Guía de inicio rápido L452 ...

Страница 2: ...s pour sélectionner le champ que vous voulez modifier puis appuyez à nouveau sur pour éditer ce champ Utilisez ensuite les touches ou pour définir le champ Si le champ est composé de plusieurs caractères utilisez les touches ou pour passer d un caractère à l autre A la fin appuyez sur pour valider La modification des nombres ne se fait pas chiffre par chiffre mais plus globalement Par exemple en p...

Страница 3: ...éditer le champ puis sur les touches ou pour faire défiler les 5 langues possibles anglais français espagnol italien et allemand et enfin sur pour valider 4 RÉGLAGES DE L HEURE ET DE LA DATE A partir de l écran précédent appuyez pour sélectionner le champ puis sur pour passer au champ suivant Appuyez à nouveau sur pour éditer le champ puis sur ou pour faire défiler les 4 choix possibles MM JJ AA A...

Страница 4: ...E MESURE Appuyez 2 fois sur Apartir de cet écran vous pouvez activer ou désactiver la voie de mesure 1 et choisir le type d entrée impulsion événement TOR courant 4 20 mA tension 10 V 1 V ou 100 mV Appuyez sur pour passer à l écran suivant et entrer l unité de la voie 1 sur 4 caractères Si vous ne spécifiez pas d unité les valeurs par défaut seront mV pour 100 mV V pour 10 V et 1 V mA pour 4 20 mA...

Страница 5: ...esure est dans les limites L alarme peut aussi être désactivée Appuyez sur pour définir les limites haute et basse Si vous avez défini des coefficients de transformation elles s afficheront directement dans l unité définie Appuyez sur pour passer à la configuration de la voie 2 et procédez comme pour la voie 1 6 BRANCHEMENT DES SONDES CAPTEURS TRANSMETTEUR OU CONDITIONNEUR DE SIGNAL Le Data Logger...

Страница 6: ...uyez 2 fois sur puis une fois sur Définissez la période d échantillonnage entre 200 ms et 1 minute Les valeurs possibles sont 200 ms 400 ms 600 ms 800 ms 1 à 60 secondes et 1 minute Puis définissez la période de stockage entre 200 ms et 1 heure Les valeurs possibles sont 200 ms 400 ms 600 ms 800 ms 1 à 60 secondes et 1 à 60 minutes Appuyez sur Choisissez une durée d enregistrement comprise entre 1...

Страница 7: ...z en appuyant sur L enregistrement est en attente et démarrera à l heure prévue Le symbole s affiche 8 INSTALLATION DU LOGICIEL DATA LOGGER TRANSFER Ne connectez pas l appareil au PC avant d avoir installé les logiciels et les pilotes Introduisez le CD dans le lecteur de CD ROM V INPUT 1 INPUT 2 V mA mA 30V MAX L452 SIMPLE LOGGER III Si l exécution automatique est activée le programme démarre auto...

Страница 8: ...ed to reverse video Use the keys to select the field you want to modify then press again to edit the field Then use the or key to define the field If the field comprises several characters use the or key to go from one character to another When you have finished press to validate The numbers are not changed digit by digit but more globally For example to go from 0 00 to 85 00 start on the left han...

Страница 9: ...4 times Press to select the field Press again to edit the field then or to scroll through the 5 possible languages English French Spanish Italian and German and finally to validate 4 SETTING THE TIME AND DATE From the previous screen press to select the field then to go to the next field Press again to edit the field then or to scroll through the 4 possible choices MM DD YY AM PM MM DD YY 24h DD M...

Страница 10: ...MEASUREMENT CHANNELS Press twice From this screen you can activate or deactivate measurement channel 1 and choose the type of input pulse event discrete 4 20mA current 10V 1V or 100mV voltage Press to go to the next screen and enter the unit of channel 1 in 4 characters If you do not specify a unit the default values will be mV for 100 mV V for 10V and 1 V mA for 4 20 mA Wh for pulse For an event ...

Страница 11: ...mit the measurement is within the limits The alarm can also be deactivated Press to define the high and low limits If you have defined transformation coefficients they will be displayed directly in the unit defined Press to go to the configuration of channel 2 and proceed as for channel 1 6 CONNECTING PROBES SENSORS TRANSMITTERS OR SIGNAL CONDITIONERS The L452 Data Logger operates with a great var...

Страница 12: ...PLE PERIOD 200 ms STORAGE PERIOD 01 s Press twice then once Define the sampling period between 200ms and 1 minute The possible values are 200ms 400ms 600ms 800ms 1 to 60 seconds and 1 minute Then define the storage period between 200ms and 1 hour The possible values are 200ms 400ms 600ms 800ms 1 to 60 seconds and 1 to 60 minutes Press Choose a recording duration between 1 minute and 99 weeks Bear ...

Страница 13: ...essing Recording is pending and will begin at the scheduled time The symbol is displayed 8 INSTALLING DATA LOGGER TRANSFER SOFTWARE Do not connect the instrument to the PC until the software and driver have been installed Insert the CD in the CD ROM drive V INPUT 1 INPUT 2 V mA mA 30V MAX L452 SIMPLE LOGGER III If automatic execution is activated the program starts automatically If not select Setu...

Страница 14: ...eiten wollen auszuwählen und drücken Sie erneut um dieses Feld zu bearbeiten Dann benutzen Sie die Tasten und um das Feld zu definieren Wenn das Feld aus mehreren Zeichen besteht verwenden Sie die Tasten oder um von einem Zeichen zum anderen zu springen Zum Abschluss drücken Sie zum Bestätigen Bei Zahlen werden nicht die einzelnen Ziffern geändert sondern generell Beispielsweise ausgehend von 0 00...

Страница 15: ...oder durch die fünf verfügbaren Sprachen Englisch Französisch Spanisch Italienisch und Deutsch und bestätigen Sie mit 4 DATUMS UND UHRZEITEINSTELLUNG Ausgehend vom vorherigen Bildschirm drücken Sie auf um das Feld auszuwählen und verwenden Sie dann die Taste um zum nächsten Feld zu springen Drücken Sie erneut auf um das Feld zu bearbeiten Dann scrollen Sie mit den Tasten oder durch die vier Möglic...

Страница 16: ...h Kanal 1 5 MESSKANÄLE KONFIGURIEREN Drücken Sie zwei Mal auf Von diesem Bildschirm aus können Sie den Messkanal 1 aktivieren oder deaktivieren und den Eingangstyp wählen Impuls Ereignis AON Strom 4 20 mA Spannung 10 V 1 V oder 100 mV Drücken Sie um zum nächsten Bildschirm zu springen und geben Sie die Einheit für Kanal 1 in vier Zeichen ein Wenn Sie keine Einheit angeben sind die Standardwerte mV...

Страница 17: ...ert liegt innerhalb der Grenzen Der Alarm kann auch ausgeschaltet werden Drücken Sie um die Ober und Untergrenzen festzulegen Wenn Sie Umrechnungsfaktoren eingestellt haben werden diese direkt in der gewählten Einheit angezeigt Drücken Sie um zum Einstellen von Kanal 2 zu springen und wiederholen Sie den Vorgang wie bei Kanal 1 6 SONDEN WANDLER UMFORMER UND SIGNALAUFBEREITER ANSCHLIESSEN Der Daten...

Страница 18: ...gerzeit 01 s Drücken Sie zwei Mal auf dann ein Mal auf Legen Sie die Abtastrate zwischen 200 ms und 1 Minute fest ZurAuswahl stehen folgende Werte 200 ms 400 ms 600 ms 800 ms 1 bis 60 Sekunden und 1 Minute Dann legen Sie die Speicherdauer zwischen 200 ms und 1 Stunde fest Zur Auswahl stehen folgende Werte 200 ms 400 ms 600 ms 800 ms 1 bis 60 Sekunden und 1 bis 60 Minuten Drücken Sie Wählen Sie ein...

Страница 19: ...e Aufzeichnung ist anhängig und startet zum programmierten Zeitpunkt Das Symbol erscheint 8 DATA LOGGER TRANSFER SOFTWARE INSTALLIEREN Das Gerät erst an den PC anschließen wenn Software und Treiber installiert sind CD in das CD ROM Laufwerk einlegen V INPUT 1 INPUT 2 V mA mA 30V MAX L452 SIMPLE LOGGER III Wenn die Autostart Funktion aktiv ist startet das Installationsprogramm automatisch Andernfal...

Страница 20: ...i tasti per selezionare il campo che volete modificare dopodiché premete di nuovo per editare questo campo Utilizzate in seguito i tasti o per impostare il campo Se il campo si compone di vari caratteri utilizzate i tasti o per passare da un carattere all altro Alla fine premete per convalidare La modifica dei numeri non si effettua cifra per cifra ma più globalmente Per esempio partendo da 0 00 p...

Страница 21: ...itare il campo poi i tasti o per fare scorrere le 5 lingue disponibili inglese francese spagnolo italiano e tedesco e infine premete per convalidare 4 IMPOSTAZIONI DELL ORA E DELLA DATA Mediante lo schermo precedente premete per selezionare il campo poi per passare al campo seguente Premete di nuovo per editare il campo dopodiché o per fare scorrere le 4 selezioni possibili MM GG AA AM PM MM GG AA...

Страница 22: ...ZIONE DELLE VIE DI MISURA Premete 2 volte Mediante questo schermo potete attivare o disattivare il canale di misura 1 e selezionare il tipo d ingresso impulso evento Tutto o niente corrente 4 20 mA tensione 10 V 1 V o 100 mV Premete per passare allo schermo seguente e digitare l unità del canale 1 su 4 caratteri Se non specificate l unità i valori per difetto saranno mV per 100 mV V per 10 V e 1 V...

Страница 23: ...a misura è entro i limiti L allarme può anche essere disattivato Premete per impostare i limiti alto e basso Se avete impostato i coefficienti di trasformazione si visualizzeranno direttamente nell unità impostata Premete per passare alla configurazione del canale 2 e procedete come per il canale 1 6 COLLEGAMENTO DI SONDE SENSORI TRASMETTITORE O CONDIZIONATORE DEL SEGNALE Il Data Logger L452 funzi...

Страница 24: ...nserv 01 s Premete 2 volte poi una volta Impostate il periodo di campionamento fra 200ms e 1 minuto I valori possibili sono 200ms 400ms 600ms 800ms da 1 a 60 secondi e 1 minuto Dopodiché impostate il periodo di stoccaggio fra 200ms e 1 ora I valori possibili sono 200ms 400ms 600ms 800ms da 1 a 60 secondi e da 1 a 60 minuti Premete Selezionate una durata di registrazione compresa fra 1 minuto e 99 ...

Страница 25: ...premendo La registrazione è in attesa e si avvierà all ora prevista Si visualizza il simbolo 8 INSTALLAZIONE DEL SOFTWARE DATA LOGGER TRANSFER Non collegate lo strumento al PC prima di avere installato i software e i driver Introducete il CD nel lettore di CD ROM V INPUT 1 INPUT 2 V mA mA 30V MAX L452 SIMPLE LOGGER III Se l esecuzione automatica è attivata il programma si avvia automaticamente In ...

Страница 26: ...lla Utilice las teclas para seleccionar el campo que desea cambiar luego pulse de nuevo para editar este campo Utilice luego las teclas o para definir el campo Si el campo consta de varios caracteres utilice las teclas o para pasar de un carácter al otro Al final pulse para aceptar El cambio de los números no se realiza cifra por cifra sino de forma más global Por ejemplo partiendo de 0 00 para ob...

Страница 27: ...ampo Pulse de nuevo para editar el campo luego las teclas o para ver los 5 idiomas posibles inglés francés español italiano y alemán y finalmente en para validar 4 AJUSTES DE LA HORA Y FECHA Desde la pantalla anterior pulse para editar el campo luego para pasar al campo siguiente Pulse de nuevo para editar el campo luego o para ver las 4 posibilidades MM DD AA AM PM MM DD AA 24h DD MM AA AM PM DD ...

Страница 28: ...IÓN DE LOS CANALES DE MEDIDA Pulse 2 veces Desde esta pantalla usted puede activar o desactivar el canal de medida 1 y elegir el tipo de entrada impulso evento TON corriente 4 20 mA tensión 10 V 1 V o 100 mV Pulse para pasar a la pantalla siguiente e introduzca la unidad del canal 1 en 4 caracteres Si no especifica la unidad los valores por defecto serán mV para 100 mV V para 10 V y 1 V mA para 4 ...

Страница 29: ... inferior la medida está dentro de los límites La alarma también se puede deshabilitar Pulse para definir el límite superior e inferior Si ha definido coeficientes de transformación aparecerán directamente en la unidad definida Pulse para pasar a la configuración del canal 2 y proceda como para el canal 1 6 CONEXIÓN DE LAS SONDAS SENSORES TRANSMISOR O ACONDICIONADOR DE SEÑAL El Data Logger L452 fu...

Страница 30: ...ra 200 ms Per Almac 01 s Pulse 2 veces y luego una vez Defina el periodo de muestreo entre 200 ms y 1 minuto Los valores posibles son 200 ms 400 ms 600 ms 800 ms 1 a 60 segundos y 1 minuto Luego defina el periodo de almacenamiento entre 200 ms y 1 hora Los valores posibles son 200 ms 400 ms 600 ms 800 ms 1 a 60 segundos y 1 a 60 minutos Pulse Elija una duración de registro comprendida entre 1 minu...

Страница 31: ... está en modo en espera y se iniciará a la hora prevista El símbolo aparece 8 INSTALACIÓN DEL SOFTWARE DATA LOGGER TRANSFER No conecte el instrumento al PC antes de haber instalado los software y los drivers Introduzca el CD en el lector de CD ROM V INPUT 1 INPUT 2 V mA mA 30V MAX L452 SIMPLE LOGGER III Si la ejecución automática está activada el programa se inicia automáticamente En caso contrari...

Страница 32: ... Fax 33 1 46 27 73 89 info chauvin arnoux com www chauvin arnoux com INTERNATIONAL Chauvin Arnoux Group Tél 33 1 44 85 44 38 Fax 33 1 46 27 95 69 Our international contacts www chauvin arnoux com contacts 694672A00 Ed 1 11 2015 Chauvin Arnoux All rights reserved and reproduction prohibited ...

Отзывы: