background image


Page 18 of 29 

Intimidator™ Wash Zoom 250 IRC User Manual Rev. 1 

14CH (cont.)


Channel 

Function 

Value 

Percent/Setting 

14 

Movement 
Macros 

000 

ó

 007 

No function 

008 

ó

 023 

Auto movement macro 1 

024 

ó

 039 

Auto movement macro 2 

040 

ó

 055 

Auto movement macro 3 

056 

ó

 071 

Auto movement macro 4 

072 

ó

 087 

Auto movement macro 5 

088 

ó

 103 

Auto movement macro 6 

104 

ó

 119 

Auto movement macro 7 

120 

ó

 135 

Auto movement macro 8 

136 

ó

 151 

Sound movement macro 1 

152 

ó

 167 

Sound movement macro 2 

168 

ó

 183 

Sound movement macro 3 

184 

ó

 199 

Sound movement macro 4 

200 

ó

 215 

Sound movement macro 5 

216 

ó

 231 

Sound movement macro 6 

232 

ó

 247 

Sound movement macro 7 

248 

ó

 255 

Sound movement macro 8 


Содержание Intimidator Wash Zoom 250 IRC

Страница 1: ...User Manual ...

Страница 2: ...am 9 Mounting 10 Orientation 10 Rigging 10 Mounting Diagram 10 4 Operation 11 Manual Zoom Lens 11 Control Panel 12 Menu Map 12 Configuration DMX 13 DMX Starting Address 13 DMX Personalities 13 DMX Channel Assignments and Values 14 7CH 14 14CH 16 Configuration Standalone 19 Sound Mode 19 Auto Mode 19 IR Mode 19 IRC 6 Operation 20 Configuration Master Slave 21 Configuring the Slaves 21 Configuring t...

Страница 3: ...n 23 Dimming Curve 24 Dimming Speed 24 Color Balance 24 Sensitivity 25 Reset 25 Reset to Factory Defaults 25 System Information 25 5 Technical Information 26 Product Maintenance 26 6 Technical Specifications 27 Returns 28 General Info 28 U S UK Ireland and Mexico 28 Contact Us 29 ...

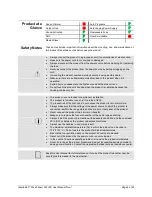
Страница 4: ...xt Conventions Convention Meaning 1 512 A range of values 50 60 A set of values Settings A menu option Menu Settings A sequence of menu options ENTER A button to be pressed ON A value to be entered or selected Symbols Symbol Meaning Critical installation configuration or operation information Not following these instructions can make the product not work cause damage to the product or cause harm t...

Страница 5: ...permanent installation The product is for indoor use only It is rated at IP20 To prevent risk of fire or shock do not expose the product to rain or moisture Always make sure that the voltage of the power source to which the product is connected is within the range stated on the sticker or rear panel of the product Never connect the product to a dimmer or rheostat Make sure to replace the fuse with...

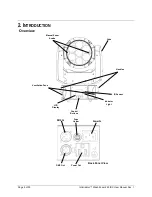
Страница 6: ...r Wash Zoom 250 IRC User Manual Rev 1 2 INTRODUCTION Overview LCD Display Control Buttons IR Sensor Indicator Light Yoke Manual Zoom Knobs DMX Out Back Panel View Power Out DMX In Fuse Holder Power In Handles Ventilation Fans ...

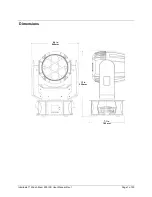
Страница 7: ...Intimidator Wash Zoom 250 IRC User Manual Rev 1 Page 7 of 29 Dimensions 9 4 in 240 mm 7 1 in 180 mm 13 in 330 mm ...

Страница 8: ... risk of electrocution or fire Never connect the product to a rheostat variable resistor or dimmer even if the rheostat or dimmer serves only as a 0 to 100 switch Fuse Replacement 1 Make sure product is not connected to a power source 2 Place the tip of a flat head screwdriver into the slot in the fuse holder 3 Turn the screwdriver counterclockwise and the fuse holder will come loose 4 Pull the fu...

Страница 9: ...dator Wash Zoom 250 IRC units on 120 V or up to 9 Intimidator Wash Zoom 250 IRC units on 230 V The power linking diagram shown above corresponds to the North American version of the product ONLY If using the product in other markets you must consult with the local CHAUVET distributor as power linking connectors and requirements may differ in your country or region 1 st Product 2 nd Product 3 rd Pr...

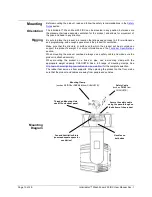
Страница 10: ...re information see the Technical Specifications section When mounting the product overhead always use a safety cable and make sure the product is attached securely When mounting the product on a truss or pipe use a mounting clamp with the appropriate weight capacity CHAUVET has a full range of mounting clamps See http www chauvetlighting com cables clamps main html for the complete selection The r...

Страница 11: ...n be adjusted when the product is turned off or when it is turned on and emitting light but do not adjust the zoom lens while it is moving To adjust the manual zoom lens do the following 1 Make sure the product is not moving 2 Grab the two manual zoom knobs gently 3 Slide the lens back and forth to achieve the desired beam size The product can be made to be stationary and emit light by using DMX c...

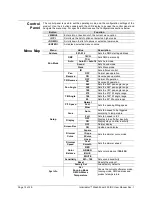
Страница 12: ...pan operation ON Reverse pan operation Tilt Reverse OFF Normal tilt operation ON Reverse tilt operation Pan Angle 540 Sets the 540 pan angle range 360 Sets the 360 pan angle range 180 Sets the 180 pan angle range Tilt Angle 270 Sets the 270 tilt angle range 180 Sets the 180 tilt angle range 90 Sets the 90 tilt angle range P T Speed Normal Sets the panning tilting speed Fast Slow Fans Auto Sets fan...

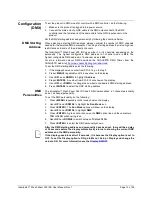
Страница 13: ...s a number from 001 512 go to step 5 2 Press MENU repeatedly until 4 icons show on the display 3 Use UP and DOWN to highlight Address 4 Press ENTER A number from 001 512 will show on the display 5 Use UP or DOWN to change the number to the desired DMX starting address 6 Press ENTER to select the DMX starting address DMX Personalities The Intimidator Wash Zoom 250 IRC has 2 DMX personalities a 7 ch...

Страница 14: ...olor 12 065 ó 069 Color 13 070 ó 074 Color 14 075 ó 079 Color 15 080 ó 084 Color 16 085 ó 089 Color 17 090 ó 094 Color 18 095 ó 099 Color 19 100 ó 104 Color 20 105 ó 109 Color 21 110 ó 114 Color 22 115 ó 119 Color 23 120 ó 124 Color 24 125 ó 129 Color 25 130 ó 134 Color 26 135 ó 139 Color 27 140 ó 144 Color 28 145 ó 149 Color 29 150 ó 154 Color 30 155 ó 159 Color 31 160 ó 164 Color 32 165 ó 169 Co...

Страница 15: ... decreasing speed 185 ó 189 Open 190 ó 204 Pulse effect 2 decreasing speed 205 ó 209 Open 210 ó 224 Gradually on and off decreasing speed 225 ó 229 Open 230 ó 244 Pulse effect 3 decreasing speed 245 ó 255 Open 7 Movement Macros 000 ó 007 No function 008 ó 023 Auto movement macro 1 024 ó 039 Auto movement macro 2 040 ó 055 Auto movement macro 3 056 ó 071 Auto movement macro 4 072 ó 087 Auto movemen...

Страница 16: ...040 ó 044 Color 8 045 ó 049 Color 9 050 ó 054 Color 10 055 ó 059 Color 11 060 ó 064 Color 12 065 ó 069 Color 13 070 ó 074 Color 14 075 ó 079 Color 15 080 ó 084 Color 16 085 ó 089 Color 17 090 ó 094 Color 18 095 ó 099 Color 19 100 ó 104 Color 20 105 ó 109 Color 21 110 ó 114 Color 22 115 ó 119 Color 23 120 ó 124 Color 24 125 ó 129 Color 25 130 ó 134 Color 26 135 ó 139 Color 27 140 ó 144 Color 28 145...

Страница 17: ...ng speed 185 ó 189 Open 190 ó 204 Pulse effect 2 decreasing speed 205 ó 209 Open 210 ó 224 Gradually on and off decreasing speed 225 ó 229 Open 230 ó 244 Pulse effect 3 decreasing speed 245 ó 255 Open 13 Control Functions 000 ó 009 No function 010 ó 014 Blackout while panning tilting 015 ó 049 No function 050 ó 054 Reset pan 055 ó 059 Reset tilt 060 ó 069 No function 070 ó 074 Reset all 075 ó 079 ...

Страница 18: ...ment macro 3 056 ó 071 Auto movement macro 4 072 ó 087 Auto movement macro 5 088 ó 103 Auto movement macro 6 104 ó 119 Auto movement macro 7 120 ó 135 Auto movement macro 8 136 ó 151 Sound movement macro 1 152 ó 167 Sound movement macro 2 168 ó 183 Sound movement macro 3 184 ó 199 Sound movement macro 4 200 ó 215 Sound movement macro 5 216 ó 231 Sound movement macro 6 232 ó 247 Sound movement macr...

Страница 19: ...e product to 1 of 16 preset movement patterns and color changes To set the product to Auto mode do the following 1 Make sure the product is connected to a power source and not connected to a DMX controller 2 Press MENU repeatedly until 4 icons show on the display 3 Use UP and DOWN to highlight the Run Mode icon 4 Press ENTER The Run Mode options will show on the display 5 Use UP and DOWN to highli...

Страница 20: ...ivity Use the and buttons to cycle through sound sensitivity levels Adjusts the brightness of the LEDs Use the and buttons to increase or decrease the brightness of the LEDs MANUAL Adjusts the white color in the LEDs Use the and buttons to increase or decrease the white color in the LEDs FADE SNAP or FADE Adjusts the speed and type of color fades Press the button to switch between fade and snap co...

Страница 21: ...ster and slaves Configure all the slaves before connecting the master to the DMX daisy chain Configuring the Slaves Configure the slaves for Slave mode before or after they are put in position and before they are daisy chained to the master To configure a slave do the following 1 Make sure the product is connected to a power source 2 Press MENU repeatedly until 4 icons show on the display 3 Use UP...

Страница 22: ...ll show on the display 4 Use UP and DOWN to highlight the Tilt Reverse option 5 Press ENTER The words ON or OFF will show in green 6 Use UP or DOWN to switch between ON and OFF 7 Press ENTER to select the setting Pan Range Setting the pan angle range is useful when there is an area of the room that the Intimidator Wash Zoom 250 IRC should not illuminate To set the range of the Pan movement do the ...

Страница 23: ...ON it will remain in any given menu for 30 seconds of inactivity and then it will return to a home screen that shows the product s current mode and DMX address If the display is set to OFF it will remain in any given menu for 30 seconds of inactivity and then it will go blank and show nothing To set the display ON or OFF do the following 1 Press MENU repeatedly until 4 icons show on the display 2 ...

Страница 24: ...mer Speed option 5 Press ENTER and Fast or Smooth will show in green 6 Use UP or DOWN to switch between Fast and Smooth 7 Press ENTER to select the setting Color Balance The color balance setting is used to set the white color of the product This setting affects only the color of the white light of the LED The red green and blue colors will remain the same To adjust the color balance do the follow...

Страница 25: ...et the product do the following 1 Press MENU repeatedly until 4 icons show on the display 2 Use UP and DOWN to highlight the Setup icon 3 Press ENTER The Setup options will show on the display 4 Use UP and DOWN to highlight the Reset option 5 Press ENTER The product will immediately reset Reset to Factory Defaults Resetting to factory defaults will clear out all customized settings and return thee...

Страница 26: ... Only clean the product when it is at room temperature Use a vacuum or dry compressed air and a soft brush to remove dust collected on the external surfaces and in the vents Use a mild soap solution ammonia free glass cleaner or isopropyl alcohol to clean all the external optics and glass or transparent surfaces Apply the cleaning solution directly to a soft lint free cotton cloth or a lens cleani...

Страница 27: ...Worldwide Power input connector IEC IEC Power output connector Edison US N A Power cord plug Edison US Local plug Power linking current units 8 A 5 units 8 A 9 units Light Source Type Power Lifespan LED 20 W 50 000 hours Color Quantity Current RGBW 7 3 7 A Photo Optic Parameter Illuminance 2 m 14 14 520 lux Illuminance 2 m 58 2 348 lux Zoom angle 14 to 58 Strobe rate 0 20 Hz Pan and Tilt 540 pan 2...

Страница 28: ...Authorization RMA number before shipping the product Be prepared to provide the model number serial number and a brief description of the reason for the return You must send the merchandise prepaid in its original box and with its original packing and accessories CHAUVET will not issue call tags Clearly label the package with the RMA number CHAUVET will refuse any product returned without an RMA n...

Страница 29: ...ormation Address Unit 1C Brookhill Road Industrial Estate Pinxton Nottingham UK NG16 6NT Voice 44 0 1773 511115 Fax 44 0 1773 511110 Technical Support Email uktech chauvetlighting com World Wide Web www chauvetlighting co uk MEXICO CHAUVET Mexico General Information Address Av Santa Ana 30 Parque Industrial Lerma Lerma Mexico C P 52000 Voice 52 728 285 5000 Technical Support Email servicio chauvet...

Отзывы: