Chauvet Professional STRIKEARRAY2 Скачать руководство пользователя страница 17

ES

 16

Strike Array 2 QRG Rev. 6

 GUÍA DE REFERENCIA RÁPIDA

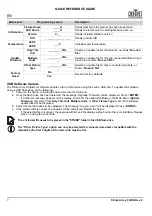
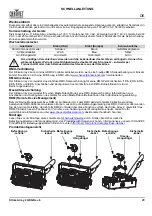
Actualización de software USB

El Strike Array 2 permite la actualización de software por USB utilizando el puerto USB incorporado. Para actualizar el 

software utilizando una unidad USB, haga lo siguiente:

1. Encienda el aparato y conecte la unidad USB al puerto USB.

2. Una vez detectada la unidad, aparecerá el mensaje “Actualizar firmware”. Pulse 

ENTER

.

Si aparece un mensaje diferente en la pantalla, busque el software actualizado en el menú (

Update 

Firmware

) y seleccione de 

Only This Unit

Multiple Units

 o 

Other Fixture Type

. Se mostrará una lista de 

los archivos de software actualizados.

3. Seleccione el archivo que necesite cargarse. Aparecerá el mensaje "¿Está seguro?" Pulse 

ENTER

.

4. Si el archivo seleccionado es correcto, se completará la mejora. Reinicie el aparato.

Si el archivo seleccionado es incorrecto, la mejora fallará y la pantalla volverá a la interfaz principal. Repita 

los pasos 1-3 utilizando el archivo correcto.
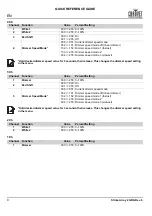
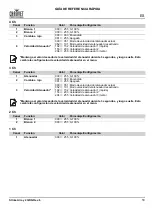
Information

Fixture Hours

_ _ _ H

Muestra el nombre total de las horas del producto

LED Hours

_ _ _ H

Muestra el total de horas que las luces LED han estado 

encendidas

Version

V_._

Muestra instalada la versión de software

UID

_ _ _ _ _ _ _ _ _ _ _ _

Muestra actual UID #

Temperature

LED1:

_ _°C

Temperatura individual de la unidad

LED2:

Update 

Firmware

Only This 

Unit

_ _ _ _ _ _.CHL

Muestra los archivos de actualización para este producto, o 

muestra “

No such file!

...

Multiple 

Units

_ _ _ _ _ _.CHL

Muestra los archivos de actualización para este producto y 

productos Strike Array 2 conectados, o muestra “

No such 

file!

...

Other Fixture 

Type

_ _ _ _ _ _.CHL

Muestra los archivos de actualización para otros productos 

conectados, o muestra “

No such file!

...

Factory 

Reset

No

Reinicia a la configuración de fábrica

Yes

El archivo con formato .chl tiene que colocarse en la carpeta "STRIKE" en la unidad USB.

La opción “Other Fixture Type” solo se puede seleccionar para productos conectados compatibles 

con la Upload 03 (los primeros 2 dígitos del código del artículo deben ser 03).
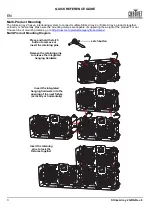
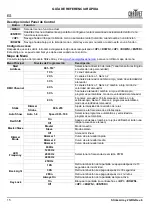
Menú Principal

Niveles de Programación

Descripción

Содержание STRIKEARRAY2

Страница 1: ...Quick Reference Guide English EN Espa ol ES Fran ais FR Deutch DE Nederlands NL Model ID STRIKEARRAY2...

Страница 2: ...his service agent or a similar qualified person The luminaire is intended for professional use only DO NOT open this product It contains no user serviceable parts To eliminate unnecessary wear and imp...

Страница 3: ...oduct for master slave operation RDM Remote Device Management Remote Device Management or RDM is a standard for allowing DMX enabled devices to communicate bi directionally along existing DMX cabling...

Страница 4: ...porting the weight of the product For our Chauvet line of mounting clamps go to http trusst com productcategory truss clamps Multi Product Mounting Diagram Remove the retaining pins to release the int...

Страница 5: ...e mounting point When not using the omega bracket never hang more than 8 cells vertically from a single mounting point With Omega Bracket Without Omega Bracket Attach the safety cable of the first pro...

Страница 6: ...v 6 Vertical Mounting Stability When mounting products attached in series use omega brackets in the back position to create a spine This will prevent any motion which may damage the products Omega bra...

Страница 7: ...1 white 2 3 Ch 3 channel Dimmer red shift dimmer speed mode 4 Ch 4 channel White 1 white 2 red shift dimmer speed mode 5 Ch 5 channel Dimmer red shift strobe auto programs dimmer speed mode 8 Ch 8 ch...

Страница 8: ...l fail and the display will go back to the main interface Repeat steps 1 3 using the correct file Information Fixture Hours _ _ _ H Shows total hours the product has been powered on LED Hours _ _ _ H...

Страница 9: ...t 153 203 Dimmer speed mode 2 204 255 Dimmer speed mode 3 slowest Hold desired dimmer speed value for 3 seconds then release This changes the dimmer speed setting in the menu Channel Function Value Pe...

Страница 10: ...3 seconds then release This changes the dimmer speed setting in the menu Channel Function Value Percent Setting 1 Dimmer 000 255 0 100 2 Red Shift 000 000 On 001 255 Off 3 Dimmer Speed Mode 000 051 C...

Страница 11: ...o NO mire a la fuente de luz cuando el producto est encendido Para evitar un desgaste innecesario y alargar su vida til desconecte complemente el producto de la alimentaci n mediante el interruptor o...

Страница 12: ...evice Management gesti n remota del dispositivo o RDM es un est ndar que permite a los dispositivos con capacidad DMX una comunicaci n bidireccional por un cableado DMX existente El Strike Array 2 adm...

Страница 13: ...a nuestra l nea Chauvet de abrazaderas de montaje visite http trusst com productcategory truss clamps Diagrama de montaje multiproducto Bot n de cierre Presione y mantenga presionado el bot n de cierr...

Страница 14: ...olo punto de montaje Cuando no usa el soporte omega nunca acople m s de 8 c lulas juntos cuando los cuelgue verticalmente de un solo punto de montaje Con Soporte Omega Sin Soporte Omega Fije el cable...

Страница 15: ...del montaje vertical Cuando monte de productos acoplados en serie utilice soportes Omega en la posici n trasera para crear una espina dorsal Esto evitar cualquier movimiento que da e los productos So...

Страница 16: ...nuador 4 Ch 4 canales blanco 1 blanco 2 cambio a rojo modo de velocidad del atenuador 5 Ch 5 canales atenuador cambio a rojo estroboscopio programas autom ticos modo de velocidad del atenuador 8 Ch 8...

Страница 17: ...tilizando el archivo correcto Information Fixture Hours _ _ _ H Muestra el nombre total de las horas del producto LED Hours _ _ _ H Muestra el total de horas que las luces LED han estado encendidas Ve...

Страница 18: ...dad de atenuador 3 lenta Mantenga el valor deseado de la velocidad del atenuador durante 3 segundos y luego suelte Esto cambia la configuraci n de velocidad de atenuador en el men Canal Funci n Valor...

Страница 19: ...te Esto cambia la configuraci n de velocidad de atenuador en el men Canal Funci n Valor Porcentaje Configuraci n 1 Atenuador 000 255 0 100 2 Cambio a rojo 000 000 001 255 Encendido Apagado 3 Velocidad...

Страница 20: ...uniquement r serv un usage professionnel N ouvrez PAS ce produit Il ne contient aucun composant susceptible d tre r par par l utilisateur Ne regardez PAS la source lumineuse lorsque le produit foncti...

Страница 21: ...M Gestion des p riph riques distance Le protocole RDM gestion des p riph riques distance est un standard pour la communication bidirectionnelle des appareils dot s de fonctions DMX dans un c blage DMX...

Страница 22: ...e fixations Chauvet sur http trusst com productcategory truss clamps Multi Product Mounting Diagram Bouton de verrouillage Appuyez sur le bouton de verrouillage et maintenez le enfonc pour enlevez ou...

Страница 23: ...attache Lorsque vous n utilisez pas le support om ga n attachez jamais plus de 8 cellules ensemble en suspension verticale partir d un m me point d attache Avec support om ga Sans support om ga Attac...

Страница 24: ...Lors de la fixation d appareils attach s en s rie utilisez des pattes de fixation Omega en position arri re pour former une structure dorsale Cela permettra d viter tout mouvement susceptible d endom...

Страница 25: ...rogrammes automatiques mode de vitesse du gradation 8 Ch 8 canaux gradation gradation 16 bit passe au rouge stroboscope blanc 1 blanc 2 programmes automatiques mode de vitesse du gradation Static Dimm...

Страница 26: ...produit et des produits Strike Array 2 connect s ou affiche No such file Other Fixture Type _ _ _ _ _ _ CHL S lectionne un fichier de mise jour pour les autres produits connect s ou affiche No such fi...

Страница 27: ...anc 2 000 255 0 100 3 Passe au rouge 000 000 001 255 Activer D sactiver 4 Vitesse du gradateur 000 051 052 101 102 152 153 203 204 255 Mode vitesse gradateur actuel Gradateur lin aire Courbe de gradat...

Страница 28: ...auten Komponenten sind f r den Kunden wartungsfrei Um unn tigen Verschlei zu vermeiden und die Lebensdauer des Ger ts zu verl ngern trennen Sie w hrend l ngerer Perioden des Nichtgebrauchs das Ger t v...

Страница 29: ...Bedienungsanleitung RDM Remote Device Management Remote Device Management bzw RDM ist ein Standard mit dem DMX aktivierte Ger te bidirektional entlang bestehender DMX Kabel kommunizieren k nnen Lesen...

Страница 30: ...onen zu unserer CHAUVET Produktlinie f r Befestigungsklemmen finden Sie unter http trusst com productcategory truss clamps Multi Product Mounting Diagram Verriegelungsknopf Dr cken und halten gedr ckt...

Страница 31: ...n Wenn Sie die omega H ngeb gel nicht verwenden Befestigen Sie niemals mehr als 8 Zellen aneinander wenn diese vertikal an einem einzigen Aufh ngepunkt aufgeh ngt werden Mit Omega H ngeb gel Ohne Omeg...

Страница 32: ...Montage Verwenden Sie bei der Montage von Produkten in Reihe Omega Halteb gel auf der R ckseite um eine Art R ckgrat zu erzeugen Dadurch wird verhindert dass sie Produkte durch Bewegungen besch digt...

Страница 33: ...gang Stroboskopeffekt Auto Programme Dimmer Geschwindigkeitsmodus 8 Ch 8 Kanal Dimmer 16 Bit Dimmer roter bergang Stroboskopeffekt Wei 1 Wei 2 Auto Programme Dimmer Geschwindigkeitsmodus Static Dimmer...

Страница 34: ...f r dieses Produkt und verbundene Strike Array 2 Produkte oder zeigt No such file Other Fixture Type _ _ _ _ _ _ CHL W hlt die Update Datei f r andere verbundene Produkte oder zeigt No such file Facto...

Страница 35: ...2 000 255 0 100 3 Roter bergang 000 000 001 255 Roter bergang aktiviert Roter bergang deaktiviert 4 Dimmergeschwindigkeit 000 051 052 101 102 152 153 203 204 255 Dimmergeschwindigkeit von Anzeige ein...

Страница 36: ...nd bedoeld voor professioneel gebruik Open het product NIET Het bevat geen te onderhouden onderdelen KIJK NIET in de lichtbron wanneer het apparaat is ingeschakeld Om onnodige slijtage te elimineren e...

Страница 37: ...eren voor Master Slave werking RDM apparaatbeheer op afstand Remote Device Management of RDM apparaatbeheer op afstand is een standaard die het voor DMX apparaten mogelijk maakt om in twee richtingen...

Страница 38: ...ht van het product kan dragen Ga voor onze Chauvet serie montageklemmen naar http trusst com productcategory truss clamps Multi Product Mounting Diagram Vergrendelknop Houd de vergrendelknop om te ver...

Страница 39: ...ingspunt Bij niet gebruik van de omega beugel bevestig nooit meer dan 8 cellen aan elkaar wanneer ze verticaal hangen aan n bevestigingspunt Met omega beugel Zonder omega beugel Bevestig de veiligheid...

Страница 40: ...le montage Wanneer producten gemonteerd worden die in serie bevestigd zijn moet u omega beugels in de achterste positie gebruiken om een ruggengraat te cre ren Dit voorkomt elke beweging die de produc...

Страница 41: ...8 Ch 8 kanaals dimmer 16 bits dimmer red shift strobo witte 1 witte 2 Auto Programme Dimmersnelheid Static Dimmer 000 255 Stelt de intensiteit in van de lichtopbrengst Strobe Selecteert de stroboscoop...

Страница 42: ...Selecteert een updatebestand voor dit product en verbonden Strike Array 2 producten of toont No such file Other Fixture Type _ _ _ _ _ _ CHL Selecteert een updatebestand voor andere aangesloten produ...

Страница 43: ...rcentage Instelling 1 Wit 1 000 255 0 100 2 Wit 2 000 255 0 100 3 Red Shift 000 000 001 255 Aan Uit 4 Dimmersnelheid 000 051 052 101 102 152 153 203 204 255 Huidige snelheidsmodus van de dimmer Lineai...

Страница 44: ...ustrial Estate Pinxton Nottingham UK Website www chauvetprofessional eu NG16 6NT Voice 44 0 1773 511115 Fax 44 0 1773 511110 Chauvet Europe BVBA Address Stokstraat 18 Email BNLtech chauvetlighting eu...

Отзывы: