background image

Assembly


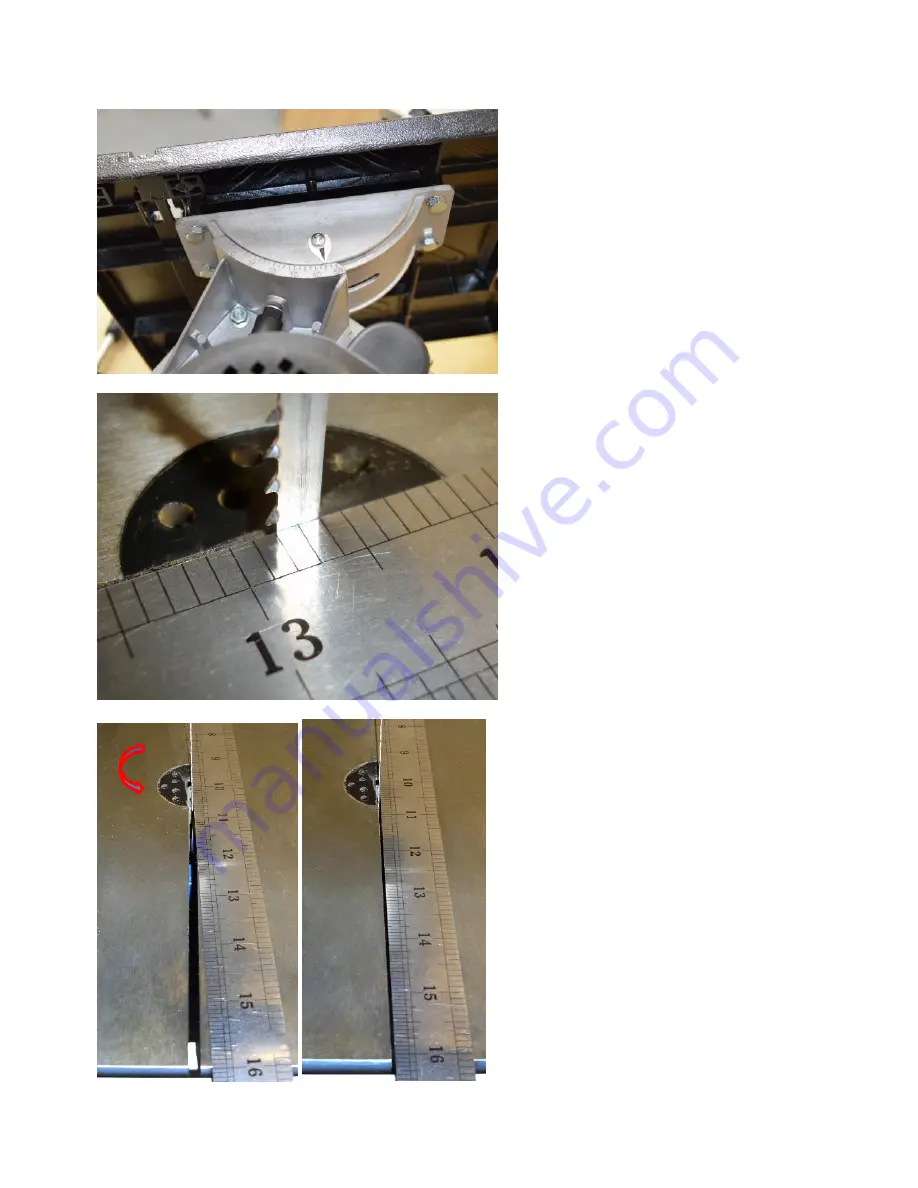
Place the saw, so that it is lying on its 
back.   
 
Prop the upper end up on a suitable 
block or box, so that the table may be 
held in place with the four threaded 
holes in line with the holes in the upper 
trunnion. 
 
Using the four bolts and serrated 
washers supplied, attach the table to 
trunnion, leaving the bolts slightly loose. 


Carefully place a steel rule against the 
side of the blade, between teeth. 


Twist the table on the trunnion until the 
rule is aligned with the slot. 
 
Tighten the four bolts holding the table 
to the trunnion. 


Содержание W711

Страница 1: ...RS MANUAL MODEL W711 Charnwood Machinery Ltd Cedar Court Walker Road Hilltop Industrial Estate Bardon Hill Leicestershire LE67 1TU Tel 01530 516 926 Fax 01530 516 929 email sales charnwood net website www charnwood net ...

Страница 2: ...7 Keep children away All visitors should be kept a safe distance from the work area 8 Make workshop childproof Use padlocks master switches and remove starter keys 9 Do not force the machine It will do the job better and be safer at the rate for which it is designed 10 Use the right tools Do not force the machine or attachments to do a job for which they are not designed Contact the manufacturer o...

Страница 3: ...UCH SIZE THAT IT WOULD BRING YOUR HANDS WITHIN 30 CM OF THE BLADE 7 Do not cut material that is badly warped or which has screws or nails in it 8 Be extra vigilant when cutting stock which has loose knots in it as these my fly out of the saw 9 NEVER tilt the table when the saw is running 10 To avoid exposure to hazardous dust do not use this saw without connecting it to a suitable dust extractor 1...

Страница 4: ...e bandsaw is supplied in one carton After cutting the tape at the top of the box invert it on a table or bench and lift it off the polystyrene insert Separate the two pieces of packing and remove all the components ...

Страница 5: ... holes in line with the holes in the upper trunnion Using the four bolts and serrated washers supplied attach the table to trunnion leaving the bolts slightly loose Carefully place a steel rule against the side of the blade between teeth Twist the table on the trunnion until the rule is aligned with the slot Tighten the four bolts holding the table to the trunnion ...

Страница 6: ...insert allows for 45 cutting The lower trunnion is attached to the body of the saw by three hex headed bolts These may be slackened and the trunnion slid in either direction until the blade is centred After adjustment tighten them securely Adjustable pointer This lever locks and unlocks the trunnion so that the table may be tilted ...

Страница 7: ...the table stop screw complete with locking nut into the tapped hole on the top face of the saw s lower housing Reset the table to 0 and adjust the screw so that it touches the underside of the table Secure it in this position with the locknut Attach the Rip Fence Carrier to the front edge of the table using the four M8 x 12mm bolts provided Screw in and lock the push stick hanger on the side of th...

Страница 8: ...Setting Up The Bandsaw Blade tensioner Blade guard height adjuster and lock Tracking control and lock ...

Страница 9: ...ont of the rubber tyre on the wheels To check the tracking open both doors and rotate the top wheel by hand If the blade starts to move towards the front edge of the wheel turn the tracking control located at the rear clockwise Lock the tracking control in this position Set The Upper Blade Guides The upper and lower thrust bearings and blade guide pins should be set up next Thrust bearing Guide pi...

Страница 10: ...g Locking screw The thrust bearing should be about 0 5 mm behind the back of the blade Adjust it and lock in place Slacken the guide pin locking screws then adjust the pins so that there is a clearance of 0 5mm either side of the blade Lock the pins in place with the grub screws Locking screws ...

Страница 11: ... rip fence may be used as a length stop for repetitive cross or mitre cuts Mitre Fence Blade width Min Diameter 6mm 1 4 60mm 2 1 2 10mm 3 8 100mm 4 Cutting Curves The bandsaw can be used to cut curves freehand The diameter of the curve you can cut depends on the width of the blade A narrower blade can cut tighter curves than a wide blade The table on the left gives a guide Note Once you have cut c...

Страница 12: ...the front and pointing down If the new blade is a different width tension track the blade first then adjust the guide pins and thrust bearings as shown in this manual Troubleshooting Problem Cause Remedy Machine does not start Blown Fuse Replace Fuse Loose switch terminal Inspect back of switch Faulty switch Replace switch Only starts when Green button is held down Faulty switch Replace switch Mot...

Страница 13: ...requirements of the directive Signed Dated 29 09 2016 Location Leicestershire Richard Cook Director Please dispose of packaging for the product in a responsible manner It is suitable for recycling Help to protect the environment take the packaging to the local amenity tip and place into the appropriate recycling bin Only for EU countries Do not dispose of electric tools together with household was...

Страница 14: ...Charnwood W711 Bandsaw Parts Diagram ...

Страница 15: ...heel 35 Blade 36 Hex Head Bolt 37 Latch 38 Nut 39 Lower Door 40 Washer 41 Latch Housing 42 Slotted Insert 43 Washer 44 Bolt 45 Upper Door 46 Circlip 47 Upper Wheel 48 Coach Bolt 49 Brush 50 Spacer 51 NVR Switch 52 Screw 53 Switch Plate 54 Upper Bearing Bolt 55 Bearing Gasket 56 Upper Bearing Bolt Support 57 Flanged Nut 58 Blade Tensioner 59 Guide Plate Assembly 60 Guide Pin 61 Guide Piece 62 Hex H...

Страница 16: ...dated September 2018 Charnwood Cedar Court Walker Road Hilltop Industrial Estate Bardon Hill Leicestershire LE67 1TU Tel 01530 516 926 Fax 01530 516 929 email sales charnwood net website www charnwood net ...

Отзывы: