background image

TH160/01

TH160/03

TH160/04

TH160/02

1

2

3

4

5

6

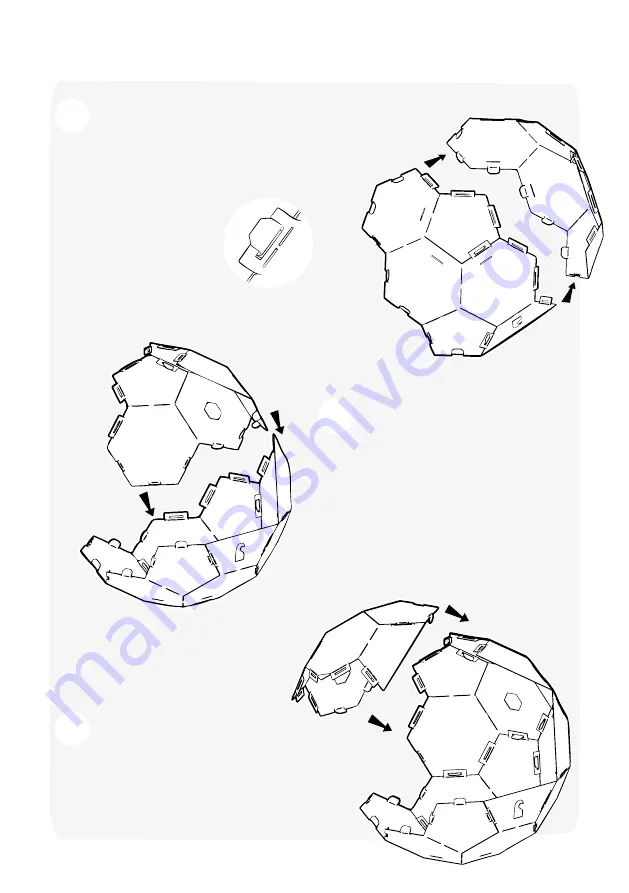
Take part TH160/01 and TH160/02 and attach 
them together using the six tabs as shown in the 
illustration. It is best to align the first tab and then 
work down. This will form the 
base of the ball.

To secure the tabs, bend the 
tabs fully over and lock into 
position. Use a small hammer 
to flatten the tabs into place.

Note the orientation of the logo on 
the front of the base.

Connect TH160/03 in the same way 
as illustrated and secure the six tabs.

Connect TH160/04 in the same way as 
illustrated and secure the six tabs.

B A L L   A S S E M B LY

B A L L   A S S E M B LY

5

6

7

Содержание FIREBALL

Страница 1: ......

Страница 2: ......

Страница 3: ...iece for the garden with a rustic finish This iconic piece is cut from mild steel and supplied as a flat pack kit making the perfect present for someone who enjoys a small project The satisfaction of building this product is all part of the experience All that is required is an hour of your time sturdy gloves a pair of pliers and a hammer ...

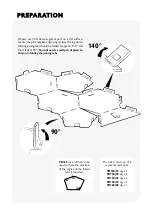
Страница 4: ... short tabs at 90 You will need a small pair of pliers to aid you in folding the joining tabs The ball is made up of 6 segments marked as TH160 01 qty x 1 TH160 02 qty x 1 TH160 03 qty x 2 TH160 04 qty x 1 TH160 05 qty x 1 TH165 is a tool that can be used to check the precision of the angles of the folded tabs if required P R E PA R AT I O N P R E PA R AT I O N 90 140 115 ...

Страница 5: ...folds as illustrated by dashed lines 2 folds as illustrated by dashed lines Bend the tabs fully over and lock into position Use a small hammer to flatten the tabs into place 1 2 3 4 Completed segment Repeat steps 1 3 for all remaining dome pieces ...

Страница 6: ... This will form the base of the ball To secure the tabs bend the tabs fully over and lock into position Use a small hammer to flatten the tabs into place Note the orientation of the logo on the front of the base Connect TH160 03 in the same way as illustrated and secure the six tabs Connect TH160 04 in the same way as illustrated and secure the six tabs B A L L A S S E M B LY B A L L A S S E M B L...

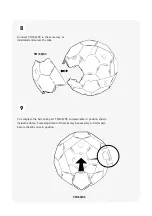
Страница 7: ...me way as illustrated and secure the tabs To complete the ball take part TH160 05 and assemble in position shown inside the dome Some adjustment of the tabs may be necessary to fit this part Secure the tabs once in position TH160 03 8 9 ...

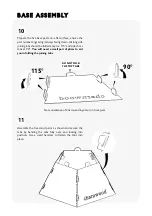
Страница 8: ...90 You will need a small pair of pliers to aid you in folding the joining tabs Assemble the five stand parts as shown and secure the tabs by bending the tabs fully over and locking into position Use a small hammer to flatten the tabs into place 90 115 DO NOT FOLD THE TOP TABS Note orientation of Charnwood logo text on front piece B A S E A S S E M B LY B A S E A S S E M B LY 10 11 ...

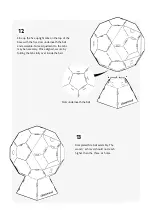
Страница 9: ... underneath the ball and assemble Some adjustment to the tabs may be necessary Once aligned secure by folding the tabs fully over inside the ball Completed fire ball assembly The wood ash level should not reach higher than the three air holes Slots underneath the ball 12 13 ...

Страница 10: ...bjects This product is only designed to burn wood and the ash level should not reach higher than the three air holes The Fireball is cut from mild steel and is 100 recyclable Due to the nature of steel the Fireball will oxidise over time and the look of the product will change This is all part of the design and character of the product Please burn responsibly ...

Страница 11: ......

Страница 12: ...ENJOY YOUR charnwoodfireball ...

Отзывы: