background image


SIDE SHELF ASSEMBLY  

 
1.  The screws used to attach the side shelf are already screwed into the left side burner 

And right side panel(see the figure below).loosen the screws from the left side burner  
And right side panel, install the side shelves and tighten screws as the figure shown  
below. 
 

Attention:

 The left side shelf should be screwed from outside into inside with 4pcs  

screws, the right side shelf should be screwed: 

a.  the upper 2 screws to the right panel should be screwed from inside to outside  

for side shelf. 

b.  the screws below them should be firmed from outside into inside.


8
9

K15Y06N-1 

Содержание 730-0289

Страница 1: ...Stainless Steel Gas Grill USE AND CARE GUIDE MODEL NO 730 0289 PLEASE CONTACT 1 800 913 8999 FOR ASSISTANCE DO NOT RETURN TO PLACE OF PURCHASE FOR OUTDOOR USE ONLY K15Y06N 1 ...

Страница 2: ...ty 28 READ THE FOLLOWING INSTRUCTIONS CAREFULLY AND BE SURE YOUR GRILL IS PROPERY INSTALLED ASSEMBLED AND MAINTAINED FAILURE TO FOLLOW THESE INSTRUCTIONS MAY RESULT IN SERIOUS BODILY INJURY AND OR PROPERTY DAMAGE IF YOU HAVE QUESTIONS CONCERNING ASSEMBLY OR OPERATION CALL OUR SERVICE CENTER AT 1 800 913 8999 MONDAY THROUGH FRIDAY 8 00AM 5 00PM PACIFIC COAST TIME NOTE TO INSTALLER LEAVE THESE INSTR...

Страница 3: ... SAFETY If you smell gas 1 Shut off gas to the appliance 2 Extinguish any open flame 3 Open Lid 4 If odor continues immediately call your gas supplier or your fire department SAFETY INSTRUCTIONS WARNING K15Y06N 1 ...

Страница 4: ... DO NOT LEAVE THE GRILL UNATTENDED WHILE COOKING SAFETY INSTRUCTIONS DO NOT USE ALUMINUM FOIL TO LINE THE GRILL RACKS OR GRILL BOTTOM This can severely upset combustion airflow or trap excessive heat in the control area INSECT WARNING Spiders and insects can nest in the burners of this and any other grill and cause the gas to flow improperly This is a very dangerous condition which can cause a fir...

Страница 5: ...KEEP EXTENSION CORD CONNECTION DRY AND OFF THE GROUND SAFETY INSTRUCTIONS WARNING Always keep your face and body as far away from the burner as possible when lighting WARNING IMPORTANT BEFORE LIGHTING Inspect the gas supply hose prior to turning the gas ON If there is evidence of cuts wear or abrasion it must be replaced prior to use Do not use the grill if the odor of gas is present Only the pres...

Страница 6: ... YOU ARE TURNING THE IGNITER LABELED FOR THE BURNER YOU INTEND ON USING TESTED IN ACCORDANCE WITH ANSI Z21 58a CSA 1 6a 2006 STANDARD FOR OUTDOOR COOKING GAS APPLIANCES THIS GRILL IS FOR OUTDOOR USE ONLY Check your local building codes for the proper method of installation In the absence of local codes this unit should be installed in accordance with the National Fuel Gas Code No Z223 1 1988 and t...

Страница 7: ...ion could in the presence of heat ignite or cause metal parts to corrode Do not use the grill for cooking excessively fatty meats or products which promote flare ups Do not operate the grill under unprotected combustible construction Use only in well ventilated areas Do not use in buildings garages sheds breezeways or other such enclosed areas THIS UNIT IS FOR OUTDOOR USE ONLY Keep the area surrou...

Страница 8: ...l dealer for professional assistance Check with your gas utility or with local building codes for instructions to install gas supply line or call a licensed and knowledgeable installer It is recommended that an ON OFF shut off valve be installed at the gas supply source outdoors after the gas line piping exits outside the wall and before the quick disconnect In a branch fuel line it should be inst...

Страница 9: ... And right side panel install the side shelves and tighten screws as the figure shown below Attention The left side shelf should be screwed from outside into inside with 4pcs screws the right side shelf should be screwed a the upper 2 screws to the right panel should be screwed from inside to outside for side shelf b the screws below them should be firmed from outside into inside 8 9 K15Y06N 1 ...

Страница 10: ...ch the side shelf handle are already screwed into the side shelf handle see the figure below loosen the screws from the side shelf handle align with the holes in the side shelf and secure into the holes on the right side shelf of the grill 9 K15Y06N 1 ...

Страница 11: ...ion button housing Please keep the positive pole of the battery facing toward you Insert the battery into the housing Replace the ignition button housing after battery is installed CONDIMENT RACK ASSEMBLY Assemble the condiment rack inside of the left door 10 K15Y06N 1 ...

Страница 12: ...GULATOR 1 The Nature Gas regulator has been factory installed Attach the PVC Gas Hose to the regulator See drawing below 2 Connect the other end of the PVC Gas Hose to the house gas line using the quick connect fitting 11 K15Y06N 1 ...

Страница 13: ...ted gas to dissipate Keep your face and hands as far away from the grill as possible Insert a lit extended match or lighter through the cooking grids to the burner Press the control knob and rotate left to the HI setting continue to press the knob until the burner ignites Burner should light immediately If the burner does not light in 4 seconds turn the knob off wait 5 minutes and try again 12 K15...

Страница 14: ...s in the control knob and rotate left to HI setting to releases gas Burner should light immediately CAUTION Do not move grill trolley while in operation If the grill fails to operate properly 1 Turn off gas at source turn control knob to OFF and wait five minutes before trying again 2 Check gas supply connections 3 Repeat lighting procedure and if grill still fails to operate properly TURN OFF GAS...

Страница 15: ... You can cook poultry and large cuts of meat slowly to perfection on one side of the grill by indirect heat from the burner on the other side Heat from the lighted burner circulates gently throughout the grill cooking the meat or poultry without any direct flame touching it This method greatly reduces flare ups when cooking extra fatty cuts because there is no direct flame to light the fats and ju...

Страница 16: ...stration Step to light the rotisserie burner Push and turn the rotisserie knob to IGNITE ON position and hold for 3 4 seconds then push electronic ignition button at the same time until burner is lit Step to light the searing burner Push and turn the searing knob to IGNITE HI position and hold for 3 4 seconds to light the burner Once it is lit release electronic igniter and still hold in the sear ...

Страница 17: ...able to drip down into grease collector and a grease fire could occur EXTERIOR Your Charmglow grill is made of heavy stainless steel it should provide you with years of trouble free service CLEANING THE COOKING GRIDS After cooking turn control knobs to OFF and let grill cool before attempting to clean your cooking grids Before first use and periodically it is suggested that you wash the cooking gr...

Страница 18: ...to the burner when you press the starter button Dose the infrared back burner light when attempting to match light If not check did you turn on the gas Regulator makes noise Vent hose on the regulator may be plugged or regulator may be faulty Ensure the vent hole on the regulator is not obstructed Clear the hole close the gas control valves Wait ten minutes and re start Check your flames for prope...

Страница 19: ...eft burner to ignite wait 5 seconds ignite Repeat for additional burners Check all gas connections for leaks with bubble test If leaks are found replace the part or tighten the fitting If it is a natural gas grill ensure there is proper pressure to the grill Refer to the user manual Example Gas line stubbed off o pool heater may exhibit deference in pressure Grill takes a long time to preheat Norm...

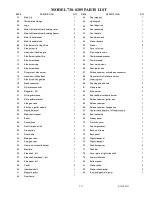
Страница 20: ...62 72 06 07 52 51 71 08 09 10 14 15 16 23 25 26 27 28 42 43 44 45 46 47 49 55 57 58 59 68 31 32 33 34 73 74 75 78 79 80 40 39 82 50 81 77 30 83 38 70 76 67 41 49 05 05 76 29 35 24 79 81 81 81 48 63 64 65 66 56 54 53 17 12 13 11 69 82 04 04 18 K15Y06N 1 ...

Страница 21: ...a am me e t ta am me er r 4 4 2 20 0 R Re eg gu ul la at to or r N NG G 1 1 6 62 2 M Ma ai in n b bu ur rn ne er r 4 4 2 21 1 N NG G r re eg gu ul la at to or r h ho os se e 1 1 6 63 3 R Re ea ar r b ba af ff fl le e o of f r ro ot ti is ss se er ri ie e b bu ur rn ne er r 1 1 2 22 2 N NG G r re eg gu ul la at to or r b br ra ac ck ke et t 1 1 6 64 4 R Ro ot ti is ss se er ri ie e b bu ur rn ne er...

Страница 22: ...tor as opposed to a microwave This in general yields a juicier cut of meat Use a spatula instead of tongs or a fork to turn the meat as a spatula will not puncture the meat and let the juices run out To get the juiciest meats add seasoning or salt after the cooking is finished on each side and turn the meat only once juices are lost when the meat is turned several times Turn the meat just after th...

Страница 23: ...avy duty foil Grill rotating occasionally Sweet Whole Medium 40 to 60 minutes White 6 to 8 ounces High 45 to 60 minutes Frozen Dot with butter or margarine Wrap in heavy duty foil Grill turning occasionally Asparagus Medium 15 to 30 minutes Broccoli Brussels Sprouts Green beans Peas French fries Medium 15 to 30 minutes Place in aluminum foil pan Grill stirring occasionally MEATS Beef Hamburgers 1 ...

Страница 24: ...um 1 inch Medium to 13 to 20 minutes 1 1 2 inch High 18 to 25 minutes Well done 1 inch Medium 17 to 30 minutes Pork Chops 1 inch Medium 20 to 30 minutes Remove excess fat from edge Slash remaining fat at 2 inch intervals Grill turning once Cook well done Well done 1 1 2 inches Medium 30 to 40 minutes Ribs Medium 30 to 40 minutes Grill turning occasionally During last few minutes brush with barbecu...

Страница 25: ...ME SPECIAL INSTRUCTIONS AND TIPS FISH AND SEAFOOD Steaks Grill turning once Brush withmelted butter margarine or oil to keep moist Halibut 3 4 to 1 inch Medium to 8 to 15 minutes Salmon High Swordfish Whole Catfish 4 to 8 ounces Medium to 12 to 20 minutes Grill turning once Brush with melted butter margarine or oil Rainbow trout High 23 K15Y06N 1 ...

Страница 26: ...ade flank steak with it Refrigerate at least 4 hours or overnight Remove steak and grill on your preheated BBQ grill Grill 5 to 7 minutes on each side basting frequently with the marinade In the meantime sauté onions from the marinade in butter in a skillet on your side burner for 3 minutes To serve slice steak diagonally into thin slices sprinkle onions over top Garnish with vegetable kabobs BAKE...

Страница 27: ...as chopped tomatoes guacamole sour cream taco sauce BEEF AND LAMB KABOBS Serve 4 lb boneless sirloin or beef cut into 1 cubes lb boneless loin of lamb cut into 1 cubes 2 3 c water divided c chopped onion 2 tbs soy sauce c vegetable oil divided 1 tbs dark brown sugar 1 tbs fresh lemon juice 2 cloves garlic minced tsp ground cumin tsp ground coriander tsp ground turmeric 1 8 tsp ground red pepper 1 ...

Страница 28: ...inue the process until the entire rack is accordion pleated Fasten the second meat hook into the rack Turn your rotis burner on high Rotis for 50 minutes or until done PORK ROAST Apple cider vinegar basting sauce 1 c apple cider vinegar 6 oz water stick butter Salt pepper parsley and garlic seasoning 2 oz lemon juice 10 lbs pork roast Time 1 1 2 hours to 2 hours Bring pork to room temperature befo...

Страница 29: ...y to operating instructions or alteration by any person other than our factory service center The warranty period is not extended by such repair or replacement Warranty claim procedure If you require service or parts for your grill please contact our Warranty Service Center for factory direct assistance Our hours of operation are 8 AM to 5 PM PST Our number is 1 800 913 8999 and our FAX number is ...

Отзывы: