background image


www.charltonandjenrick.co.uk 

31 

LT5878 (ISS 14) 


Содержание INFINITY 780 FL

Страница 1: ...dfuturereference For use in Great Britain and Ireland Literature NO 5878 ISS 14 IMPORTANT This appliance is guaranteed for 12 months subject to conditions The 5 year extended parts warranty will only be valid if the annual service recommended in this manual has been completed and appliance has been registered online ...

Страница 2: ... Scheme on the opposite page and ensure your installer has filled in the appropriate checklist This in no way reduces your statutory rights Your warranty commences from the date of purchase and you must retain your receipt or invoice as proof of a purchase date THIS EXTENDED WARRANTY SPECIFICALLY EXCLUDES GLASS AND SOFT REFRACTORY COMPONENTS THE BULB AND ANY BATTERIES Terms and Conditions 1 The ap...

Страница 3: ...ed to the customer who should on receipt write the Notification Number on the Benchmark Checklist This product should be serviced regularly to optimise its safety efficiency and performance The service engineer should complete the relevant Service Record on the Benchmark Checklist after each service The Benchmark Checklist will be required in the event of any warranty It is a requirement that the ...

Страница 4: ...4 LT5878 ISS 14 Installer information required to register for the extended warranty Name Date of installation Gas safe number ...

Страница 5: ...ed for cleaning the coals or cleaning after servicing installation it is recommended that it be of the type fitted with a HEPA filter Disposal of refractory ceramic materials To keep dust to a minimum these materials should be securely wrapped in polythene and be clearly labelled RCF waste These materials are not classified as hazardous waste and should be disposed of at a site licensed for the di...

Страница 6: ...ay be evident This is the starch binder used during the manufacture of the fibre components of the fire and there are no harmful effects produced During the normal operation of the fire some black staining may appear on some parts of the fuel bed This is quite normal and adds to the appearance of the appliance However if excessive black staining does occur it may be due to the fuel bed being incor...

Страница 7: ...urn on start up Pressing and holding displays an UNLOCK graphic Fig 2 prompting the button to be pressed simultaneously Whilst both are pressed a progress bar Fig 3 will complete If either button is released before the progress bar has completed the operation will cancel Once the progress bar has completed the handset will display the status of the fire priming ignition pilot main burner finishing...

Страница 8: ...ht Press to select Auto or Sleep Sleep Use the selector wheel to choose from the available time range of 5 minutes to 1 hour 30 minutes Once the desired countdown time has expired the appliance will turn off By pressing the button during the countdown will cancel the countdown timer if required Note The handset contains a sensitive temperature measurement device To achieve the best thermostatic ef...

Страница 9: ...the hours Press to change to minutes select Use the selector wheel to change the minutes Press the button to alternate hours and minutes to make any other alterations Finally press the button to save the clock setting Display Temperature display units use selector wheel to select either Celsius degree C or Fahrenheit degree F Press the button to save selection Gas fire pair code The device screen ...

Страница 10: ...sing the tool provided then pull clear and from the location studs Carefully lift the glass panel from within the bottom location slot Remove the log fuel bed shapes and bark shapes Lift out the air tray assembly from the location points within the shelf The pilot is located on the right hand side of the appliance any debris in or around the aeration hole should be remove using the nozzle of a vac...

Страница 11: ...OUR Fuel Bed Cleaning and Layout user instructions Before you clean any part of the appliance ensures that the appliance is turned off and cold Use only the fuel bed components provided and no additional parts must added Incorrect positioning of the fuel bed components could result in the staining of the glass panel Important Refer to the Health Safety Notice located on page 3 of this booklet befo...

Страница 12: ... air tray it is very IMPORTANT that it is seated correctly Ensure all liner securing tabs are bent correctly See below Failure to do this could stop the air tray from sitting flat and lead to operational issues Please make sure no loose shapes are placed directly on top of the pilot shield Please see figure above ...

Страница 13: ...ltonandjenrick co uk 13 LT5878 ISS 14 Place the small bark shapes as shown above Please note that vermiculite will be provided on LPG models Place the bark shapes around the edge of the air tray as shown above ...

Страница 14: ...14 LT5878 ISS 14 Place the 2 log shapes as shown above Place the 2 log shapes as shown above Place the 2 log shape as shown above ...

Страница 15: ...r from the lead and remove Remove the two screw retaining the gas connection cover from within the burner shelf and remove cover Shut down restrictor elbow and disconnect the 8mm inlet nut Undo the three fixing screws from the burner tray and lift out burner tray assembly taking care not to damage the liners Remove the six M4 nuts from the front face of the inner firebox Taking care not to damage ...

Страница 16: ...lug Input 100 240 VAC 50 60 Hz 0 2A Appliance Dimension NOTE The efficiency of this appliance has been measured as specified in BS7977 1 2009 A1 2013 and the result is 72 71 The gross calorific value of the fuel has been used for this efficiency calculation Gastec have certified the test data from which it has been calculated The efficiency value may be used in the UK Government s Standard Assessm...

Страница 17: ...eland The appliance must be installed by a competent person and installed in accordance with the current edition of I S 813 Domestic Gas Installation the current building regulations and the current ETCI rules for electrical installation if appropriate Prior to the installation ensure that the local distribution conditions identification of type of gas and pressure and adjustment of the appliance ...

Страница 18: ... ins minimum diameter flue liner conforming to BS 715 may be used Provided a suitable sealing plate is fitted to the base of the liner and the appliance does not restrict the opening into the liner Ensure a smooth lead into the flue way and no combustible materials are used A void of 50mm must be maintained from the top of the firebox to gather into flue PREPARING THE OPENING FOR STANDARD INSTALLA...

Страница 19: ...e liner using a suitable fixing at a height that clears the out fire box assembly Remove the inner box and top inspection cover as described in section five general points With the out fire box in place attach the gather hood to the fire box using the four fixing screws provided within the kit Re assemble in reverse order Clearance to Shelf Minimum clearance from hearth or base of opening to under...

Страница 20: ...ppliance installation instructions GAS SUPPLY ROUTING Use rigid or semi rigid tube to connect the supply Determine the gas supply pipe route to the appliance before installing the fire Fixing Firebox Assembly Slide the firebox into the fireplace open guiding the gas supply pipe through the hole at the rear LH bottom of the firebox Retain the Firebox using wall plugs and screw using the four holes ...

Страница 21: ...auge and replace the pressure test point screw Turn on the supply to the appliance and check the pressure test point for soundness with detection fluid Refit the gas connection cover Fit the air tray within the location with the burner shelf Construction of a false chimney breast front Using 50mm K D Sawn stud work will provide the required rebate The vertical sides of the stud work should not be ...

Страница 22: ...peration of Fire installation instructions REFIT GLASS PANEL AND FIREPLACE FRAME COVERS refer to section 3 CHECKING FOR COMBUSTION PRODUCTS CLEARENCE IMPORTANT The smoke test must be carried out with the fire starting from cold Light the fire and leave at maximum input Close all the doors and windows After five minutes fit the smoke match in a holder and position as illustrated with the head of th...

Страница 23: ...re batteries and glass removal tool SECTION ELEVEN Maintenance maintenance instructions GENERAL Servicing should be carried out annually by a competent person such as a Gas safe registered person in accordance with the relevant regulations to ensure the safe and correct operation of the appliance Before commencing any service or replacement of parts turn off the gas supply to the fire After servic...

Страница 24: ...ll to clean out holes Refer to the appliance data section for details Re assemble in reverse order REPLACEMENT OF OXY PILOT ASSEMBLY NOTE If the pilot assembly is replaced it must be replaced by an identical unit from the same manufacturer and replaced as a complete unit Follow the burner tray removal sequence Undo the compression nut on the supply pipe at the pilot Carefully pull off the ignition...

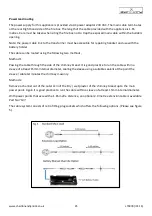
Страница 25: ...ing the following two methods Method 1 Passing the cable through the side of the chimney breast It is good practice to run the cable within a sleeve of at least 15mm internal diameter sealing the sleeve using a suitable sealant at the point the sleeve cable terminates the chimney masonry Method 2 Remove a channel out of the outer skin of the Dry wet plaster of the chimney breast up to the main pow...

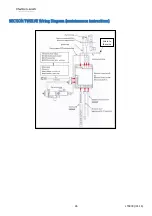
Страница 26: ...26 LT5878 ISS 14 SECTION TWELVE Wiring Diagram maintenance instructions Attach to the valve ...

Страница 27: ...www charltonandjenrick co uk 27 LT5878 ISS 14 Register your appliance online today to activate your warranty ...

Страница 28: ...ufacturer s instructions Hearth Requirements where fitted Is the hearth constructed from non combustible material Is the hearth a minimum of 12mm thick with a minimum floor to top surface of 50mm BS5871 or as per manufacturer s instructions Is the hearth for open fronted fires a minimum of 760mm wide and has 300mm projecting from the fire opening BS6871 or to manufacturer s instructions Mounting h...

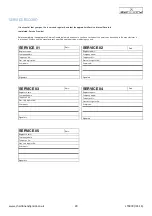
Страница 29: ...ays use the manufacturer s specified spare part when replacing controls SERVICE 01 Date Engineer name Company name Telephone No Gas safe register No Comments Signature SERVICE 02 Date Engineer name Company name Telephone No Gas safe register No Comments Signature SERVICE 03 Date Engineer name Company name Telephone No Gas safe register No Comments Signature SERVICE 04 Date Engineer name Company na...

Страница 30: ...30 LT5878 ISS 14 ...

Страница 31: ...www charltonandjenrick co uk 31 LT5878 ISS 14 ...

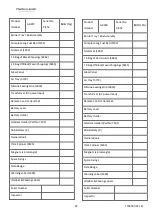
Страница 32: ...gnets x4 rectangle Spare Fixings Data Badge Warning Label 1409 ID Label Packing Labels Serial Number Inspector Product ID Label A 0339 Serial No Prefix MV LPG Burner Tray Box Assembly Complete Log Fuel Bed 5752 Grommet 1092 1 X Bag of Vermiculite 5880 1 X Bag Of Black Fawn Chippings 5855 Glass Panel Air Tray 5773 Silicone Sealing Strip 4818 Transformer AC power lead Remote Control Hand Set Battery...

Отзывы: