LT-CMPH-85
Page 3 of 4
Marking utensil
#6 ground wire or rod and earth ground materials
Bond straps
Any exterior cable strain relief, per company practice
Socket wrenches, slotted and Phillips screwdrivers
Assorted cable ties
Can wrench (216 tool)
Level
3.4
Preparing the Installation Site
Observe the following site preparation recommendations:
Leave adequate horizontal and vertical space between multiple installations to allow for proper cable access, as well as enough
room to remove dome.
The site must meet minimal personnel and equipment safety requirements.
The distance from the cable entry point should be consistent with local installation practices.
Run all cable facilities to the site.
3.5
Lifting the Enclosure
The enclosure is manufactured from HPDE with aluminum internal brackets. It is designed with a 2-section dome for reduced lifting
weight. In most instances, one individual should be able to lift and move the individual enclosure components at the job site.
3.6
Installing the Enclosure In-Ground
-NOTE-
When installed in-ground, confirm appropriate locate service has been completed before digging
.
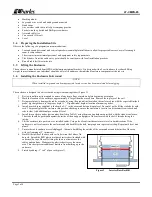
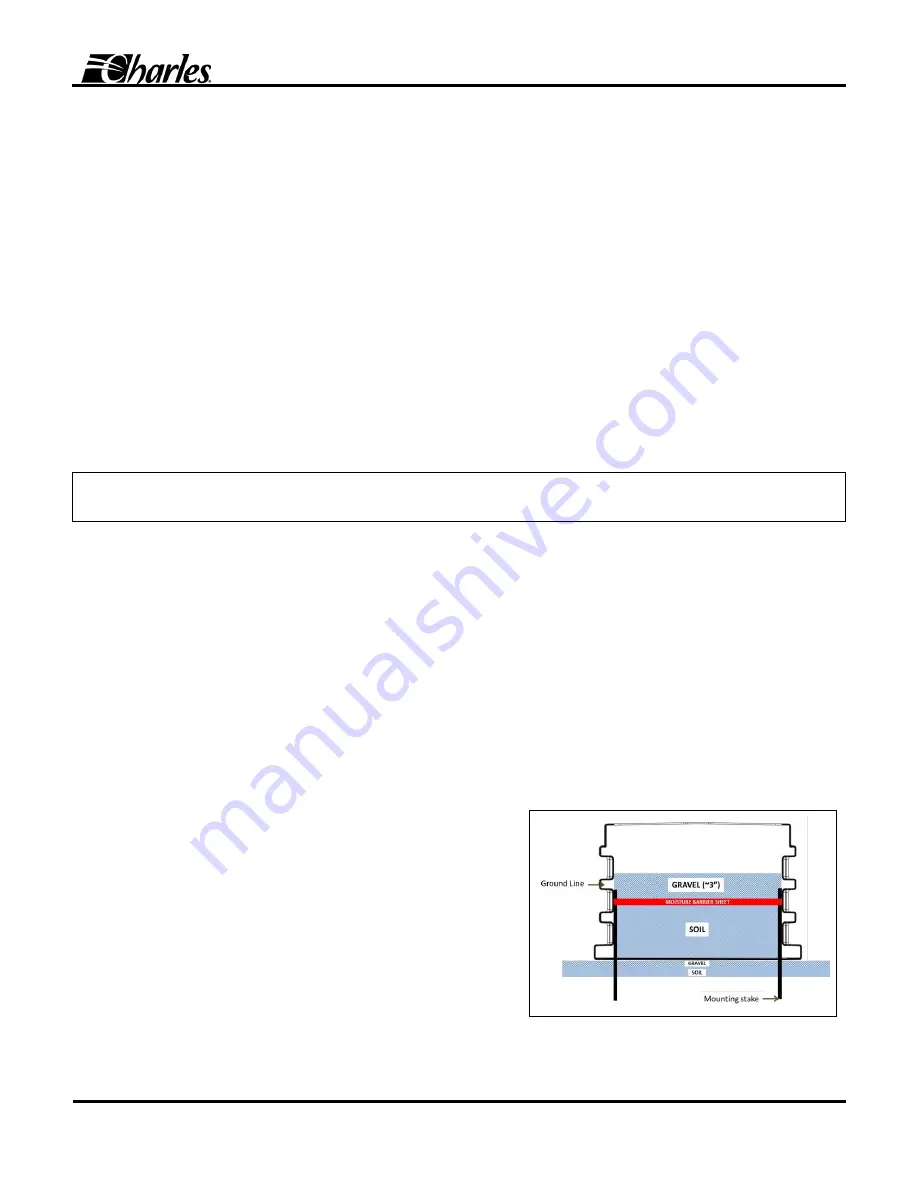
The enclosure is designed to be direct buried using two mounting stakes (Figure 3).
1.
Review installation site map and be aware of any locate flags or markers before beginning excavation.
2.
Mark the location of the enclosure, approximately 4” larger than the overall base. Remove the top layer of the soil.
3.
Being careful not to damage the cables or conduits, using the ground line located on the enclosure base with the expected finished
grade, dig straight down to the proper depth +1”. Dig additional depth at location of mounting stakes.
4.
Install pea rock (user supplied) to the depth of ~1” in the excavated hole and tamp level. Be careful not be fill the stake holes with
rock. Temporarily place the enclosure into position, checking to ensure the enclosure is level in two directions (front to back and
side to side). Add additional pea rock until level.
5.
Install two enclosure stakes (part number detailed in Table 2) using the mounting hardware provided with the stake or enclosure.
The stake should be positioned against the inside of the u-support uprights of the enclosure with the bolt’s threads facing the
inside.
6.
Lift the enclosure into position, over installed cables. Using a level, confirm the enclosure is level in both directions. If the
enclosure is not level, remove the enclosure and add backfill to the hole, tamping down to prevent settling. Repeat until level and
plumb.
7.
Ensure the cable conduits are sealed/plugged. Alternate backfilling the outside of the excavated area and the inside of the area
with soil, tamping at 2” increments.
8.
Backfill the inside of the base with soil to between the 2nd are 3rd
base rib. Spread the RED plastic moisture barrier sheet (included with
enclosure) on top of the soil, slitting the sheet to allow access for
cables and conduits. Make sure the plastic sheet covers the entire
area. This sheet prevents additional moisture from building up in the
enclosure.
9.
Finish by adding ~3” to 4” of pea rock (gravel).
Figure 3
Interior Base Backfill

