background image

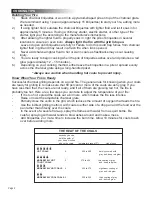
THE HEAT OF THE COALS

seconds you can 
hold the palm of 

your hand 4 inches 

above the coals

temperature range (Fº)

visual cues

HOT COALS

2

400 to 450

barely covered with 

gray ash; deep red glow

MODERATELY HOT

375 to 450

thin coating of gray

ash; deep red glow 

MODERATELY HOT COALS

4

325 to 375

significant coating of 

gray ash; red glow

MODERATELY COOL COALS

5

300 to 325

thick coating of gray 

ash; dull red glow

3

Building Your Fire

1.)

Stack charcoal briquettes or wood into a pyramid-shaped pile on top of the charcoal grate. 

We recommend using 1 pound (approximately 15 briquettes) to start your fire, adding more 
as needed.

2.)

If using lighter fluid, saturate the charcoal briquettes with lighter fluid and let it soak in for 

approximately 5 minutes. If using a chimney starter, electric starter, or other type of fire 
starter, light your fire according to the manufacturer's instructions.

3.)

After allowing the lighter fluid to properly soak in, light the pile of briquettes in several 

locations to ensure an even burn.


Always light the fire with the grill lid open.

Leave lid open until briquettes are fully lit. Failure to do this could trap fumes from charcoal 

lighter fluid in grill and may result in a flash fire when lid is opened.

4.)

Never add charcoal lighter fluid to hot or warm coals as flashbacks may occur causing 

injury.

5.)

You are ready to begin cooking when the pile of briquettes ashes over and produces a red 

glow (approximately 12 – 15 minutes). 

6.)

Depending on your cooking method, either leave the briquettes in a pile or spread evenly 

across the charcoal grate using a long-handled poker.

 *Always use caution when handling hot coals to prevent injury.

Know When Your Fire is Ready

Successful charcoal grilling depends on a good fire. The general rule for knowing when your coals 
are ready for grilling is to make sure that 80 percent or more of the coals are ashy gray. If you 
have less than that, the coals are not ready, and if all of them are glowing red hot, the fire is 
probably too hot. Here are a few steps you can take to adjust the temperature of your fire:
-

If it is too hot, spread the coals out a bit more, which makes the fire less intense.

-

Raise or lower the adjustable charcoal grate.

-

Partially close the vents in the grill, which reduces the amount of oxygen that feeds the fire.

-

Use the indirect grilling method, with coals to either side of a drip pan and the food over the 

pan rather than directly over the coals.

-

In the event of a severe flare-up, spray the flames with water from a squirt bottle. Be 

careful, spraying with water tends to blow ashes around and make a mess. 

-

Add briquettes 2 or 3 at a time to increase the burn time. Allow 10 minutes for coals to ash 

over before adding more. 

COOKING TIPS

TO HOT COALS

Page 4

Содержание 11301678

Страница 1: ...Fill out the product record information below American Gourmet 300 Series The following are trademarks registered by W C Bradley Co in the U S Patent and Trademark Office Caldera Charcoal2Go Char Broil American Gourmet Bandera Brush Hawg CB 940 Char Diamonds Char Broil Charcoal Gas Everybody Grills Grill 2 Go Grill 2 Go Express Grill Lovers Infrared Grilling That sAllAbout U Keepers of the Flame M...

Страница 2: ... products produced when using this product contains chemicals known to the State of California to cause cancer birth defects or other reproductive harm 2 This product contains chemicals including lead and lead compounds known to the State of California to cause cancer birth defects or other reproductive harm Wash your hands after handling this product WARNING All surfaces can be hot during use Use...

Страница 3: ...commended however wood or a combination of both may be used as the fuel source for grilling with the fuel source placed and ignited on the ash pan Do not build too large of a fire We recommend starting a fire with no more than 1 pound of charcoal approximately 15 briquettes and adding more as needed during cooking After allowing the fire to burn down place the cooking grate on the unit Failure to ...

Страница 4: ...hot or warm coals as flashbacks may occur causing injury 5 You are ready to begin cooking when the pile of briquettes ashes over and produces a red glow approximately 12 15 minutes 6 Depending on your cooking method either leave the briquettes in a pile or spread evenly across the charcoal grate using a long handled poker Always use caution when handling hot coals to prevent injury Know When Your ...

Страница 5: ...er the drip pan This injects a little extra moisture into the cooking environment and also catches dripping juices which makes clean up a little easier and reduces the possibility of flare ups Remember to keep a spray bottle filled with water on hand to extinguish any flare ups Once you get used to the indirect method you may prefer to use it for more grilling tasks Although it may take a little l...

Страница 6: ...ailure or damage resulting from acts of God improper care and maintenance grease fire accident alteration replacement of parts by anyone other than Manufacturer misuse transportation commercial use abuse hostile environments inclement weather acts of nature animal tampering improper installation or installation not in accordance with local codes or printed manufacturer instructions THIS LIMITED WA...

Страница 7: ...RONT E 1 TEMPERATURE GAUGE P 2 UPPER LEG SUPPORT F 1 FIREBOX Q 2 SIDE BRACE CART G 1 GREASE TRAY R 1 RIGHT LEG FRONT H 2 GREASE TRAY BRACKET S 2 LEFT LEG I 1 CHARCOAL GRATE T 1 BOTTOM SHELF J 2 CHARCOAL GRATE HANGER U 1 AXLE ROD K 2 COOKING GRATE V 2 WHEEL W 1 RIGHT LEG REAR 1 HARDWARE PACK 1 ASSEMBLY GUIDE ENGLISH 1 ASSEMBLY GUIDE FRENCH NOT Pictured A B E C D F G H H I J J K K L L M N O P Q Q P ...

Страница 8: ...sembly To begin assembly locate the four leg tubes The Right Front Leg Tube and Right Rear Leg Tube will have an RF and RR sticker on them Insert the Bottom Shelf wireform tabs into each leg as shown in Figure A Stand the assembly up as shown below Attach Cart Side Braces to the outside of the leg assemblies using 4 each 1 4 20x3 4 screws per side Insert Bottom Shelf wireform into each leg Figure ...

Страница 9: ...le Rod through both RH leg Tubes Install the remaining Wheel Axle Washer and Cotter Pin Attach the Upper Leg Supports to the cart assembly by slipping the ends of the tubes into the ends of the legs Secure the Upper Leg Supports with 4 each 1 4 20x3 4 Machine Screws 1 4 20x3 4 Machine screw Qty 4 Upper Leg Support 1 4 20x3 4 Machine Screw Axle Washer Wheel Cotter Pin Axle Rod Cotter Pin Axle Washe...

Страница 10: ...4 20 Flange nuts Tighten securely Page 10 1 4 20 Flange Nut Qty 4 1 4 20x1 3 4 Machine Screw Qty 4 1 4 20x3 4 Machine screw Qty 4 Install the Grease Tray Brackets onto the bottom of the firebox using 2 1 4 20x3 4 Machine Screws per bracket Once the Grease Tray Brackets are installed slide the Grease Tray onto the Grease Tray Brackets Grease Tray Shown Installed Grease Tray Bracket 1 4 20x3 4 Machi...

Страница 11: ...ce the Damper Wheel onto the screw from inside the firebox making sure the tab sticks out through the damper holes Install the reversible Lock Nut onto the screw Do not over tighten the nut The Damper Wheel must be able to rotate freely 1 4 20x1 Machine Screw 1 4 20x1 Machine Screw Qty 4 Side Shelf 1 4 20x3 4 Machine Screw Reversible Lock nut Damper Wheel 1 4 20 Reversible Lock Nut Qty 1 1 4 20x3 ...

Страница 12: ...hen insert the shaft of the gauge into the lid and reinstall the wingnut from inside the Grill Lid Assemble the Lid Handle to the Grill Lid by inserting 2 each 1 4 20x3 4 Machine Screw through the handle and then through the lid secure with 2 each 1 4 20 Flange Nuts from inside the Grill Lid 1 4 20 Flange Nut Qty 2 1 4 20x3 4 Machine screw Damper Wheel 1 4 20 Reversible Lock Nut 1 4 20x3 4 Machine...

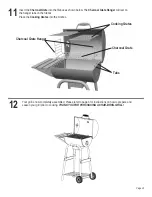
Страница 13: ...n the hanger tabs on the firebox Place the Cooking Grates into the Firebox Your grill is now completely assembled Please refer to page 3 for instructions on how to prepare and season your grill prior to cooking THANK YOU FOR PURCHASING A CHAR BROIL GRILL Charcoal Grate Hanger Cooking Grates Charcoal Grate Tabs ...

Страница 14: ...ST Page 14 1 4 20 Reversible Lock Nut Qty 2 1 4 20 Flange Nut Qty 6 1 4 20x1 3 4 Machine Screw Qty 4 1 4 20x1 Machine Screw Qty 4 Axle Washer Qty 2 1 4 20x3 4 Machine screw Qty 20 Cotter Pin Qty 4 Hinge Pin Qty 2 ...

Страница 15: ......

Страница 16: ...REGTEMP REV02 Warranty Registration Department P O Box 1240 Columbus GA 31902 1240 ...

Отзывы: