background image

4E

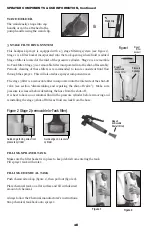
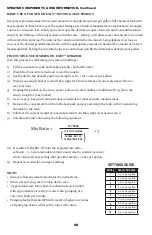
FILLING SPRAYER TANK
Make sure the filter basket is in place to keep debris from entering the tank. 

Fill sprayer tank with water.

SPRAYER COMPONENTS & USE INFORMATION, Continued

Stage 3 

(removable 

Shut-off filter)

Figure 1

Stage 1

(Filter

basket)

3 STAGE FILTERING SYSTEM

Stage 2

(Removable

In-Tank Filter

Pressure 

Cylinder

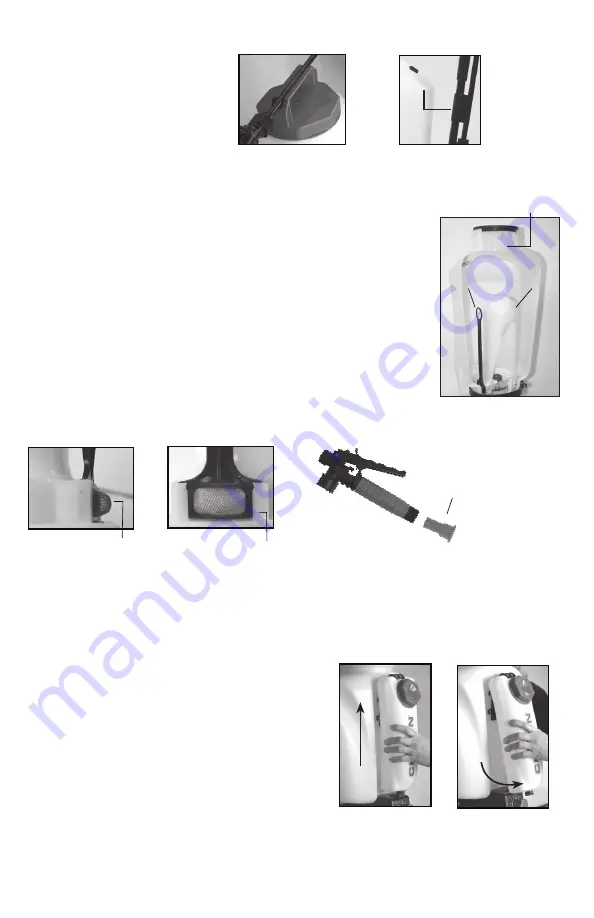
This backpack sprayer is equipped with a 3 stage filtering system (see figure 1). 
Stage 1 is a filter basket incorporated into the tank opening where fluid is added.  
Stage 2 filter is located at the inlet of the pressure cylinder.  Stage 2 is a removable 
In-Tank filter. Stage 3 is a removable filter incorporated into the shut-off assembly. 
Periodic cleaning of these filters is recommended to insure consistent fluid flow 
through the sprayer.  This will also reduce sprayer component wear.                    

The stage 3 filter is a removable filter incorporated into the inlet side of the shut-off 
valve (see section “disassembling and repairing the shut-off valve”).  Make sure 
pressure is released before detaching the hose from the shut-off.  
It is best to have no or minimal fluid in the pressure cylinder before removing and 
reinstalling the stage 3 shut-off filter as fluid can leak from the hose.   

Figure 2 Stage 2 (removable In-Tank filter)

Guide edge facing away from 

pressure cylinder

Guide edge on pressure 

cylinder

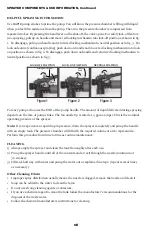
WAND HOLDER
The wand easily snaps into cap 

handle or can be attached to the 

pump handle using the wand clip.

Wand Clip

Or

FILLING CHEMICAL TANK

Push chemical tank up (figure 1), then pull out (figure 2).

Place chemical tank on a flat surface and fill with desired 

amount of chemical. 

Always follow the Chemical manufacturer’s instructions. 
Snap chemical tank back onto sprayer.

Figure 2

Figure 1

Содержание MIXES 63950

Страница 1: ...nstructions Before Use WARNING DO NOT RETURN THIS SPRAYER TO STORE Call 1 800 950 4458 www chapinmfg com Chapin International Inc P O Box 549 700 Ellicott St Batavia NY 14021 0549 U S A 1 800 950 4458 www chapinmfg com BACKPACK SPRAYER Use and Care Manual ...

Страница 2: ...s only with manufacturer s original parts Never spray flammable caustic acidic chlorine bleach or other corrosive solutions or heat pressure or gas producing chemicals Always read and follow chemical manufacturer s instructions before use with this sprayer as some chemicals may be hazardous when used with this sprayer SK 1158 1 PRE USE CHECK Before each use check tightness of hose nut to be sure h...

Страница 3: ...ter do not exceed 120 F 49 C or nontoxic household cleaning chemicals for carpets floors walls glass counter tops and ceilings DO NOT use sprayer that has been used with herbicides pesticides or other toxic chemicals for household applications General Outdoor Use Use the sprayer for cleaning windows or with a detergent for general purpose cleaning SPRAYER COMPONENTS USE INFORMATION NOZZLE ASSEMBLY ...

Страница 4: ...to bolts There are holes in the pump handle to allow for either left fig 2 4 or right fig 5 hand mounting The backpack strap is provided with multiple features including shoulder strap chest strap waist belt and lumbar support figure 1 The top the shoulder strap is attached to the top of the tank and is removable figure 2 The hook from the lumbar support attaches to the base tube on the bottom of ...

Страница 5: ... sprayer This will also reduce sprayer component wear The stage 3 filter is a removable filter incorporated into the inlet side of the shut off valve see section disassembling and repairing the shut off valve Make sure pressure is released before detaching the hose from the shut off It is best to have no or minimal fluid in the pressure cylinder before removing and reinstalling the stage 3 shut of...

Страница 6: ...ucket on the scale spray 1 gallon of water adding an additional 8 34 lbs to the empty weight of your bucket 6 As you spray keep your pump strokes consistent for most accurate measurement 7 Remove the concentrate tank from the backpack sprayer and weigh the tank with it s remaining chemical in the tank 8 Subtract the current weight of concentrate tank from the weight recorded in step 2 9 Calculate ...

Страница 7: ...ND of the pump handle The amount of liquid delivered during spraying depends on the rate of pump stroke The fan nozzle tip is rated at 4 gpm at 40psi This is the nominal operating pressure of the sprayer Note If you experience a rapid drop in pressure drain the sprayer completely and pump the handle with an empty tank The pressure chamber will fill with the required volume of air to repressurize Pe...

Страница 8: ...der Replace Piston Cylinder Damaged Piston Replace Piston Shut off leaks Connections loose Tighten connection Worn or damaged shut off Rebuild or replace the shut off valve Wand assembly leaks Connections loose Tighten connection Damaged or worn o ring gasket Replace o ring gasket Nozzle assembly leaks Connections loose Tighten connection Damaged or worn o ring gasket Replace o ring gasket Leak be...

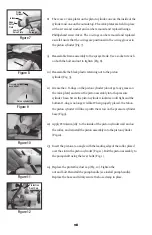
Страница 9: ...n out of the piston cylinder C 3 Remove the 2 bolts that hold the frame assembly to the sprayer tank Fig 2 Use a socket wrench on both the bolt and nut to loosen Fig 2 Once these bolts are removed the frame assembly should separate from the tank 4 With a pair of pliers reach into the pump cylinder to loosen the black plastic retaining nut Fig 3 to remove the detach the hose 5 Remove the piston cyl...

Страница 10: ...ston assembly into the pressure cylinder base Screw the piston cylinder clockwise until tight and the bottom O ring is no longer visible When properly placed the tab on the piston cylinder will line up with the arrow on the pressure cylinder base Fig 9 12 Apply Petroleum jelly to the inside of the piston cylinder wall and on the collar and reinstall the piston assembly into the piston cylinder Fig...

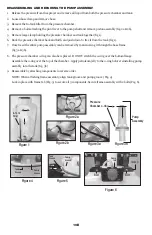
Страница 11: ...d push down to free it from the tank fig 1 7 Once freed the entire pump assembly can be removed by maneuvering it through the base frame fig 3a 3b 8 The pressure chamber o ring can also be replaced DO NOT stretch the o ring over the bottom flange Assemble the o ring over the top of the chamber Apply petroleum jelly to the o ring before reinstalling pump asembly into the tank fig 3b 9 Reassemble by...

Страница 12: ...he O rings and reassemble by reversing the steps above Place the handle groove in the slotted area of the valve stem and make sure the locking clip is positioned in the neutral position see Helpful Spraying Information section Insert the retaining pin Push down on the handle a few times to distribute the lubricant evenly Check filter C in end of shut off valve for debris Remove filter and flush wi...

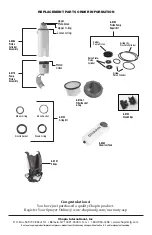
Страница 13: ... 6 8093 Poly Adjustable Nozzle Retaining Nut Nozzle gasket Elbow with o ring 6 8148 Nozzle Kit O ring Screw Cap 6 8105 Hose Assembly Hose Washer Retaining Nut Hose 6 8120B Shut off Valve Repair Kit 6 8138 Shut off Assembly 6 8169 Filter Replacement Kit 6 8219 Wand Assembly Wand 6 8150 Wand Clip ...

Страница 14: ...ifications may change without notice U S and foreign patents pending REPLACEMENT PARTS ORDER INFORMATION 6 8064 Piston Cylinder Assembly 6 8179 Pump Piston Assembly Upper Plate Valve Upper O ring Lower O ring Piston Collar 6 8180 Piston Pump Repair Kit 6 8146 1 Filter Basket Cap Collar Pump Piston Valve Plate Piston Cylinder O ring 2 Pressure Cylinder O ring Piston Cylinder 6 8153 O ring Kit Elbow...

Страница 15: ...s de utilizarlo NO DEVOLVER ESTE PULVERIZADOR A LA TIENDA LLAMAR AL 1 800 950 4458 www chapinmfg com ADVERTENCIA Chapin International Inc P O Box 549 700 Ellicott St Batavia NY 14021 0549 U S A 1 800 950 4458 www chapinmfg com PULVERIZADOR DE MOCHILA Manual de uso y cuidado ...

Страница 16: ...ticas ácidas con cloro con lejía u otras soluciones corrosivas o químicos que produzcan calor presión o gas Siempre lea y siga las instrucciones del fabricante del producto químico antes de usarlo con este pulverizador ya que algunos productos químicos pueden ser peligrosos cuando se usan con este pulverizador SK 1158 3 ADVERTENCIA PRECAUCIÓN REVISIÓN PREVIA AL USO Revise que la tuerca de la mangu...

Страница 17: ... o químicos limpiadores para el hogar no tóxicos en alfombras pisos paredes vidrio encimeras y techos NO utilice el pulverizador que se utilizó con herbicidas pesticidas u otros químicos tóxicos para aplicaciones en el hogar Uso general en exteriores utilice el pulverizador para limpiar ventanas o para aplicar algún detergente para propósitos de limpieza general INFORMACIÓN DE LOS COMPONENTES Y US...

Страница 18: ...o Figure 4 Apriete las tuercas a los pernos Perno con rosca Contratuerca de nylon Manija de la bomba Eje de la bomba Ensamblaje completo La correa de la mochila viene con varios accesorios entre ellos la correa para hombros la correa de pecho el cinturón el apoyo lumbar y la almohadilla para la espalda figura 1 La parte superior de la correa para hombros está sujeta a la parte superior del tanque ...

Страница 19: ...na cantidad mínima o nada de líquido en el cilindro de presión antes de retirar y reinstalar el filtro de cierre de la etapa 3 ya que el líquido podría gotear por la manguera SISTEMA DE FILTRACIÓN EN 3 ETAPAS Figura 2 Etapa 2 varilla de filtro desmontable El borde de la guía está mirando hacia afuera del cilindro de presión El borde de la guía está en el cilindro de presión Etapa 3 Filtro de cierr...

Страница 20: ...ción de tara 5 Dejando el cubo en la báscula pulverice 1 galón de agua sumando 8 34 libras adicionales al peso vacío de su cubo 6 Mientras pulveriza mueva la bomba de manera uniforme para que la medición sea más precisa 7 Quite el tanque de concentrado del pulverizador de mochila y pese el tanque con la sustancia química restante en el tanque 8 Reste el peso actual del tanque de concentrado del pe...

Страница 21: ...uido expulsado durante la pulverización depende de la frecuencia de bombeo La extremidad de boca de ventilador es clasifica da en 4 gpm en 40psi Ésta es la presión de funcionamiento nominal del rociador Nota Si experimenta una pérdida rápida de presión vacíe el pulverizador por completo y bombee la manija con el tanque vacío La cámara de presión se llenará con el volumen de aire necesario para vol...

Страница 22: ...Reemplace el cilindro de pistón Fugas en la unidad de cierre Conexiones sueltas Ajuste la conexión Unidad de cierre desgastada o dañada Reconstruya o reemplace la válvula de cierre Fugas en el montaje de la varilla Conexiones sueltas Ajuste la conexión Anillo O junta dañada o desgastada Reemplace el anillo O la junta Fugas en el montaje de la boquilla Conexiones sueltas Ajuste la conexión Anillo O...

Страница 23: ...an el conjunto de la estructura al tanque del pulverizador Fig 2 Utilice una llave de dado tanto en el perno como en la tuerca para aflojar Fig 2 Una vez que se hayan retirado estos pernos el conjunto de la estructura debe separarse del tanque 4 Con un par de pinzas introduzca la mano en el cilindro de la bomba para aflojar la tuerca de retención de plástico negro Fig 3 para retirar la manguera 5 ...

Страница 24: ... la base del cilindro de presión Atornille el cilindro del pistón en el sentido de las manecillas del reloj hasta que apriete y ya no se vea el anillo O en el fondo Cuando se coloca de manera apropiada la pestaña en el cilindro del pistón quedará alineada con el pestillo de la base del cilindro de pistón Fig 9 12 Aplique jalea de petróleo en la pared interna del cilindro de pistón y en el collarín...

Страница 25: ...as 3a y 3b 8 El anillo O de la cámara de presión también se puede cambiar NO estire el anillo O sobre la pestaña inferior Monte el anillo O sobre la parte superior de la cámara Aplique vaselina al anillo O antes de reinstalar el montaje de la bomba en el tanque Figura 3b 9 Vuelva a instalar colocando los componentes en orden inverso NOTA Al acoplar el conjunto de la estructura alinee la ranura del...

Страница 26: ...las partes desgastadas Lubrique los anillos O y vuelva a armar siguiendo los pasos anteriores pero a la inversa Coloque la hendidura de la manija en el área ranurada del vástago de la válvula y asegúrese de que el broche sujetador esté en la posición correcta consulte la sección Información útil acerca de la pulverización Inserte la clavija de retención Presione la manija hacia abajo varias veces ...

Страница 27: ...9 Ensamlbaje de la varilla Varilla pulverizadora Anillo o Tapa roscada 6 8105 Montaje de la manguera Arandela de manguera Tuerca de retensión Manguera 6 8120B Kit de reparación de la válvula de cierre 6 8138 Unidad de cierre Tuerca de retención Junta de la boquilla Codo con anillo O 6 8148 Kit de boquilla 6 8169 Kit de reemplazo de filtro 6 8150 Sujetador para varilla ...

Страница 28: ...aíses INFORMACIÓN DE PEDIDO DE PARTES DE REPUESTO 6 8064 Ensamblaje del cilindro de pistón 6 8179 Ensamblaje del cilindro de pistón Placa superior de válvula Anillo O superior Anillo O inferior Collarín del pistón 6 8180 Kit de reparación de la bomba de pistón 6 8146 1 Tapón y canastilla del filtro Pistón del collar de la bomba Placa de válvula Cilindro de pistón Anillo O Cámara de presión Cilindr...

Страница 29: ...utilisation NE PAS RETOURNER CE PULVÉRISATEUR AU MAGASIN APPELER 1 800 950 4458 www chapinmfg com AVERTISSEMENT Chapin International Inc P O Box 549 700 Ellicott St Batavia NY 14021 0549 U S A 1 800 950 4458 www chapinmfg com PULVÉRISATEUR À DOS Manuel d utilisation et d entretien ...

Страница 30: ...ment avec des pièces originales du fabricant Ne jamais pulvériser de matériaux inflammables caustiques acides chlore eau de javel ou autres solutions corrosives ou chaleur pression ou produits chimiques produisant du gaz Toujours lire et suivre les instructions du fabricant de produits chimiques avant d utiliser ce pulvérisateur car certains produits chimiques peuvent être dangereux lorsqu ils son...

Страница 31: ...des solutions de nettoyage de l eau chaude sans dépasser 49 C 120 F ou des produits chimiques de nettoyage résidentiel non toxique pour les tapis les planchers les murs le verre les comptoirs et les plafonds N utilisez PAS de pulvérisateur utilisé avec des herbicides des pesticides ou autres produits chimiques toxiques pour les applications résidentielles Utilisation extérieure générale utilisez l...

Страница 32: ...ez les écrous aux boulons Boulon fileté Écrou autobloquant en nylon Poignée de la pompe Arbre de pompe Assemblage terminé La bandoulière du sac à dos est doté de plusieurs caractéristiques incluant bretelle des épaules bretelle pectorale ceinture et support lombaire figure 1 Le haut de la bretelle des épaules est attaché au dessus du réservoir et est amovible figure 2 La sangle du support lombaire...

Страница 33: ...on est retirée avant d enlever le boyau du robinet Il est préférable d avoir peu ou aucun fluide dans le cylindre de pression avant de retirer et de réinstaller le filtre d arrêt de l étape 3 car le fluide pourrait couler du boyau Étape 3 filtre d arrêt Figure 2 Étape 2 tube à filtre amovible Bord guide face au côté opposé du cylindre de pression Bord guide face sur le cylindre de pression REMPLIR...

Страница 34: ...ure si votre balance n a pas de fonction de tarage 5 Gardez le seau sur la balance pulvérisez 1 gallon d eau en ajoutant 3 79 kg 8 34 lbs supplémentaire au poids vide de votre seau 6 Lorsque vous pulvérisez assurez vous que vos coups de pompe sont constants pour obtenir une mesure exacte 7 Retirez le réservoir de concentré du pulvérisateur dorsal et pesez le réservoir avec son produit chimique res...

Страница 35: ...ite Pour faciliter le pompage utilisez l EXTRÉMITÉ de la poignée de la pompe La quantité de liquide livré par la pulvérisation dépend du rythme des mouvements de pompage L embout de gicleur de ventilateur est évalué à 4 gal mn à 40psi C est la pression de fonctionnement nominale du pulvérisateur Remarque si vous voyez une chute de pression rapide drainez entièrement le pulvérisateur et actionnez l...

Страница 36: ...errées Resserrez les connexions Robinet d arrêt endommagé ou usé Reconstruisez ou remplacez le robinet d arrêt Assemblage de tube fuit Connexions desserrées Resserrez les connexions Joint torique joint d étanchéité endommagé ou usé Remplacez le joint torique joint d étanchéité Assemblage de la buse fuit Connexions desserrées Resserrez les connexions Joint torique joint d étanchéité endommagé ou us...

Страница 37: ...aintiennent l assemblage du cadre au réservoir du pulvérisateur Fig 2 Utilisez une clé à douille sur le boulon et l écrou pour les desserrer Fig 2 Une fois ces boulons retirés l assemblage du cadre devrait se séparer du réservoir 4 Avec une paire de pinces multiprises saisissez le cylindre de la pompe pour desserrer l écrou de retenue en plastique noir Fig 3 afin de retirer le tuyau détaché 5 Reti...

Страница 38: ...lage du piston sur la base du cylindre de pression Vissez le cylindre du piston dans le sens horaire jusqu à ce qu il soit serré et que le joint torique inférieur ne soit plus visible Lorsqu il est bien placé la languette du cylindre du piston s alignera avec la rainure sur la base du cylindre de pression Fig 9 12 Appliquez un peu de pétrolatum à l intérieur de la paroi du cylindre du piston et su...

Страница 39: ...assemblage de la pompe peut Ítre retiré en le faisant passer à travers l armature de base fig 3a et 3b 8 Le joint torique de la chambre de pression peut aussi être remplacé N étirez PAS le joint torique sur le rebord inférieur Assemblez le joint torique sur le dessus de la chambre Appliquez du pétrolatum sur le joint torique avant de réinstaller l assemblage de la chambre de pompe dans la cuve fig...

Страница 40: ...ez les pièces usées Lubrifiez les joints toriques et remontez en inversant les Ètapes precedentes Placez la rainure de la poignee dans l endroit à fentes de la tige de la soupape et assurez vous que la pince de verrouillage soit bien placee voir la section Information utile sur la pulvérisation Insérez la cheville de retenue Enfoncez la poignée et dégagez la quelques fois pour répartir la graisse ...

Страница 41: ...blocage Buse joint d étanchéite Coude avec joint torique 6 8148 Trousse de buse 6 8219 Assemblage de tube Tube Joint torique Bouchon vissé 6 8105 Assemblage du boyau Rondelle du boyau Écrou de blocage Boyau 6 8120B Trousse de réparation de robinet d arrêt 6 8138 Assemblage d arrêt 6 8169 Trousse de remplacement 6 8150 Pinces du tube ...

Страница 42: ...ers en instance INFORMATION DE COMMANDE DE PIÈCES DE RECHANGE 6 8064 Assemblage du cylindre de piston 6 8179 Assemblage du piston à pompe Plaque porte soupape Joint torique supérieur Joint torique inférieur Collier de piston 6 8180 Trousse de réparation de pompe à piston Collier pompe à piston Plaque porte soupape cylindre du piston Joint torique chambre de pression Joint torique cylindre du pisto...

Страница 43: ...Chapin International Inc P O Box 549 700 Ellicot St Batavia NY 14021 0549 U S A 1 800 950 4458 www chapinmfg com ...

Страница 44: ...Chapin International Inc P O Box 549 700 Ellicot St Batavia NY 14021 0549 U S A 1 800 950 4458 www chapinmfg com ...

Отзывы: