background image


34.


PITCH BEND + 

Allows small adjustments in the tempo/pitch, this button is usually used to allow seamless mixing. 
You can use this button to temporarily increase the pitch and tempo of the music. 

35.


EFX SEL 

Pressing this will allow you to scroll through the software effects. 

36.


PARAMETER 2 

Use this to adjust the parameters of the selected effect.  Use this with the "shift" button (22.) to 
adjust the filter effect. 

37.


SYNC 

Pressing this button will automatically synchronize the BPM of the song to the same BPM of the  

track playing on the other deck. 

38.


SET CUE 

This button will set the cue at the desired location. It will also return the audio to the last set cue  
position. Holding this button will also allow the user to preview the cue point until the button is  

released. 

39.


CUE PLAY 

Will return the track to the last set cue position and play the track. 

40.


PLAY/PAUSE 

This allows the user to play or pause the track. 
 

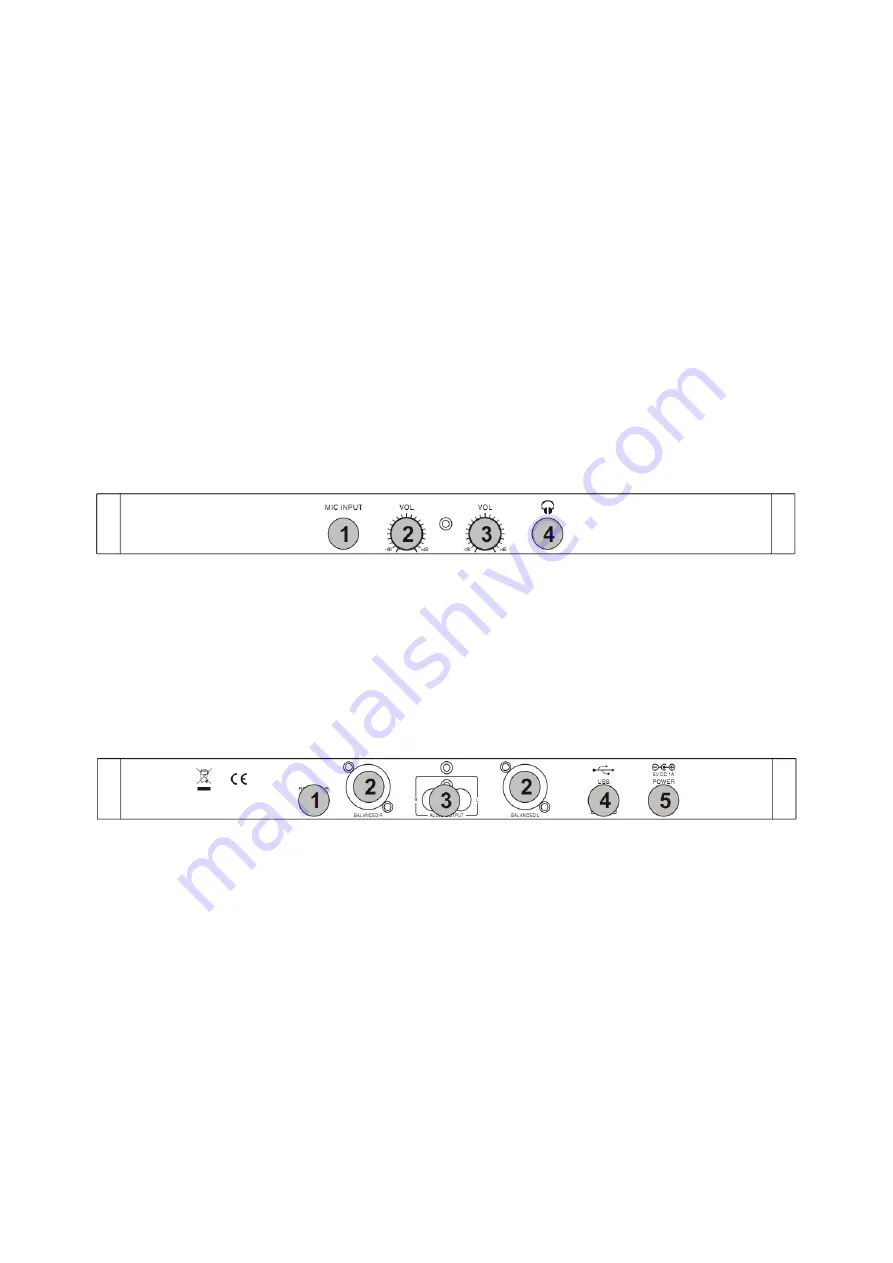
Front Panel 


1.


MIC INPUT 

Input for microphone with a 1/4" connector. 

2.


MIC VOLUME 

Adjusts the microphone level. 

3.


HEADPHONE VOL 

Adjusts the headphone level. 

4.


HEADPHONE OUTPUT 

Output for headphone with a 1/4" connector. 

Rear Panel 


1.


RCA/XLR SWITCH 

Switches the output of the soundcard to either RCA or XLR. 
NOTE: It is not possible to use both RCA & XLR at the same time. 

2.


XLR OUTPUTS 

Connect output cable (XLR female) from here to amplifier or powered speakers. 

3.


RCA OUTPUT 

Connect output cable from here to amplifier or powered speakers. 

4.


USB 

USB connection for use with B Type connector - please be sure to use the USB 2.0 cable that came 
with this unit. (Please note, if you are using a USB hub, please ensure it is a powered hub as if not  

you may experience latency problems) 

5.


POWER 

Input for optional power adaptor ( DC 5V 500mA ~ 1000mA ). 


Содержание 10006364

Страница 1: ...Resident DJ Kontrol 3 10006364...

Страница 2: ...lesen Sie die folgenden Anschluss und Anwendungshinweise sorgf ltig durch und befolgen Sie diese um m glichen technischen Sch den vorzubeugen Lieferumfang 1 USB MIDI Mischpult 2 VIRTUALDJ LE Software...

Страница 3: ...CD ein Das Setup startet automatisch 3 Befolgen Sie die nun angezeigten Anweisungen Geben Sie den Lizenzcode der sich auf der CD H lle befindet ein 4 Nach Eingabe des Lizenzcodes erscheint der Kontrol...

Страница 4: ...F r Mac Benutzer W hlen Sie die interne Soundcard Siehe unten F r PC Benutzer W hlen Sie das Mischpult als Soundcard Siehe unten...

Страница 5: ...Hintergrundbeleuchtung 17 Drehregler inkl 1x Titelwahl und 6x Abschalten 51 Druckkn pfe viele mit LED Hintergrundbeleuchtung 5 Schieberegler 1 Schalter 2 sehr ber hrungsempfindliche Felder zur schnel...

Страница 6: ...echts der Software ausgew hlten Titel 4 BACK Einen Order in der Titelauswahl zur ck 5 GAIN Lautst rke des gew hlten Kanals einstellen 6 HIGH H hen des gew hlten Kanals einstellen 7 MID Mitten des gew...

Страница 7: ...weitere Funktionen zu nutzen 23 HOT CUE 1 Dr cken Sie diese Taste an einer beliebigen Stelle des Titels um diesen Punkt zu speichern Dr cken Sie die Taste erneut um diese Stelle erneut aufzurufen 24 H...

Страница 8: ...ch und XLR ist nicht m glich 2 XLR Ausg nge Hier k nnen Sie einen Verst rker oder aktive Lautsprecher anschlie en 3 Cinch Ausgang Hier k nnen Sie einen Verst rker oder aktive Lautsprecher anschlie en...

Страница 9: ...us Behandeln Sie das Produkt sorgf ltig Es kann durch St e Schl ge oder den Fall aus bereits geringer H he besch digt werden Halten Sie das Produkt fern von Feuchtigkeit und extremer Hitze ACHTUNG Es...

Страница 10: ...r dem Totalausfall Das Ger t sollte vor jeglichen Feuchtigkeit und direkter Sonneneinstrahlung gesch tzt werden Das Ger t bitte nicht mit Reinigungsmitteln reinigen Verwenden Sie zur Reinigung nur ein...

Страница 11: ...In the box 1 USB MIDI controller 2 VIRTUALDJ LE Software CD ROM License code 3 USB cable Wiring the system Please see the suggested connection diagram below Active Speaker Amplifier...

Страница 12: ...automatically 3 Follow the on screen instructions to install the VIRTUALDJ Program Enter the System Serial Number which can be found on the CD cover to activate the program 4 After entering the Serial...

Страница 13: ...For Mac User Select Mac Built In Soundcard please refer to the setting below For PC User Select Controller Soundcard please refer to the setting below...

Страница 14: ...es 2 touch sensitive ultra precise jog wheels LED backlight 17 rotary knobs incl 1 track select push 6 kill push 51 push buttons many featuring LED back lighting 5 faders 1 switch 2 needle drop touch...

Страница 15: ...GH Rotate this knob to increase decrease the high band frequencies of the corresponding channel 7 MID Rotate this knob to increase decrease the middle band frequencies of the corresponding channel 8 L...

Страница 16: ...e pad that allows you to search through the music or jump to a specific location NOTE When the LED flashes it s an indication that the track is coming to the end 22 DELETE SHIFT Use this button to del...

Страница 17: ...9 CUE PLAY Will return the track to the last set cue position and play the track 40 PLAY PAUSE This allows the user to play or pause the track Front Panel 1 MIC INPUT Input for microphone with a 1 4 c...

Страница 18: ...RAM 200MB free on the hard drive Mac Minimum system requirements Intel Processor Mac OS X v10 5 1024x768 resolution CoreAudio compatible soundcard 1024MB RAM 50MB free on the hard drive Recommended sy...

Отзывы: