background image

Chapter 3     


23 

Chapter 3  BIOS Setup Program 

Phoenix-Award BIOS ROM has a built-in setup program that allows users to modify 
the basic system configuration. This information is stored in CMOS RAM so that it 
can retain the setup information, even when the power is turned off. 
To enter the 

Phoenix-Award BIOS

 setup program press the [

Delete key

] when you 

Power on

 or 

reboot

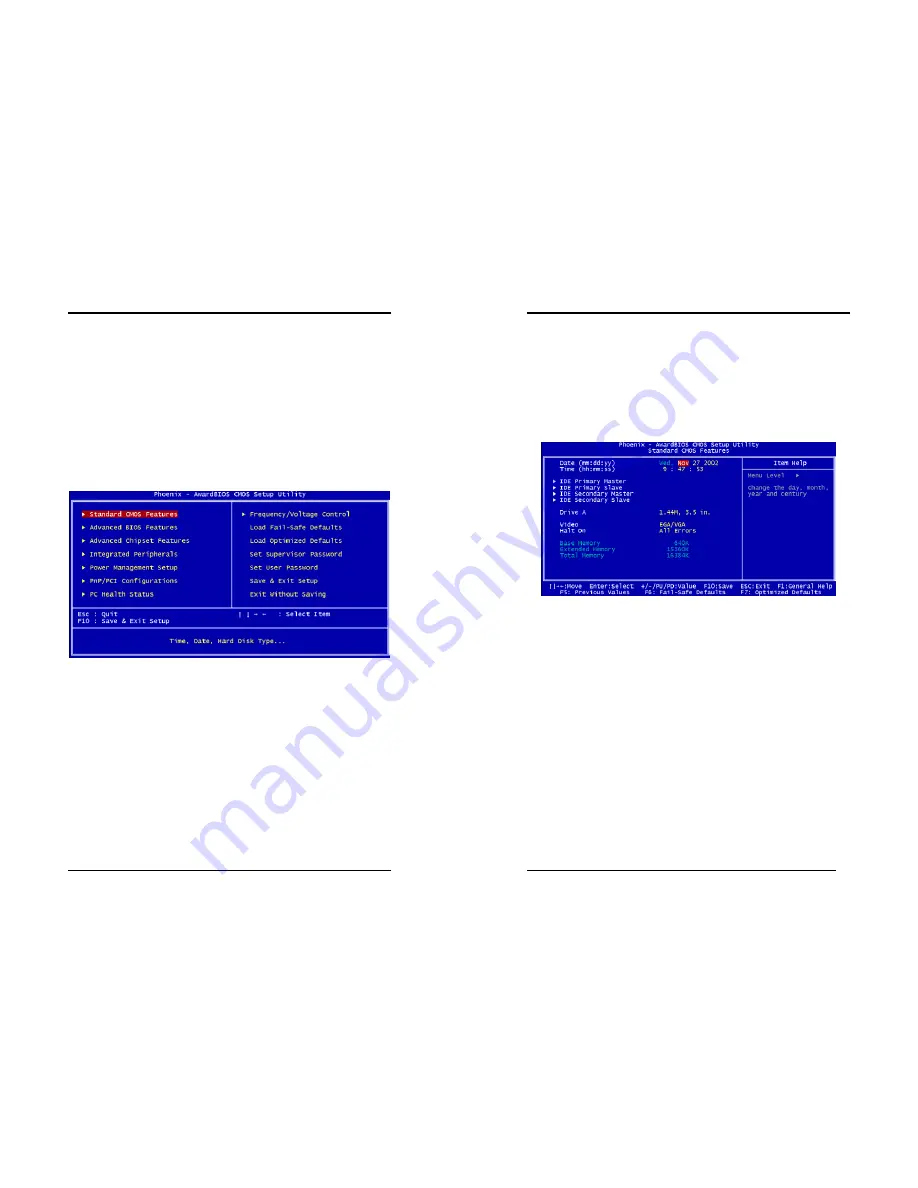
 the computer system. The primary screen as shown in Figure 

3-1 is a list of the menus and functions available in the setup program. Select the 
desired item by your arrow keys and press enter to make the changes. Operating 
commands are located at the bottom of this and all other BIOS screens. When a field 
is highlighted, on-line help information is displayed on the right side of the screen. 


Figure 3-1 Setup Program Initial Screen 


Chapter 3   


24 

3-1  Standard CMOS Setup 

The Standard CMOS Setup allows users to configure system components such as hard 
disk drive, floppy disk drive and video display as well as date, time and boot-up error 
signaling. This configuration menu should be changed when installing a motherboard 
for the first time, changing hardware in your system such as the HDD, FDD, video 
display, or when the CMOS data has been lost or contaminated. Choose the Standard 
CMOS Setup option from the CMOS Setup Utility menu (Figure 3-1) to display the 
following screen. 


Figure 3-2


Standard CMOS Feature Screen 

Date/Time: 

Set the date and time of the system. Do not skip this function as all of your timed 
events such as power management, saving files, etc are based on this timer. 

IDE (Primary/Secondary; Master/Slave): 

This category identifies up to four IDE hard disk drives that have been installed in the 
computer. This section does not show information on other IDE devices such as 
CD-ROM drives or other hard drive type such as SCSI drives. 

Drive A/B: 

Select different Floppy device Model. Available options are [None], [360K, 5-1/4 in], 
[1.2M, 5-1/4 in], [720k, 3-1/2 in], [1.44M, 3-1/2 in], and [2.88M, 3-1/2 in]. 

Video: 

Select the type of video adapter present in your system. You can ignore this setting if 
you are using a VGA monitor; VGA BIOS will automatically configure this setting. 

Halt On: 

When the system is powered on, BIOS performs a series of diagnostic tests called 
POST (Power On Self Test). This function stops the computer if BIOS detects a 
hardware error. You can tell BIOS to halt on all errors, no errors, or not to halt on 
specific errors. 

Содержание 7VJL1

Страница 1: ...ice that complies with 47 CFR Parts 2 and 15 of the FCC Rules Operation is subject to the following two conditions 1 This device may not cause harmful interference 2 This device must accept any interf...

Страница 2: ...rmation in this document is subject to change without notice and does not represent a commitment on the part of the vendor No warranty or representation either expressed or implied is made with respec...

Страница 3: ...ction Optional USB adapter for additional USB2 0 1 1 ports On board ITE 8705 Super I O Controller Two UARTs support serial port s and IR function up to 115 2Kbps for HPSIR and ASKIR One SPP ECP EPP pa...

Страница 4: ...Chapter 1 3 1 3 7VJL1 Motherboard Diagram Chapter 1 4 1 4 7VJL1 Motherboard Layout...

Страница 5: ...e CPU to push itself into place Do not apply extra pressure as doing so may result in damaging your CPU Snap the lever back into place Installing an AMD approved heat sink with cooling fan is necessar...

Страница 6: ...1 7 1 6V 256KB 0 18 0 13 1800 1500MHz 133 11 5 1 7 1 6V 256KB 0 18 0 13 1900 1600MHz 133 12 0 1 7 1 6V 256KB 0 18 0 13 2000 1666MHz 133 12 5 1 7 1 6V 256KB 0 18 0 13 2100 1733MHz 133 13 0 1 7 1 6V 256...

Страница 7: ...3 The plastic clip on each side of the DIMM slot will automatically close to hold the DDR Modules in place Chapter 2 10 2 4 Connector and Jumper Reference Chart Jump Connector Function Page PW 1 2 AT...

Страница 8: ...message It is now safe to turn off your computer will not be shown when using this function Chapter 2 12 Power On By Modem While in Soft Off state if an external modem ring up signal occurs the system...

Страница 9: ...ard that has a power supply from external battery to keep the data and system configuration To clear the contents of the CMOS please follow the steps below 1 Disconnect the system power supply from th...

Страница 10: ...s Power On Management screen You must also set this jumper s cap to pins 2 3 to use this function Pin Definition 1 2 Disable default 2 3 Enable Pin Definition 1 2 Disable default 2 3 Enable Chapter 2...

Страница 11: ...e Over ride Power Button Operation diagram 2 P LED Power LED Connector The power indicator LED shows the system s power status It is important to pay attention to the correct cables and pin orientatio...

Страница 12: ...hip costs Magic Packet technology is designed to give WOL capability to LAN controller This header is used to connect an add in NIC Network Interface Card which gives WOL capability to the motherboard...

Страница 13: ...his board contains a USB Host controller and includes a root hub connector for optional USB Adaptor USB 2 3 and 4 5 Chapter 2 22 CN24 Front Audio Connector This connector give you the option of a fron...

Страница 14: ...t time changing hardware in your system such as the HDD FDD video display or when the CMOS data has been lost or contaminated Choose the Standard CMOS Setup option from the CMOS Setup Utility menu Fig...

Страница 15: ...up Floppy Seek This is a set up check for floppy power on after starting the computer system Boot Up NumLock Status This function defines the keyboard s number pad as number keys or arrow keys If it i...

Страница 16: ...the manufacturer s default values for the motherboard Figure 3 4 Advance Chipset Features Screen All of the above settings have been determined by the motherboard manufacturer and should not be change...

Страница 17: ...RAM resulting in better system performance However if any programs write to this memory area a system error may occur Flash BIOS Protection The motherboard manufacturer developed BIOS protection techn...

Страница 18: ...ng Super I O device By choosing the Integrated Peripherals option from the CMOS Setup Utility menu Figure 3 5 the screen below is displayed This sample screen contains the manufacturer s default value...

Страница 19: ...ck read writes per sector the drive can support Chapter 3 34 3 5 Power Management Setup This section provides information on the Green PC power management functions By choosing the Power Management Se...

Страница 20: ...M 1 2 complaint operating systems Soft Off by PBTN When set to Delay 4 Sec this function allows the power button to put the system in Suspend a power saving mode When set to Instant Off the Soft Off b...

Страница 21: ...e or a card in the system This includes legacy and PCI ISA PnP devices PCI VGA Palette Snoop When set to Enabled multiple VGA devices operating on different buses can handle data from the CPU on each...

Страница 22: ...lows the system memory to run at a particular CPU clock speed The default setting is at 100Mhz This motherboard can support memory overclocking up to 250 MHz provided that the CPU clock must be set to...

Страница 23: ...ults Load Optimized Defaults loads the default system values directly from the CMOS Setup Utility menu Figure3 1 If the stored record created by the setup program becomes corrupted and therefore unusa...

Страница 24: ...he BIOS chip 3 13 Exit Without Saving Selecting this option and pressing Y followed by the Enter key lets you exit the Setup program without recording any new values or changing old ones Chapter 4 44...

Страница 25: ...Installation or Quick Installation for maximum performance please select Normal Installation and click NEXT to continue Chapter 4 46 5 Un tick the check box for any unwanted Drivers then click NEXT to...

Страница 26: ...nt to restart my computer now then Please Click OK to restart you computer If you do not want to restart your computer select No I will restart my computer later then click OK to continue Chapter 4 48...

Страница 27: ...t to continue install the VIA Audio driver 4 Please click Finish to complete VIA Audio Drive installation Chapter 4 50 4 3 USB 2 0 Driver 1 Please select USB 2 0 Drive to begin installation 2 Please c...

Страница 28: ...e click OK to continue Chapter 4 52 5 Please click the Print to File to print your End User Legal Agreement EULA Then the installation program will continue to install 6 You EULA TXT fill will be at C...

Страница 29: ...ntechusa com E mail Sales sales chaintech excel com E mail Tech Support tech chaintech excel com For UK EELT COMPUTER Ltd Moulton Park Business Centre Redhouse Road Moulton Park Northampton Northants...

Страница 30: ...t For Korea CHAINTECH KOREA CO Ltd 14F Mi Won B D Yeouido Dong 43 Youngdeunpo Gu Seoul Korea Tel 82 2 63323377 Fax 82 2 63323379 E Mail erin chaintechkorea com NOTE All rights are reserved for the pro...

Отзывы: