-2-
-1-
Uses
II. With Water
Bottle
I. With Provided
Cup
Figure (4)
Figure (5)
Water Cup
Water bottle
Hydrogen
generator
(base)
Hydrogen
generator
(base)
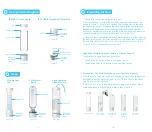
Components Diagram
Directions for Both Uses (as shown in Figures 4 and 5)
Touch switch to begin hydrogen generation:
Touch twice for 3-minute mode, see green light on
Touch three times for 9-minute mode, see blue light on
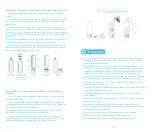
Purpose #1. Use With Provided Cup (as shown in Figure 4)
1. Fill the cup to the water line and close tightly. Water should always be
poured between the water line and 1.5 cm (2/3 inch) above the water
line. Do not overfill or underfill.
2. Select 3- or 9-minute mode and begin to produce hydrogen. When
hydrogen production is complete, water is ready to drink.
Preparing for Use
1.Please fully charge the battery before use.
2. For the first use, unscrew the hydrogen generator base (base) (as
shown in Figure 1). Locate, and remove the silica gel cap on the base
(as shown in Figure 3). Reattach the base tightly to the cup to prevent
leakage during operation. Pour room temperature purified, filtered,
mineral, or distilled water into the provided cup and soak for 3 hours (as
shown in Figure 4). Discard the water and rinse a final time.
3. Once you have soaked the electrode plate/membrane inside the base
(as shown in Figure 3), perform an initial test run before the first use. Fill
the cup with water to the water line. Touch the switch twice to run the
3-minute mode. Discard the water and rinse.
Portable Hydrogen Generator
Major Components
Figure (1)
Cap
Cap
Water line
Water Cup
Light Indicator
Hydrogen
generator
(base)
Hydrogen
generator
(base)
Hydrogen
generator
(base)
Switch
Figure (2)
Electrode plate
and membrane
Figure (3)
silicone plug cover
II. with Hydrogen
Inhalation Lid
Water Cup
Figure (6)
Hydrogen
generator
(base)
1. Open the lid
2. Pour water
in the bottle
3. Tighten the
lid and turn on
base
4. Finish
producing
hydrogen
5. Drink the
water

