background image


This product is NOT suited for commercial use.


DANGER! METAL CONDUCTS ELECTRICITY! Do not let this ladder or any of its parts 
contact live electrical wires. 


Maximum load for this ladder is 150kg. The weight of user plus tools and materials 
should not exceed 150kg. 


Always ensure that the locking mechanisms with weight placed on them are in the 
locked position before applying weight to the ladder. All the mechanisms should be 
locked if using the ladder at full extension! 


The ladder must be used with regular distances between the steps. 


Do not use any attachments, components or accessories not sold or recommended by 
Kogan.com with this ladder. 


Inspect the ladder after delivery, before use to confirm condition and operation of all 
parts. 


Inspect all parts prior to each use. Do not use if any parts of the ladder are missing, 
damaged or worn in any way. For professional users, regular periodic inspections are 
required. 


Ensure that the ladder is suitable for the task. 


Do not attempt to modify this ladder in any way. Doing so may result in serious injury 
and will void the warranty. 


Never attempt to repair a damaged ladder. Always have a qualified repair person to 
repair the damaged ladder. 


Destroy ladder if exposed to excessive heat (such as in a house fire) or corrosive agents 
(like acids or alkalis). 


Always use a firm grip and face ladder wherever possible. 


Always set up the ladder on a surface that is level, stable and dry. Never place the 
ladder on a slippery surface or try to increase the height of the ladder by placing 
anything under the rubber feet. 


Always ensure both rubber feet are firmly supported before stepping on the ladder. 

WARNING:


To avoid serious injury or death, please read these instructions 

and observe all warning labels on the product before use. Retain this 
manual for future reference.


        SAFETY & WARNINGS 
 

Содержание CTLADTLF6MA

Страница 1: ...6 2 METRE TELESCOPIC FOLDABLE LADDER CTLADTLF6MA ...

Страница 2: ......

Страница 3: ...r are missing damaged or worn in any way For professional users regular periodic inspections are required Ensure that the ladder is suitable for the task Do not attempt to modify this ladder in any way Doing so may result in serious injury and will void the warranty Never attempt to repair a damaged ladder Always have a qualified repair person to repair the damaged ladder Destroy ladder if exposed...

Страница 4: ...escopic tubes Pushing or pulling anything while on the ladder or scaffold may cause the ladder to tip and you to fall Use extreme caution if you must push or pull from the ladder Never attempt to jump walk or move the ladder while on it If you need to reposition the ladder get off it first To avoid losing your balance and or tipping the ladder never overreach Always stay balanced and keep your bod...

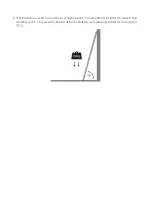
Страница 5: ... If the ladder is used for access to a higher level it must extend at least 1m above the landing point Only use the ladder at full extension as a leading ladder at an angle of 75 C ...

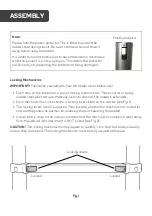
Страница 6: ...sist of spring loaded steel pins that automatically lock into place as the ladder is extended Each mechanism is connected to a locking lever visible on the outside see Fig 1 The locking levers have 2 purposes They indicate whether the mechanism is locked or not and they serve as buttons for releasing the pins lowering the ladder A lever that is close to the side rail indicates that the mechanism i...

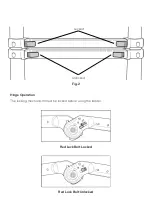
Страница 7: ...Fig 2 Hinge Operation The locking mechanism must be locked before using the ladder Red Lock Bolt Locked Red Lock Bolt Unlocked Locked Unlocked ...

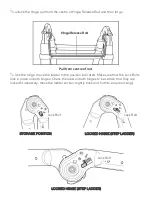
Страница 8: ...ake sure that the Lock Bolts lock in place on both hinges Check the label on both hinges to be certain that they are locked if necessary move the ladder section slightly back and forth to ensure locking Hinge Release Rod Pull from centre of rod LOCKED HINGE STEP LADDER LOCKED HINGE STEP LADDER STORAGE POSITION Lock Bolt Lock Bolt Lock Bolt ...

Страница 9: ...se the hinge release rod to adjust move or transport the ladder Do not use this ladder if the lock bolts do not lock in place Keep hinges clean and free of dirt paint snow etc The hinges in this ladder have been lubricated at the factory Note For best operation clean and lubricate hinges periodically with light machine oil as required ...

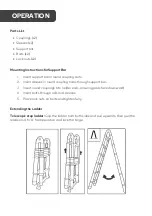
Страница 10: ...s in round coupling holes through support bar 3 Insert round couplings into ladder ends ensuring pads face downward 4 Insert bolts through rails and sleeves 5 Place lock nuts on bolts and tighten fully Extending the Ladder Telescopic step ladder Grip the ladder from both sides and pull upwards then pull the release rod to A frame position and lock the hinge OPERATION ...

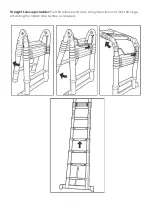
Страница 11: ...Straight telescopic ladder Pull the release rod to the straight position and lock the hinge extending the ladder step by step as required ...

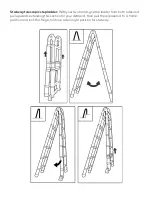
Страница 12: ... ladder With your two hands grip the ladder from both sides and pull upwards extending this section for your demand then pull the release rod to A frame position and lock the hinge fold one side in right position for stairway ...

Страница 13: ...n you have finished using the ladder you can collapse it for easy storage by folding it and closing it step by step with both hands Storage The ladder must be stored in a safe dry location away from children and excessive heat ...

Страница 14: ...NOTES ...

Страница 15: ......

Страница 16: ...tion We hope that this user guide has given you the assistance needed for a simple set up For the most up to date guide for your product as well as any additional assistance you may require head online to help kogan com ...

Отзывы: