


User’s Manual
Quick Installation Guide
6
First-Time Installation and Configuration
This chapter describes how to setup your WM-200N eXtreme PoE High-End Wireless Access
Point for wireless connectivity to your LAN.
Please Follow below setup
1.
Place the WM-200N at a best location.
The best location for WM-200N is usually at the center of your wireless network.
2.
Connect WM-200N to your external network device.
Connect one end of the Ethernet cable to the LAN1 port of WM-200N on the front
panel. On your environment, connect the other end of the cable to the external
Internet. The LAN1 LED indicator should be ON to indicate a proper connection.
3.
Connect
WM-200N
to
your network device.
Connect one end of the Ethernet cable the LAN2 port of WM-200N on the front panel.
Connect the other end of cable to a PC for configuring the system. The LAN2 LED
indicator should be ON to indicate a proper connection.
4.
There are two ways to supply power over to WM-200N
I. Connect the
DC power adapter
to the WM-200N power socket one the front
panel.
Please only use the power adapter supplied with the WM-200N package. Using a different
Power adapter may damage this system
II.WM-200N is capable of transmitting DC current via its LAN PoE port. Connect an
IEEE802.3af-compliant PSE device, e.g. A PoE Switch, to the LAN1 port of
WM-200N with the Ethernet cable.
Now, the hardware installation is completed.
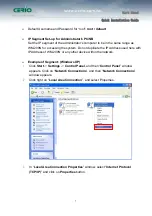
Software Configuration
WM-200N supports web-based configuration. Upon the completion of hardware
installation, WM-200N can be configured through a PC/NB by using its web browser such
as Internet Explorer 6.0 or later.
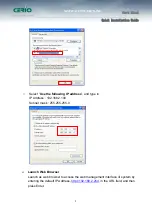
Default IP Address:
192.168.2.254
Default Subnet Mask:
255.255.255.0