background image

10

H

SI

L

G

N

E

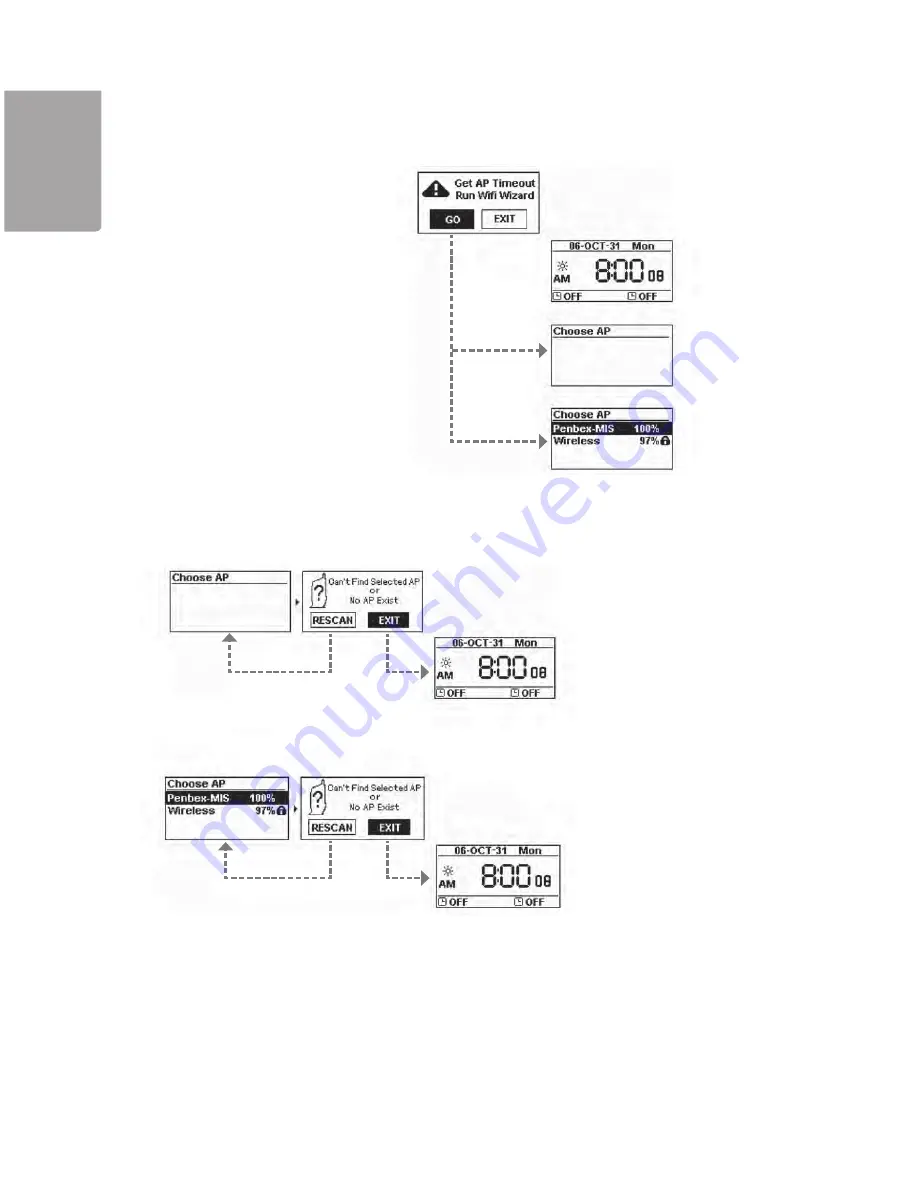
If no wireless network can be found:


Select 

GO

 to start the guide.

(1)  Cannot find a wireless network


Select 

RESCAN

 to search again or select 

EXIT

 to exit the guide

(1)  Cannot find the desired wireless network


Select 

RESCAN

 to search again or select 

EXIT

 to exit the guide

Содержание 1315117

Страница 1: ...H S I L G N E Internet Radio Micro Hi Fi System 1315117...

Страница 2: ...Functions 14 Using Internet Radio 17 Playing Music from USB memory 19 Playing Music from a Memory Card 20 Using FM Radio 21 Playing Music from a Media Server 23 File Manager 24 AUX 24 Settings 25 Tro...

Страница 3: ...imply any right to distribute content created with this product in revenue generating broadcast systems terrestrial satellite cable and or other distribution channels streaming applications via Inter...

Страница 4: ...t to you for any information that you provide You agree that Gracenote Inc may enforce its rights under this Agreement against you directly in its own name The Gracenote service uses a unique identifi...

Страница 5: ...any objects containing liquid on the product e g flower vase or soft drink Turn off the standby function during night time or when you will be away for periods of time Do not cover the product Adequa...

Страница 6: ...of service if it is not the same 2 To turn the power off completely unplug the unit from the wall socket It is reccomended to unplug the unit during strong thunder storms to protect the device 2 1 3...

Страница 7: ...eless network e g a wireless router is ready for connection and has a connection to the Internet Connect the included wireless network adaptor WiFi Dongle to the socket marked WiFi on the back of the...

Страница 8: ...iguration Protocol DHCP DHCP Timeout the below screen will be displayed If connection is successful the clock display will be shown Select LAN to connect to the Internet via a network or Select WLAN t...

Страница 9: ...I L G N E Network Settings WLAN With WiFi Dongle Select LAN to connect to the Internet via a network or Select WLAN to connect to the Internet via a wireless network or Select EXIT to exit from the g...

Страница 10: ...n be found Select GO to start the guide 1 Cannot find a wireless network Select RESCAN to search again or select EXIT to exit the guide 1 Cannot find the desired wireless network Select RESCAN to sear...

Страница 11: ...ed wireless network Select a protected wireless network which requires a password Select YES to establish a connection or NO to select another network Enter the network password and then select YES to...

Страница 12: ...mber is obtained via DHCP DHCP Timeout 1 Select RETRY to reconnect 2 or select WIZARD to search for available wireless networks 3 or select EXIT to exit 1 Select RETRY to reconnect 2 or select WIZARD...

Страница 13: ...f Off Off off f f o f f o off CD D CD C CD Loading Loading Loading Loading CD D CD C CD SD MMC SD MMC SD MMC SD MMC 1 The equipment starts up 2 Searches for a network 3 The clock synchronizes with a t...

Страница 14: ...Using the menus I I 3 Using the CD player The instructions in the operating manual describe the buttons on the main unit and in some cases refer to the buttons on the remote control You can at any ti...

Страница 15: ...track will instead show Unknown Track 01 and so on 1 To play all the tracks use the arrow buttons to select All 2 Then press or SELECT OK to start the playback 1 To play all the tracks use the arrow...

Страница 16: ...memory are connected you will be asked to choose which location you want the files to be saved 3 6 Playing options The following playing options will work during the playback of CD or MP3 files on a...

Страница 17: ...d connection e g ADSL or cable modem The following format for Internet radio can be received World Station The unit automatically sorts through the radio stations by country This makes it easier to fi...

Страница 18: ...nd press SELECT OK to confirm 3 Choose the desired category and press SELECT OK to confirm 4 Choose the desired radio station and press SELECT OK to confirm and connect to the radio station 5 When the...

Страница 19: ...to play Then press MEMORY to mark the selected track 6 Repeat the above to select the desired tracks The symbol marks the chosen track 7 Then press II or SELECT OK to start the playback of selected tr...

Страница 20: ...tracks 3 To play all the tracks use the arrow buttons to select All 4 Then press II or SELECT OK to start the playback 5 Use the arrow to select the track you wish to play Then press MEMORY to mark th...

Страница 21: ...hing hold I or I to quickly search again 7 3 Automatic search and storing radio channels 1 Press and hold SELECT OK until the message Pre Scan is shown on the display 3 Any radio stations found are au...

Страница 22: ...radio channel The selected channel will show on the display 7 6 Record from a FM radio to a USB memory or SD MMC memory card 1 Select the desired radio channel 2 Insert a USB memory or SD MMC memory c...

Страница 23: ...o your network and will automatically obtain an IP address notify its qualities and identify other connected units Prepare the computer 1 Install the desired software on the computer e g Windows Media...

Страница 24: ...button The following menu appears on the display Copy Move Delete Press the SELECT OK button on the unit or OK button on the remote control to confirm your selection e g Copy Then choose the storage m...

Страница 25: ...y time the unit is turned on Time Sync will show on the display when the time and date is updated 1 Under setting select Date Time and confirm with SELECT OK 2 Select Date and confirm with SELECT OK 3...

Страница 26: ...utton to choose the time for automatic shut off 4 When the function is activated Zz lights up in the upper part of the display 11 3 Network adjustments 11 3 1 List of possible symbols for connection t...

Страница 27: ...to choose between LAN network cable and WLAN wireless network Select WLAN 4 Select Wizard to start the connection guide The search for an accessible network begins 5 Select the desired network to con...

Страница 28: ...IP source and press SELECT OK to select Dynamic Obtain an IP address automatically or Static Use a fixed IP address 4 Select TCP IP in the menu to enter an IP address 5 Enter a number using the remote...

Страница 29: ...ownload and install 11 7 Return to manufacturer s settings Select Reset all Settings to return the micro system to the original default settings at time of delivery Care and Maintenance General Care U...

Страница 30: ...opied CD R Playing of the CD does not work The CD disc is scratched or dirty Change or clean the disc See section for care The laser lens is misty Wait until the lens has adjusted to the room s temper...

Страница 31: ...eck that any possible firewalls are deactivated Make sure that any proxy installations are correct The message No More Data appears Check the network adjustments and also that the stereo is connected...

Страница 32: ...to an outlet on a circuit different from that to which the receiver is connected 4 consult the dealer or an experienced radio TV technician for additional suggestions Any changes or modifications not...

Страница 33: ...on or exclusion may not apply to you Defacing the serial number or using your Product for commercial or institutional purposes voids this warranty Are There Other Warranties There are no express warra...

Отзывы:

Похожие инструкции для 1315117