


Page 18
For technical questions, please call 1-800-444-3353.
SKU 67708
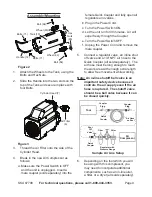
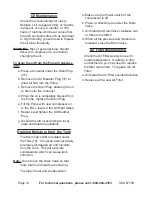
PartS lISt
Part
description
Qty
1
Cover
1
2
Elbow
1
3
Start Valve
1
4
Spring Washer M6
8
5
Screw M6 x 50
4
6
Air Filter
1
7
Cylinder Head
1
8
Head Gasket
1
9
Valve Plate
2
10
Metal Gasket
1
11
Valve
2
12
Valve Plate Gasket
1
13
Cylinder
1
14
Bolt M8 x 30
2
15
Spring Washer M8
3
16
Cylinder Gasket
1
17
Pin
1
18
Compression Ring
2
19
Oil Ring
1
20
Wrist Pin Retainer
2
21
Piston
1
22
Connecting Rod
1
23
Screw M6 x 20
5
24
Hex Nut M6
3
25
Crank Shaft
1
26
O-Ring
2
26a Zip Tie
1
27
Capacitor
1
28
Screw M8 x 20
1
29
Capacitor Bracket
1
30
Hex Nut M8
1
31
Crank Case Cover
1
32
O-Ring
1
33
Oil Sight Glass
1
34
O-Ring
1
35
Drain Plug M5 x 10
1
36
O-Ring
1
37
Oil Breather Plug
1
38
Crankcase Cover Gasket
1
39
Pump Crankcase
1
40
Washer M5
10
41
Screw M5 x 16
10
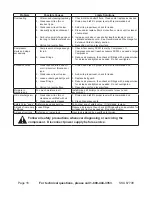
Part
description
Qty
42
Manual Overload Protector
1
43
Oil Seal
1
44
Bearing
1
45
Rotator
1
46
Bearing
1
47
Stator
1
48
Automatic Thermal Protector
1
49
End Cover
1
50
Fan
1
51
Circlip
1
51a Plain Washer 5
4
51b Spring Washer 5
4
51c Bolt
4
52
Connector
1
53
Tank Pressure Gauge
1
54
Pressure Switch
1
55
Unloader Tube
1
56
Nut
1
57
Ferrule
1
58
Check Valve
1
59
Ferrule
2
60
Nut
2
61
Exhaust Tube
1
62
Cooling Fin
1
63
Wheel
2
64
Bolt M12 x 55 (washer/bushing
assembly)
2
65
Hex Nut M12
2
66
Drain Valve
1
67
Foot Pad
2
68
Washer
2
69
Screw M6 x 25
2
70
Tank
1
71
Bolt M6 x 10
4
72
Handle
1
73
Safety Valve
1
74
Pressure Regulator
1
75
Motor Cord
1
76
Quick Coupler
1
77
Output Pressure Gauge
1
78
Plug
1


