background image


Using the Reader 

Ensure the reader had been set to the desired mode (i.e. read-only or 
read-write) before connecting the device to your computer. 

1.


Connect the reader to your computer’s USB port with a mini USB 
cable and allow the system to detect the device. 

2.


Insert the flash media card in the appropriate slot in the reader. 

3.


For MS insert the card with metal contacts facing downwards and 
the notch to the left. 

4.


For MMC, SD, and SM insert the card with the metal contacts 
facing downward and the notch on the right. 

5.


For xD insert the card with metal contacts facing up.  

6.


For Compact Flash (CFI & CFII) or Micro Drives, insert the card 
with holes facing toward the reader. 

7.


Gently push the card all the way in. 

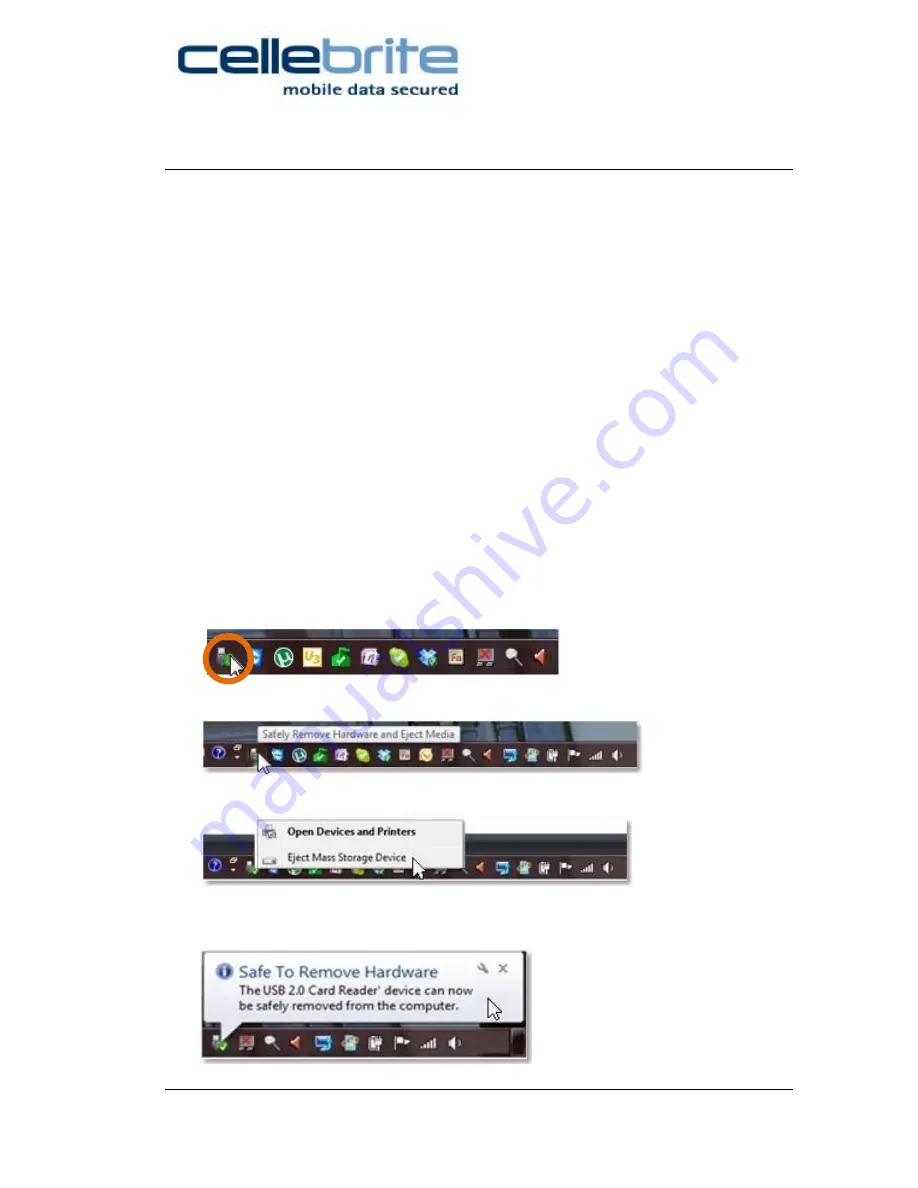
Safe Removal of the Reader 

1.


Select the device in the Windows® system tray. 

2.


Click “Safely Remove Hardware and Eject Media”. 

3.


Click “Eject Mass Storage Device”. 

4.


When the “Safe To Remove Hardware” prompt appears, remove 
the USB cable. 

Содержание Forensic Memory Card Reader

Страница 1: ...1 Cellebrite Forensic Memory Card Reader User Guide January 2012 2012 Cellebrite Mobile Synchronization LTD All rights Reserved...

Страница 2: ...eproduced by any means electronic or mechanical without the express prior written permission of Cellebrite Ltd The text and graphics are for the purpose of illustration and reference only The specific...

Страница 3: ...emoval of the Reader 6 Changing Read only Read write Functionality 7 Offering 7 Technical Support 7 Windows is a registered trademark of Microsoft Corporation in the United States and other countries...

Страница 4: ...ow to use the Cellebrite Forensic Memory Card Reader and how to obtain the best results Description The Cellebrite Forensic Memory Card Reader is a multi format card reader that provides either read o...

Страница 5: ...ports Left Panel Contains a USB 2 0 connector and the power cable connector Right panel Contains the microSD T Flash M2 connector and the Read write Read only switch Use a mini USB cable cable no 80 t...

Страница 6: ...cts facing downwards and the notch to the left 4 For MMC SD and SM insert the card with the metal contacts facing downward and the notch on the right 5 For xD insert the card with metal contacts facin...

Страница 7: ...he computer will not change its functionality NOTE the USB hub is not influenced by the write block switch When the card is in read only mode the front red LED will glow The green LED device access li...

Отзывы: