background image

40’ x 280’ Classic Series Frame Tent

www.GetTent.com / www.CelinaTent.com

PG.10

© 2013 Celina Tent Inc. 

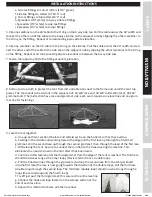
14. Step on the base plate to free both hands and lift one side of the tent frame. Do not lift one corner at a time; 

lift the entire side of the tent. Insert corner fittings into the top of the leg, securing with a pin. Insert all pins from 

the outside in; this keeps the protruding section of the pin from puncturing the tent fabric. 

SAFETY

MAINTENANCE

INS
TALLA
TION

CONT
AC

TS

INSTALLATION INSTRUCTIONS

13. In windy conditions, locate the downwind side of the tent to lift first; this keeps the wind from catching the tent.

12. Attach the base plates to the legs (6’8” brown, or 7’8” black), securing with a pin.

11. Loosely fasten 2 alligator straps at each corner around the perimeter tubing to secure the tent top.

10. Pull the tent top over the frame, lifting up on the fabric or “flapping” it to create a cushion of air.

15. While the tent is still low to the ground fasten the rest of the alligator straps around the perimeter tubing.

16. Repeat with the other side of the tent. When finished with the corner legs, install all other legs at side tee 

fitting locations. 

17. Center the tent top on the frame by hiding the seams behind the hip rafters and tightening the straps. Guide 

excess strap through the metal slide on the alligator clip.

18. Place stakes 5’ out from each leg; drive stakes into the ground so that approximately 6” or less of the stake 

is showing.

Содержание CLASSIC SERIES FRAME

Страница 1: ...porary structures and do not meet structural code unless specified Since weather is unpredictable the installer end user must incorporate their own good judgment common sense and knowledge of local co...

Страница 2: ...rs available by special order White Red 5051 White Green 5052 White Blue 5053 PRODUCT SPECIFICATIONS SAFETY MAINTENANCE INSTALLATION CONTACTS Classic Series Frame Tent Specifications Width 40 ft 12 2m...

Страница 3: ...FT The equipment may be heavy and may require 2 or more people to lift and move DO NOT OVERREACH Keep proper footing and balance at all times Use a ladder when necessary DRESS PROPERLY Do not wear loo...

Страница 4: ...the tent canopy structure or shelter to the site surface Celi na s responsibility is limited to the manufacture of the tent parts and materials It is the installer s responsibility not Celina s to de...

Страница 5: ...Side Tee w Ring 54 6 Way Crown 2 Base Plates 64 R Pin OR Pin Bail 566 6 Way Side Tee w Ring 6 6 Way Hip Joint 4 Ridge Crown 23 Ridge Support Bracket 46 A Ratchet Buckle with Loop Strap 2 Ratchet 5 Loo...

Страница 6: ...Frame Fittings Description Qty Corner 4 Side Tee w Ring 54 6 Way Crown 2 Base Plates 64 R Pin Pin Bail 566 6 Way Side Tee w Ring 6 6 Way Hip Joint 4 Ridge Crown 23 Ridge Support Bracket 46 40 Cable 25...

Страница 7: ...p joint to each hip rafter 14 4 red iii First spreader 9 4 white to the 6 way crown iv First spreader 9 4 white to first ridge crown v Rafters 21 10 5 red to first ridge crown vi First ridge crown to...

Страница 8: ...e crown liv Eighteenth spreader 9 4 white to seventeenth ridge crown lv Eighteenth ridge crown to eighteenth spreader 9 4 white lvi Rafters 21 10 5 red to eighteenth ridge crown lvii Nineteenth spread...

Страница 9: ...the end of each lace line h Repeat this method to secure all other lace lines SAFETY MAINTENANCE INSTALLATION CONTACTS INSTALLATION INSTRUCTIONS 8 Roll out a drop cloth to protect the tent from dirt a...

Страница 10: ...ach the base plates to the legs 6 8 brown or 7 8 black securing with a pin 11 Loosely fasten 2 alligator straps at each corner around the perimeter tubing to secure the tent top 10 Pull the tent top o...

Страница 11: ...our left hand take the opposite end and create two loops that overlap Move the first loop located on the bottom so that it slightly overlaps on top of the second put loops over the stake through the c...

Страница 12: ...e lace line tie off is accessed b Untie knot and unlace the tent top section while disconnecting the rain flap 10 Fold and roll the tent top pieces as tight as possible Remember not to stand or walk o...

Страница 13: ...r holes Repair kits and tools are avail able online at www GetTent com or by contacting Celina Celina Tent Inc warrants that this product will be free from defects in material and workmanship for a pe...

Страница 14: ...STATE CENTER PHONE New York Dig Safely New York 800 926 7962 New York City Long Island One Call 800 272 4480 North Carolina North Carolina One Call 800 634 4949 North Dakota North Dakota One Call 800...

Отзывы: