background image

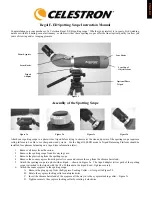
Tripod Balancing Platform (for the 100mm model)

This is used on the Regal 100 F-ED model to properly balance your spotting scope on top of a photo/video tripod.

To use the tripod balancing platform:
Mount the platform to the top of your photo tripod using the ¼"-20 threaded hole on the bottom side of the platform. 
Attach your spotting scope to the platform using the ¼"-20 mounting screw located on the top side of the platform.  Thread the 
mounting screw in as far as it  will  go.  Slide the attached  spotting  scope along the slotted  cutout until your spotting scope is 
balanced on the tripod.  Tighten the locking ring to hold the spotting scope in place.  

Photographic Use

SLR Cameras

To use your spotting scope for photography, you will shoot through the spotting scope with the zoom eyepiece attached.  Make 
sure the eyepiece locking collar is secure during each stage of the setup.

Remove the eyecup from the top of the zoom eyepiece.  With the eyecup down, rotate it counterclockwise to remove 
it and the eyepiece will appear as in Figure 6a with exposed threads at the top. 

Attach  the  T-Adapter  (this  is  packed  with  the  zoom  eyepiece  in  its  protective  case)  to  the  threads  at  the  top  of  the 
zoom eyepiece – Figure 6b. Make sure the threads are positioned as shown.

Thread an optional T-Ring for your make and model of SLR camera onto the T-threads of the T-Adapter – Figure 6c.  

Attach your SLR camera body to the T-Ring. – Figure 6d shows setup complete awaiting your SLR camera.

Regal  F-ED spotting  scopes  have  fixed  apertures  and,  as  a  result,  fixed  f/ratios.  To  properly  expose  your  subjects 
photographically,  you  need  to  set  your  shutter  speed  accordingly.  Most  SLR  cameras  offer  through-the-lens  metering  which 
lets  you  know  if  your  picture  is  under  or  overexposed.  Adjustments  for  proper  exposures  are  made  by  changing  the  shutter 
speed. Consult your camera manual for specific information on metering, changing shutter speeds, and other settings.

Hint:  Most photos will be the sharpest and brightest when using the lowest power on the zoom eyepiece.

Figure 6a

Figure 6b

Figure 6c 

Figure 6d

Digital Cameras

Since  digital  cameras  (not  digital  SLR  cameras)  do  not  use  the  T-system  to  mount  cameras  to  lenses,  spotting  scopes, 
telescopes, etc. you need a different way to be able to use them to take photos.  Celestron (and  many other  companies)  offer 
Universal  Digital  Camera  Adapters  which  makes  it  easy  to  attach a  digital  camera  to  your  Regal  F-ED spotting  scope. 
However, many brands of digital cameras cannot obtain a centered image due to their lenses not being able to reach up to the 
center of the eyepiece. In this case, you cannot use the Universal Camera Adapter but can only use your camera by holding it 
behind the eyepiece for taking images.

Note:  With  many  digital  cameras,  your  image  will  be  vignetted  (gives  you  a  circular  image  surrounded  by  black 
background) which is normal.

You will shoot through the spotting scope with the zoom eyepiece (or any optional 1.25” eyepiece) attached.

¼"-20 Mounting Screw

¼"-20 Threaded Hole 

(not shown)

Locking Ring

Mounting Screw

Содержание Regal F-ED

Страница 1: ...formation later 1 Remove all items from the carton 2 Remove the spotting scope from its carrying case 3 Remove the plastic bag from the spotting scope 4 Remove the zoom eyepiece from its protective ca...

Страница 2: ...ge in the eyepiece is clear and sharp You will have to refocus when changing power Once you are focused clearly on an object turn the focus knob clockwise to focus on a closer object and counterclockw...

Страница 3: ...ws setup complete awaiting your SLR camera Regal F ED spotting scopes have fixed apertures and as a result fixed f ratios To properly expose your subjects photographically you need to set your shutter...

Страница 4: ...celestron com REV 2 111808 2009 All Rights Reserved Printed in China 01 09 Model 52301 52302 52303 Description Regal 65 F ED Regal 80 F ED Regal 100 F ED Viewing Position 45 Angled 45 Angled 45 Angled...

Страница 5: ...iv installiert werden siehe nachstehende Informationen 1 Nehmen Sie alle Komponenten aus dem Karton 2 Nehmen Sie das Spotting Scope aus der Tragetasche 3 Nehmen Sie das Spotting Scope aus der Plastikt...

Страница 6: ...r erungsleistung m ssen Sie die Bildsch rfe erneut einstellen Wenn Sie ein Objekt scharf eingestellt haben drehen Sie den Fokussierknopf im Uhrzeigersinn um ein n her gelegenes Objekt anzuvisieren und...

Страница 7: ...SLR Kamera bereite Anordnung Regal F ED Spotting Scopes haben feste Blenden ffnungen und demzufolge feste f Ratios Um Ihre Objekte fotografisch richtig zu belichten m ssen Sie Ihre Belichtungszeit ent...

Страница 8: ...Alle Rechte vorbehalten Gedruckt in China 01 09 Modell 52301 52302 52303 Beschreibung Regal 65 F ED Regal 80 F ED Regal 100 F ED Betrachtungsposition 45 angewinkelt 45 angewinkelt 45 angewinkelt Blend...

Страница 9: ...ni che seguono 1 Togliete tutti gli articoli dalla confezione 2 Togliete lo spotting scope dalla sua custodia di trasporto 3 Togliete la borsa di plastica dallo spotting scope 4 Togliete l oculare zoo...

Страница 10: ...oculare non risulta chiara e nitida Quando cambiate la potenza dovrete rimettere a fuoco Una volta che abbiate messo a fuoco chiaramente un oggetto girate la manopola di messa a fuoco in senso orario...

Страница 11: ...e Regal F ED hanno aperture fisse e di conseguenza rapporti f fissi Per esporre correttamente i soggetti dal punto di vista fotografico dovrete impostare di conseguenza la velocit dell otturatore La m...

Страница 12: ...111808 2009 Tutti i diritti sono riservati Stampato in Cina 01 09 Modello 52301 52302 52303 Descrizione Regal 65 F ED Regal 80 F ED Regal 100 F ED Posizione di visualizzazione Angolata a 45 Angolata...

Страница 13: ...ener un equilibrio ptimo sobre el mismo vea la informaci n m s adelante 1 Extraiga todas las piezas de la caja 2 Extraiga el telescopio del estuche 3 Quite la bolsa de pl stico al telescopio 4 Retire...

Страница 14: ...dr que volver a enfocar al cambiar de potencia Una vez enfocada claramente la imagen gire el bot n de enfoque hacia la derecha para enfocar un objeto m s cercano y hacia la izquierda para enfocar uno...

Страница 15: ...configuraci n completa para colocar su c mara SLR Los telescopios Regal F ED tienen aberturas fijas y como resultado de ello las f escalas tambi n son fijas Para exponer correctamente sus objetos fot...

Страница 16: ...com REV 2 111808 2009 Todos los derechos reservados Impreso en China 01 09 Modelo 52301 52302 52303 Descripci n Regal 65 F ED Regal 80 F ED Regal 100 F ED Posici n de visualizaci n En ngulo de 45 En...

Страница 17: ...pied voir informations ci dessous 1 Retirez tous les l ments du carton 2 Sortez la longue vue de son tui de transport 3 Retirez le sac en plastique de la longue vue 4 Retirez l oculaire zoom de son tu...

Страница 18: ...ournez le bouton de mise au point grossi re jusqu ce que l image dans l oculaire soit claire et nette Vous devrez refaire une mise au point si vous modifiez la puissance Une fois parvenu une mise au p...

Страница 19: ...vertures fixes et donc des rapports focaux fixes Pour obtenir une bonne exposition des sujets photographi s vous devez r gler la vitesse de l obturateur en cons quence La plupart des appareils photos...

Страница 20: ...Californie 90503 U S A www celestron com REV 2 111809 2009 Tous droits r serv s Imprim en Chine 01 09 Mod le 52301 52302 52303 Description Regal 65 F ED Regal 80 F ED Regal 100 F ED Position d observa...

Отзывы: