5
A
A
t
t
t
t
a
a
c
c
h
h
i
i
n
n
g
g
t
t
h
h
e
e
F
F
i
i
n
n
d
d
e
e
r
r
s
s
c
c
o
o
p
p
e
e
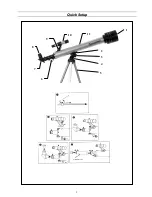
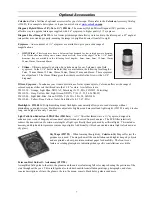
1. Remove the two small, silver thumbscrews located at the back of the telescope tube. See Figure 2.
2. Place the finderscope bracket over the two holes in the telescope tube, lining up the holes on the finderscope
bracket with those in the telescope tube.
3. Insert the thumbscrews through the finderscope bracket and thread them into the telescope tube.
A
A
l
l
i
i
g
g
n
n
i
i
n
n
g
g
t
t
h
h
e
e
F
F
i
i
n
n
d
d
e
e
r
r
s
s
c
c
o
o
p
p
e
e
1. Locate a distant daytime object and center it in a low power eyepiece in the main telescope.
2. Look through the finderscope and take notice of the position of the same object.
3. Without moving the main telescope, turn the adjustment thumb screws located around the finderscope bracket
until the crosshairs of the finder are centered on the alignment object.
F
F
i
i
n
n
d
d
i
i
n
n
g
g
O
O
b
b
j
j
e
e
c
c
t
t
s
s
1. Loosen the altitude locking screw (3) on the base of tripod head (4), then move the telescope in the desired
direction.
2. Look through the finderscope and pan the telescope until the object appears in the field of view. Once it’s in
the field, tighten the altitude and azimuth locks.
F
F
o
o
c
c
u
u
s
s
i
i
n
n
g
g
1. Once you have found an object in the telescope, turn the focusing knob (6) until the image is sharp.
2. To focus on an object that is nearer than your current target, turn the focusing knob toward the eyepiece (i.e.,
so that the focusing tube moves away from the front of the telescope). For more distant objects, turn the
focusing knob in the opposite direction.
3. To achieve a truly sharp focus, never look through glass windows or across objects that produce heat waves,
such as asphalt parking lots.
I
I
m
m
a
a
g
g
e
e
O
O
r
r
i
i
e
e
n
n
t
t
a
a
t
t
i
i
o
o
n
n
1. When observing with a diagonal, the image will be right side up, but reversed from left to right.
2. When observing straight through, with the eyepiece inserted directly into the telescope, the image will be
inverted. Also, the image in the finderscope is inverted.
M
M
a
a
g
g
n
n
i
i
f
f
i
i
c
c
a
a
t
t
i
i
o
o
n
n
The magnification (or power) of a telescope varies depending upon the focal length of the eyepiece being used and the
focal length of the telescope.
The PowerSeeker 50 telescope has a focal length of 600mm and comes with a 20mm 1¼" eyepiece. To calculate
magnification, use the following formula, in which FL = focal length:
Therefore, if you use the 20mm eyepiece your magnification is 600/20 = 30x. The same formula can be applied to any
of your eyepieces.
Magnification through any telescope has its limits. These limits are determined by the laws of optics and the nature of
the human eye. Most of your viewing will be done in the range of 30x to 100x. Higher powers are used mainly for
lunar and sometimes planetary observing where you can greatly enlarge the image and the atmospheric conditions are
near perfect. The images at extremely high powers magnify the image, but remember that the contrast will be very low
due to the high magnification. For the brightest images with the most contrast, start by using the lower power eyepiece
with a smaller image scale.
Magnification =
FL (telescope) in mm
FL (eyepiece) in mm
Important!


