Celestron Power Seeker 50 Скачать руководство пользователя страница 2


2

I N T R O D U C T I O N


Congratulations on your purchase and welcome to the 

Celestron 

world of amateur astronomy.  Some of the terms 

and parts described in these instructions may be new to you, so a few commonly used terms you’ll want to be 
familiar with are defined below.  

 
Altazimuth mount

 - the simplest type of mount, with two motions: altitude (up and down) and azimuth (side-to-

side).  “Mount” refers to the part of the telescope that support the tube, which carries all the telescope’s optics.


Altitude lock - 

allows the telescope tube to be locked into place once a focused image has been set up, by tightening 

the two screws on the outside of the altazimuth mount. 

Focal length - 

the distance from the optical center of the lens to the point where the incoming light rays converge, 

creating a clear, focused image. 

Objective lens

 - the front lens of the telescope.  It gathers incoming light to create a sharply focused image. 

Refracting telescope

 - a long, thin tube where light passes in a straight line from the front objective lens directly to 

the eyepiece at the opposite end of the tube. 
 
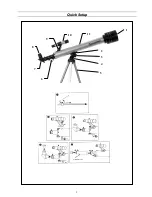
First, you need to take the time to familiarize yourself with the parts of your 

PowerSeeker 

 telescope, then assemble 

it, following the easy instructions provided.  Next, read over the operating instructions and become familiar with how 
your telescope works, to prepare for hours of viewing enjoyment. 
 

CAUTION: READ THIS SECTION BEFORE USING YOUR TELESCOPE 


Your 

PowerSeeker 

telescope is designed to give you hours of fun and rewarding observing.  However, there are a 

few things to be aware of before using your telescope that will ensure your safety and protect your equipment. 
 

N

EVER LOOK DIRECTLY AT THE SUN WITH THE NAKED EYE OR WITH A TELESCOPE.  NEVER POINT 

YOUR TELESCOPE AT THE SUN UNLESS YOU’RE USING THE PROPER SOLAR FILTER.  PERMANENT 
AND IRREVERSIBLE EYE DAMAGE MAY RESULT. 
 

N

EVER USE YOUR TELESCOPE TO PROJECT AN IMAGE OF THE SUN ONTO ANY SURFACE, OR USE AN 

EYEPIECE

 SOLAR FILTER OR A HERSCHEL WEDGE.  INTERNAL HEAT BUILD-UP CAN DAMAGE THE 

TELESCOPE AND/OR ANY ACCESSORIES THAT MAY BE ATTACHED TO IT. 
 

N

EVER LEAVE YOUR TELESCOPE UNSUPERVISED, ESPECIALLY WHEN CHILDREN ARE PRESENT.  

THIS ALSO HOLDS TRUE FOR ADULTS WHO MAY NOT BE FAMILIAR WITH THE CORRECT 
OPERATING PROCEDURES FOR YOUR TELESCOPE. 
 

A

LWAYS COVER THE FINDERSCOPE WHEN USING YOUR TELESCOPE WITH THE CORRECT SOLAR 

FILTER.  ALTHOUGH SMALL IN APERTURE, THIS INSTRUMENT HAS ENOUGH LIGHT GATHERING 
POWER TO CAUSE PERMANENT AND IRREVERSIBLE EYE DAMAGE.  THE IMAGE PROJECTED BY THE 
FINDERSCOPE IS HOT ENOUGH TO BURN SKIN OR CLOTHING. 


Содержание Power Seeker 50

Страница 1: ...P Po ow we er rS Se ee ek ke er r 5 50 0 I IN NS ST TR RU UC CT TI IO ON N M MA AN NU UA AL L 2 21 10 03 39 9 ...

Страница 2: ...ope then assemble it following the easy instructions provided Next read over the operating instructions and become familiar with how your telescope works to prepare for hours of viewing enjoyment CAUTION READ THIS SECTION BEFORE USING YOUR TELESCOPE Your PowerSeeker telescope is designed to give you hours of fun and rewarding observing However there are a few things to be aware of before using you...

Страница 3: ...3 Q Qu ui ic ck k S Se et tu up p 1 3 5 7 9 10 8 6 2 4 11 ...

Страница 4: ...g to secure them in place See Figure 1 2 After all the screws have been hand tightened you are ready to attach the telescope tube to the mount Remove the altitude locking screw 3 from the tripod head 4 3 Place the telescope tube on the altazimuth mount so that the hole in the mounting platform 2 lines up with the holes in the tripod head 4 4 Insert the altitude locking screw 3 through the tripod h...

Страница 5: ...pe For more distant objects turn the focusing knob in the opposite direction 3 To achieve a truly sharp focus never look through glass windows or across objects that produce heat waves such as asphalt parking lots I Im ma ag ge e O Or ri ie en nt ta at ti io on n 1 When observing with a diagonal the image will be right side up but reversed from left to right 2 When observing straight through with ...

Страница 6: ...optical surfaces 2 A small amount of dust on any optical surface isn t a problem and doesn t need to be removed If the dust builds up then use a can of compressed air and a camels hair brush to remove the dust To remove fingerprints or other contaminants use an optical cleaning kit or the Celestron Lens Pen 93575 3 If the inside of the objective lens needs cleaning it should be done by a professio...

Страница 7: ...ts that thread into the 1 1 4 oculars Available sets are 94119 10 Orange Light Blue ND13 T Polarizing s 21 80A 96ND 13 Polarizing 94119 20 Deep Yellow Red Light Green ND25 T s 12 25 56 96ND 25 94119 30 Light Red Blue Green ND50 T s 23A 38A 58 96ND 50 94119 40 Yellow Deep Yellow Violet Pale Blue s 8 15 47 82A Flashlights 93588 LED light emitting diode flashlights conveniently allow you to read star...

Страница 8: ...d repair Further product malfunction or deterioration due to normal wear is not covered by this warranty CELESTRON DISCLAIMS ANY WARRANTIES EXPRESS OR IMPLIED WHETHER OF MERCHANTABILITY OF FITNESS FOR A PARTICULAR USE EXCEPT AS EXPRESSLY SET FORTH HEREIN THE SOLE OBLIGATION OF CELESTRON UNDER THIS LIMITED WARRANTY SHALL BE TO REPAIR OR REPLACE THE COVERED PRODUCT IN ACCORDANCE WITH THE TERMS SET F...

Отзывы: