background image

Telescope Basics     •     25

With the telescope fully assembled and all the accessories attached, you are
ready for your first look.  Your first look should be done in the daytime when it
is easier to locate the locking clutches.  This will help to familiarize you with
your telescope, thus making it easier to use at night.

Daytime Observing

As mentioned in the introduction, your Celestron CM-1100 telescope works
well as a terrestrial spotting scope.  When not used to examine objects in the
night sky, it can be used to study objects here on Earth.

WARNING !

NEVER POINT YOUR TELESCOPE AT THE SUN UNLESS YOU HAVE THE
PROPER SOLAR FILTER.  PERMANENT AND IRREVERSIBLE EYE DAM-
AGE MAY RESULT AS WELL AS DAMAGE TO YOUR TELESCOPE.  ALSO,
NEVER LEAVE YOUR TELESCOPE UNATTENDED DURING A DAYTIME
OBSERVING SESSION, ESPECIALLY WHEN CHILDREN ARE PRESENT.

1.

Find a distant object that is fairly bright.

2.

Insert a low power eyepiece (one with a large focal length) into the tele-
scope.

3.

Adjust the R.A. and DEC clutch knobs if needed and point the telescope in
the direction of the object you selected.

4.

Locate the object in your finder.

5.

Move the telescope — by hand — until the object is centered in the finder.

6.

Look through the main optics and the object will be there (if you aligned
the finder first).

Try using different optional eyepieces to see how the field changes with various
magnifications.

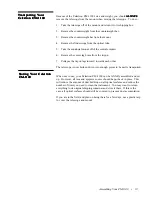
Your First Look

Содержание 11055

Страница 1: ...CELESTRON CI 700 CM 1100 CM 1400 INSTRUCTION MANUAL Models 91525 11055 11065...

Страница 2: ...ing recording or by any information storage and retrieval system without written permission from Celestron Interna tional Celestron International provides this manual as is without warranty of any ki...

Страница 3: ...Axis Finder 14 Moving the Telescope in R A and DEC 15 Using the Slow Motion Controls 15 Adjusting the Mount 16 Balancing the Mount in R A 17 Balancing the Mount in DEC 18 TransportingYourCelestronCM...

Страница 4: ...ervingDeep SkyObjects 45 Using the Setting Circles 45 StarHopping 46 ViewingConditions 48 Transparency 48 Sky Illumination 48 Seeing 48 CELESTIAL PHOTOGRAPHY 50 Short Exposure Prime Focus 51 Piggyback...

Страница 5: ...r desert or wherever you observe The Celestron CM 1100 and CM 1400 are made of the highest quality materials to ensure stability and durability All this adds up to telescopes that will give you a life...

Страница 6: ...challenging observations The final part of this manual contains a list of objects that can be observed through your Celestron CM 1100 telescope Included are the coordinates for each object its brightn...

Страница 7: ...catadioptric telescope This unique design offers large diameter optics while maintaining very short tube lengths making them extremely portable This makes them extremely popular among amateur astrono...

Страница 8: ...f the standard accessories which are 26mm Pl ssl Ocular 1 1 4 Visual Back 1 1 4 2 Visual Back on the CM 1400 Star Diagonal 1 1 4 2 Mirror Diagonal for the CM 1400 9x50mm Finderscope with Bracket Car B...

Страница 9: ...5 Polar Axis Finderscope 6 Drive Control Electronics 7 Hand Control 8 Tripod 9 Center Leg Brace 10 Counterweight 11 Counterweight Bar 12 R A Clutch Knob 13 DECClutchKnob 14 Mounting Platform Clamp Kno...

Страница 10: ...t up the tripod 1 Stand the tripod vertically on a level surface with the feet facing down See Figure2 2 2 Grab the lower portion of two of the tripod legs and lift them slightly off the ground so tha...

Страница 11: ...8 16 button head cap screws provided through the holes in the central column and into the tripod head 5 Tighten the screws to hold the column securely in place Attaching the Center Leg Brace For maxim...

Страница 12: ...o the tripod 1 Insert the base of the equatorial mount into the top of the central column 2 Rotate the equatorial mount on the central column until the holes in the mount line up with those in the cen...

Страница 13: ...wards north before the tube assembly and counterweights are at tached This will make the polar alignment procedure much easier The Celestron CM 1100 comes standard with one 23 pound counterweight The...

Страница 14: ...platform of the mount Slide the telescope so that the back of the dovetail bar is almost flush with the back of the mounting platform 3 Tighten the locking knobs on the side of the mounting platform...

Страница 15: ...agonal is a prism that diverts the light at a right angle to the light path of the telescope This allows you to observe in positions that are physi cally more comfortable than if you looked straight t...

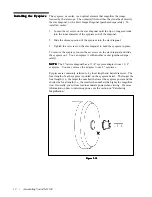
Страница 16: ...replace it with another ocular purchased sepa rately NOTE NOTE NOTE NOTE NOTE The 2 mirror diagonal has a 1 1 4 eyepiece adapter to use 1 1 4 eyepieces You may remove the adapter to use 2 eyepieces E...

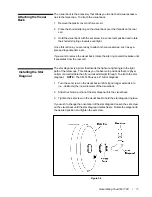
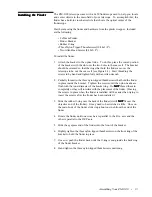
Страница 17: ...Tighten the screws until the nylon heads are flush with the inner diameter of the bracket ring Do NOT NOT NOT NOT NOT thread them in completely or they will interfere with the placement of the finder...

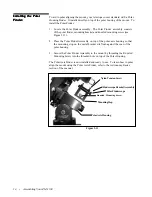
Страница 18: ...p on the metal bracket sits flush against the rear of the polar housing 3 Secure the Polar Finder Assembly to the mount by threading the Knurled Mounting Screw into the threaded hole on top of the Pol...

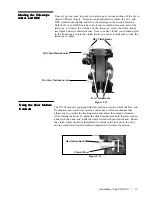
Страница 19: ...cope in R A and DEC in R A and DEC in R A and DEC in R A and DEC in R A and DEC Using the Slow Motion Using the Slow Motion Using the Slow Motion Using the Slow Motion Using the Slow Motion Controls C...

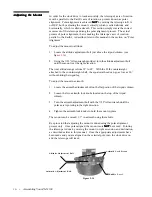
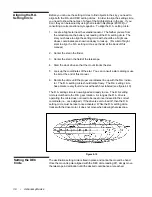
Страница 20: ...counterweight attached to the counterweight shaft the equatorial head can go as low as 20 without hitting the tripod leg To adjust the mount in azimuth 1 Locate the azimuth adjustment bolt on the fla...

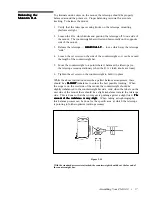
Страница 21: ...he above instructions describe a perfect balance arrangement there should be a SLIGHT SLIGHT SLIGHT SLIGHT SLIGHT imbalance to ensure the best possible tracking When the scope is on the west side of t...

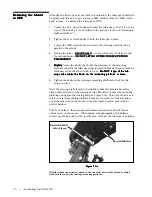
Страница 22: ...f the tele Do NOT let go of the tele scope tube while the knob on the mounting platform is loose scope tube while the knob on the mounting platform is loose scope tube while the knob on the mounting p...

Страница 23: ...M 1100 can be left fully assembled and set up However all lens and eyepiece covers should be put back in place This will reduce the amount of dust build up on all optical surfaces and reduce the numbe...

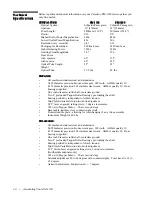
Страница 24: ...o 2 preloaded Tapper Roller Bearings pre loading the shaft Bearing preload is independent of clutch tension Slip Clutch Variable friction two knob adjustment 5 25 laser engraved setting circle 1 degre...

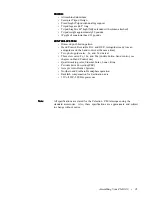
Страница 25: ...A and DEC Autoguider ready use an autoguider and the hand control at the same time Two photo guide rates 3x and 5x sidereal Three slew rates 8x 16x and 20x double button hand control see chapter on H...

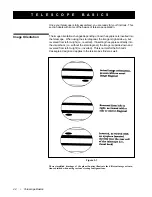
Страница 26: ...agonal the image is right side up but reversed from left to right i e reverted If inserting the eyepiece directly into the visual back i e without the star diagonal the image is upside down and revers...

Страница 27: ...lt may vary in thickness from one part of a window to the next This inconsistency can and will affect the ability to focus your telescope In most cases you will not be able to achieve a truly sharp im...

Страница 28: ...an 9x50mm finder which helps in aiming the main telescope at distant objects that are hard to find in the narrow field of the telescope The first number used to describe the finder is the power while...

Страница 29: ...UNLESSYOUHAVETHE PROPERSOLARFILTER PERMANENTANDIRREVERSIBLEEYEDAM AGE MAY RESULT AS WELL AS DAMAGE TO YOUR TELESCOPE ALSO NEVERLEAVEYOURTELESCOPEUNATTENDEDDURINGADAYTIME OBSERVINGSESSION ESPECIALLYWHE...

Страница 30: ...lock drive on 6 Loosen the right ascension and declination clutch knobs and point the telescope at the desired target The Moon or one of the brighter planets is an ideal first target 7 Locate the obje...

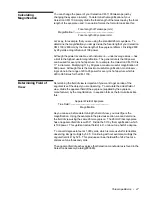
Страница 31: ...of 20 to 35 power for every inch of aperture which is 220 to 385 times for the CM 1100 Determining the field of view is important if you want to get an idea of the angular size of the object you are o...

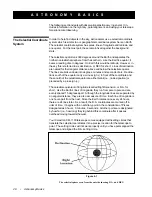
Страница 32: ...sign in front of the coordinate and those north of the celestial equator are either blank i e no designation or preceded by a plus sign The celestial equivalent of longitude is called Right Ascension...

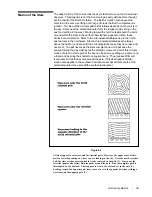
Страница 33: ...ou will never see the stars complete one circle because the sunlight during the day washes out the starlight However part of this circular motion of stars in this region of the sky can be seen by sett...

Страница 34: ...view If not using the clock drive all objects in the sky day or night will slowly drift out of the field This motion is caused by the Earth s rotation Even if you are not using the clock drive polar a...

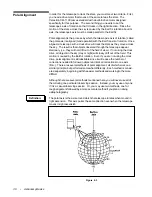
Страница 35: ...Polaris The position of the Big Dipper changes during the year and throughout the course of the night When the Big Dipper is low in the sky i e near the horizon it may be difficult to locate Observer...

Страница 36: ...rizon to the celestial pole is always equal to your latitude If you are observing from Los Angeles which has a latitude of 34 then the celestial pole is 34 above the northern horizon All a latitude sc...

Страница 37: ...polar axis 3 Adjust the mount in altitude and or azimuth until Polaris is in the field of viewofthefinder 4 Center Polaris in the field of the telescope using the fine adjustment controls on the mount...

Страница 38: ...d towards the celestial pole see Figures 4 8 and 4 9 You may need to loosen the nylon tension screws on the polar finder bracket Remember that the north celestial pole is located by moving away from P...

Страница 39: ...he scope on the side of the mount insert the diagonal so it points straight up Insert a cross hair ocular and align the cross hairs to be parallel to declination and right ascension motion Use 16x gui...

Страница 40: ...mount tracks the star 5 Look up the coordinates of the star You can consult a star catalog or use the list at the end of this manual 6 Rotate the circle until the proper coordinates line up with the R...

Страница 41: ...To supply power to your Celestron CM 1100 plug your Car Battery Adapter or optional AC Adapter into the outlet on the electronic console labeled 12 VDC Then plug the other end of the adapter into the...

Страница 42: ...ge from your power source The drive has four basic rates sidereal solar lunar and King which is a modified sidereal rate that takes into account atmospheric refraction While solar and lunar rates are...

Страница 43: ...unction is a two step process First you must guide for at least eight minutes keeping the guide star centered on the cross hairs of your optional guiding eyepiece during which time the system records...

Страница 44: ...ked while the PEC function is activated This eliminates the possibility of shifting the focus or moving the telescope suddenly during an exposure The fast set function is locked while the PEC function...

Страница 45: ...e switch back to the ON or up position The hand controller allows you to move the telescope in R A and DEC using the corresponding motors This includes fine corrections for guided astropho tography an...

Страница 46: ...ion of either the R A and or DEC buttons change the switch setting of the appropriate axis see Figure 5 7 Autoguiding On the top side of the hand controller you will find a phone jack outlet desig nat...

Страница 47: ...pe to keep the Moon centered This effect is more noticeable at higher power If you are using the clock drive and have polar aligned the Moon will remain centered if using the lunar tracking rate Consu...

Страница 48: ...These filters reduce the intensity of the Sun s light making it safe to view With these filters you can see sun spots as they move across the solar disk and faculae which are bright patches seen near...

Страница 49: ...ll no longer be necessary 2 Look up the coordinates in an atlas or reference book 3 Move the telescope in declination until the indicator is pointing at the correctdeclinationcoordinate 4 Move the tel...

Страница 50: ...Andromedae 3 Move northeast approximately 7 There you will find two stars of equal brightness Delta and Pi Andromedae about 3 apart 4 Continue in the same direction another 8 There you will find two...

Страница 51: ...gh the telescope and the Ring Nebula should be in the tele scope Its angular size is quite small and therefore not visible in the finder Because the Ring Nebula is rather faint you may need to use ave...

Страница 52: ...s and the amount of fine detail seen in extended objects The air in our atmosphere acts as a lens which bends and distorts incoming light rays The amount of bending depends on air density Varying temp...

Страница 53: ...he seeing is generally better Type 3 seeing conditions are characterized by fast ripples but sharp images In extended objects fine detail is visible but the image shifts around the field Stars are cri...

Страница 54: ...SLR cameras the most com mon type of 35mm camera on the market today Second the B or manual setting should not run off the battery Many new electronic cameras use the battery to keep the shutter open...

Страница 55: ...al With your camera attached to the telescope you are ready for prime focus photography Start with an easy object like the Moon Here s how to do it 1 Load your camera with film that has a moderate to...

Страница 56: ...your exposures taking a few photos at each shutter speed This will ensure that you will get a good photo Keep accurate records of your exposures This information is useful if you want to repeat your...

Страница 57: ...ISO 100 or faster or print film ISO 400 orfaster 3 Set the f ratio of your camera lens so that it is a half stop to one full stop down from completely open 4 Set the shutter speed to the B setting and...

Страница 58: ...ct your technique try specialized films i e specially designed and or treated for this type of astrophotography Here are some popular choices Ektar 125 color print Fujichrome 100D color slide Tech Pan...

Страница 59: ...over one second use the hat trick This technique incorporates a hand held black card placed over the aperture of the telescope to act as a shutter The card prevents light from entering the telescope w...

Страница 60: ...otos at each shutter speed This will ensure that you will get a good photo It is not uncommon to go through an entire roll of 36 exposures and have only one shot turn out good Don t expect to record m...

Страница 61: ...d guide simulta neously Celestron offers a very special and advanced off axis guider called the Radial Guider 94176 In addition you will need a T Ring to attach your camera to the Radial Guider Other...

Страница 62: ...cially designed and or treated for this type of astrophotography Here are some popular choices Ektar 125 color print Fujichrome 100D color slide Tech Pan gas hypered black and white print T Max 400 bl...

Страница 63: ...htheoptional2xbarlow makingit the most versatile imaging system available today This makes the system ideal for imaging deep sky objects as well as planetary detail The key to the Fastar s versatility...

Страница 64: ...iguration Fastar Lens Assembly PixCel 237 CCD Camera Table7 3 Figure 7 2 Light path at f 11 focus Figure 7 3 LightpathatFastarf 2 1focus Description of F numbers Fastar Configuration StandardCassegrai...

Страница 65: ...ger than f 2 1 There are only a select few objects that work well at f 11 The moon images fine because it is so bright but planets are still a bit small and should be shot at f 22 The Ring nebula is a...

Страница 66: ...ks good see AutoGrab feature in the PixCel Operating Manual This is due to the atmospheric seeing condi tions For every 10 exposures you might save 1 To image at f 22 you need to purchase a 2x Barlow...

Страница 67: ...ntinue observing the dew must be removed either with a hair dryer or by pointing the telescope at the ground until the dew has evaporated If moisture condenses on the inside of the corrector remove th...

Страница 68: ...f the skewed light These screws are located in the secondary mirror holder Make only a small 1 6 to 1 8 field correction and recenter the star by moving the scope before making any improvements or bef...

Страница 69: ...f it is turbulent or aim to a steadier part of the sky A steadier part of the sky is judged by steady versus twinkling stars 5 While looking through the eyepiece use a screwdriver to turn the collimat...

Страница 70: ...o observe Once aligned the system keeps track of where it is pointed And the Advanced Astro Master has an RS 232 port for complete interface to your personal computer The RS 232 cable 93921 is availab...

Страница 71: ...mm These eyepieces are all parfocal The 35mm Ultima gives the widest possible field of view with a 1 1 4 diagonal and is ideal for use with the Reducer Corrector Lanthanum Eyepieces LV Series Lanthanu...

Страница 72: ...escope This way the camera can photograph with its normal or wide angle lens while you guide through the telescope The piggyback mount attaches to the rear cell of the telescope next to the finder Pol...

Страница 73: ...in telescope This is used for terrestrial photography and short exposure lunar and filtered solar photography It can be used for long exposure deep sky photography if you use a separate guidescope T C...

Страница 74: ...11 NGC6705 Sct 18 51 1 6 16 5 8 Op Cl Wild Duck Cluster M12 NGC6218 Oph 16 47 2 1 57 6 6 Gl Cl M13 NGC6205 Her 16 41 7 36 28 5 9 Gl Cl HerculesCluster M14 NGC6402 Oph 17 37 6 3 15 7 6 Gl Cl M15 NGC707...

Страница 75: ...0 3058 7 0 Gl Cl M56 NGC6779 Lyr 19 16 6 30 11 8 2 Gl Cl M57 NGC6720 Lyr 18 53 6 33 02 9 0 P Neb RingNebula M58 NGC4579 Vir 12 37 7 11 49 9 8 Sp Gx M59 NGC4621 Vir 12 42 0 11 39 9 8 El Gx M60 NGC4649...

Страница 76: ...68 Leo 10 46 8 11 49 9 2 Sp Gx M97 NGC3587 UMa 11 14 9 55 01 11 2 P Neb OwlNebula M98 NGC4192 Com 12 13 8 14 54 10 1 Sp Gx M99 NGC4254 Com 12 18 8 14 25 9 8 Sp Gx Pin Wheel Nebula M100 NGC4321 Com 12...

Страница 77: ...2 0 01 Vega Lyr 18 36 56 38 47 01 0 04 Capella Aur 05 16 41 45 59 53 0 05 Rigel Ori 05 14 32 08 12 06 0 14 Procyon CMi 07 38 18 05 13 30 0 37 Betelgeuse Ori 05 55 10 07 24 26 0 41 Achernar Eri 01 37 4...

Страница 78: ...inson Costanzo Chaple NGC2000 0 Sinnott General Observational Astronomy TheCambridgeAstronomyGuide Liller Mayer A Complete Manual Of Amateur Astronomy Sherrod The Guide To Amateur Astronomy Newton Tee...

Страница 79: ...repair Further product malfunction or deterioration due to normal wear is not covered by this warranty CI DISCLAIMS ANY WARRANTIES EXPRESS OR IMPLIED WHETHER OF MERCHANTABILITY OF FITNESS FOR A PARTI...

Страница 80: ...Street Torrance CA 90503 Tel 310 328 9560 Fax 310 212 5835 Website http www celestron com Copyright1998CelestronInternational Allrightreserved Productsorinstructionsmaychange withoutnoticeorobligatio...

Отзывы: