background image

22 


>>


www

.celestron

.com

>>

 Finding the North Celestial Pole

In each hemisphere, there is a point in the sky around which all the 
other stars appear to rotate . These points are called the celestial poles 
and are named for the hemisphere in which they reside. For example, 
in the northern hemisphere all stars move around the north celestial 
pole . When the telescope’s polar axis is pointed at the celestial pole, it 
is parallel to the Earth’s rotational axis .

Polaris

(North Star)

Fall

Spring

Summer

Winter

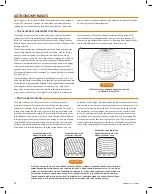
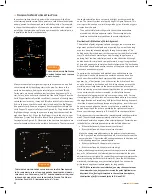
The position of the Big Dipper 
changes throughout the year 
and the night.

 FIGURE 6-5

Many methods of polar alignment require that you know how to find 
the celestial pole by identifying stars in the area. For those in the 
northern hemisphere, finding the celestial pole is not too difficult. 
Fortunately, we have a naked eye star less than a degree away. This 
star, Polaris, is the end star in the handle of the Little Dipper . Since the 
Little Dipper (technically called Ursa Minor) is not one of the brightest 
constellations in the sky, it may be difficult to locate from urban areas. 
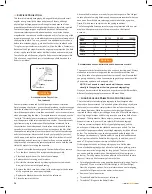
If this is the case, use the two end stars in the bowl of the Big Dipper 
(the pointer stars) . Draw an imaginary line through them toward the 
Little Dipper. They point to Polaris (see Figure 6-6).  The position of the 
Big Dipper changes during the year and throughout the course of the 
night (see Figure 6-5).  When the Big Dipper is low in the sky (i.e., near 
the horizon), it may be difficult to locate. During these times, look for 
Cassiopeia (see Figure 6-6). Observers in the southern hemisphere are 
not as fortunate as those in the northern hemisphere . The stars around 

the south celestial pole are not nearly as bright as those around the 
north. The closest star that is relatively bright is Sigma Octantis. This 
star is just within naked eye limit (magnitude 5.5) and lies about 59 arc 
minutes from the pole .  

The north celestial pole is the point in the northern hemisphere 
around which all stars appear to rotate. The counterpart in the 
southern hemisphere is referred to as the south celestial pole.

Declination Drift Method of Polar Alignment  

This method of polar alignment allows you to get the most accurate 
alignment on the celestial pole and is required if you want to do long 
exposure deep-sky astrophotography through the telescope . The 
declination drift method requires that you monitor the drift of selected 
stars . The drift of each star tells you how far away the polar axis is 
pointing from the true celestial pole and in what direction . Although 
declination drift is simple and straight-forward, it requires a great deal 
of time and patience to complete when first attempted. The declination 
drift method should be done after any one of the previously mentioned 
methods has been completed .
To perform the declination drift method you need to choose two 
bright stars.  One should be near the eastern horizon and one due 
south near the meridian .  Both stars should be near the celestial 
equator (i.e., 0° declination).  You will monitor the drift of each star 
one at a time and in declination only .  While monitoring a star on the 
meridian, any misalignment in the east-west direction is revealed .  
While monitoring a star near the east/west horizon, any misalignment 
in the north-south direction is revealed.  It is helpful to have an 
illuminated reticle eyepiece to help you recognize any drift.  For very 
close alignment, a Barlow lens is also recommended since it increases 
the magnification and reveals any drift faster. When looking due south, 
insert the diagonal so the eyepiece points straight up.  Insert the cross 
hair eyepiece and align the cross hairs so that one is parallel to the 
declination axis and the other is parallel to the right ascension axis .  
Move your telescope manually in R .A . and DEC to check parallelism .
First, choose your star near where the celestial equator and the meridian 
meet .  The star should be approximately within 1/2 an hour of the 
meridian and within five degrees of the celestial equator.  Center the star 
in the field of your telescope and monitor the drift in declination.
  •  If the star drifts south, the polar axis is too far east.
  •  If the star drifts north, the polar axis is too far west.
  Make the appropriate adjustments to the polar axis to eliminate any 

drift.  Once you have eliminated all the drift, move to the star near the 
eastern horizon .  The star should be 20 degrees above the horizon and 
within five degrees of the celestial equator.

  •  If the star drifts south, the polar axis is too low.
  •  If the star drifts north, the polar axis is too high.
Again, make the appropriate adjustments to the polar axis to eliminate 
any drift.  Unfortunately, the latter adjustments interact with the prior 
adjustments ever so slightly.  So, repeat the process again to improve the 
accuracy checking both axes for minimal drift.  Once the drift has been 
eliminated, the telescope is very accurately aligned .  You can now do 
prime focus deep-sky astrophotography for long periods .

NOTE: If the eastern horizon is blocked, you may choose a star near 
the western horizon, but you must reverse the polar high/low error 
directions. Also, if using this method in the southern hemisphere, 
the direction of drift is reversed for both R.A. and DEC.

Polaris

(North Star)

Big Dipper

Little Dipper

Cassiopeia

N.C.P.

Poin

ter S

tars

 FIGURE 6-6

The two stars in the front of the bowl of the Big Dipper point 
to Polaris which is less than one degree from the true (north) 
celestial pole.  Cassiopeia, the “W” shaped constellation, is on 
the opposite side of the pole from the Big Dipper.  The North 
Celestial Pole (N.C.P.) is marked by the “+” sign.

Содержание 11007

Страница 1: ...InstructionManual 11007 11008 11009...

Страница 2: ...www celestron com...

Страница 3: ...20 22 CELESTIAL OBSERVING 23 24 CELESTIAL PHOTOGRAPHY 25 29 TELESCOPE MAINTENANCE 30 31 OPTIONAL ACCESSORIES 31 32 APPENDIX A TECHNICAL SPECIFICATIONS 33 34 APPENDIX B GLOSSARY OF TERMS 34 36 APPENDI...

Страница 4: ...other high performance features TheCPC DeluxeHD s features combined withCelestron s legendary optical systems give amateur astronomers the most sophisticated and easy to use telescopes available on th...

Страница 5: ...onal 9 Schmidt Corrector Lens 14 Accessory Tray Center 4 Hand Control 10 Altitude Locking Knobs Support Bracket 5 Eyepiece 11 Carrying Handle 15 Focus Knob 6 Finderscope A Hand Control Port C PC Inter...

Страница 6: ...tached so the tripod legs can collapse To set up the tripod 1 Hold the tripod with the head up and the legs pointed toward the ground 2 Pull the legs away from the central column until they will not s...

Страница 7: ...be aligned for GoTo use Any manual movement of the telescope will invalidate your telescope s alignment Before attaching your visual accessories first loosen the altitude locking knob while holding t...

Страница 8: ...erscope Installation The finderscope must first be mounted in the included quick release bracket then attached to the rear cell of the telescope To install the finderscope 1 Locate the finderscope mou...

Страница 9: ...target Remember that the image orientation through the finder is inverted i e upside down and reversed from left to right Because of this it may take a few minutes to familiarize yourself with the dir...

Страница 10: ...unique list of some of the most recognizable star patterns in the sky CCDObjects A custom list of many interesting galaxy pairs trios and clusters that are well suited forCCD imaging with theCPC tele...

Страница 11: ...rmation downloaded from theGPS 3 The hand control will display a message reminding you to level the tripod if you already haven t done so Press ENTER to continue 4 Use the arrow buttons on the hand co...

Страница 12: ...der press ENTER The display will then instruct you to center the star in the field of view of the eyepiece When the star is centered pressALIGN to accept this star as your second alignment star When t...

Страница 13: ...e EQ alignments gives you the choice of performing anAutoAlign Two Star alignment One Star alignment or Solar System alignment EQAutoAlign The EQAutoAlign uses all the same time site information as th...

Страница 14: ...amed Stars NamedObject Double Stars Variable Stars Asterisms andCCDObjects Selecting any one of these catalogs will display a numeric alphabetical listing of the objects under that list Pressing theUP...

Страница 15: ...number 1 on the hand control is the slowest rate 5x sidereal and can be used for accurate centering of objects in the eyepiece and photographic guiding To change the speed rate of the motors Press th...

Страница 16: ...by entering the R A and declination for that object Scroll to the Enter RA DEC command and press ENTER The display will then ask you to enter first the R A and then the declination of the desired obje...

Страница 17: ...tions If you notice a jump when releasing the button but setting the values lower results in a pause when pressing the button go with the higher value for positive but use a lower value for negative C...

Страница 18: ...acklash compensation values initial date and time longitude latitude along with slew and filter limits will be reset The hand control will ask you to press the 0 key before returning to the factory de...

Страница 19: ...ection PEC PEC is designed to improve photographic quality by reducing the amplitude of the worm gear errors and improving the tracking accuracy of the drive This feature is for advanced astrophotogra...

Страница 20: ...focusing knob until the image is sharp If the knob will not turn it has reached the end of its travel on the focusing mechanism Turn the knob in the opposite direction until the image is sharp Once a...

Страница 21: ...e apparent field of the eyepiece supplied by the eyepiece manufacturer by the magnification In equation format the formula looks like this As you can see before determining the field of view you must...

Страница 22: ...oving toward the west Motionof theStars The daily motion of the Sun across the sky is familiar to even the most casual observer This daily trek is not the Sun moving as early astronomers thought but t...

Страница 23: ...y bright star in the telescope s database select the AlignWedge option The telescope will then re slew to the same star 1 Center the star in the finderscope and press ENTER 2 Then accurately center th...

Страница 24: ...one after any one of the previously mentioned methods has been completed To perform the declination drift method you need to choose two bright stars One should be near the eastern horizon and one due...

Страница 25: ...te power PlanetaryObserving Hints Remember that atmospheric conditions are usually the limiting factor on how much planetary detail will be visible So avoid observing the planets when they are low on...

Страница 26: ...ance deep sky viewing from light polluted areas by blocking unwanted light while transmitting light from certain deep sky objects You can on the other hand observe planets and stars from light pollute...

Страница 27: ...models are available ShortExposurePrimeFocusPhotography Short exposure prime focus photography is the best way to begin recording celestial objects It is done with the camera attached to the telescope...

Страница 28: ...for your next exposure Don t forget to take photos of varying duration and keep accurate records of what you have done Record the date telescope exposure duration eyepiece f ratio film and some commen...

Страница 29: ...s ENTER You will have 5 seconds before the system starts to record The first time each observing session that PEC record or play is selected the worm gear must rotate in order to mark its starting pos...

Страница 30: ...f 2 There are only a select few objects that work well at f 10 The Moon images fine because it is so bright but planets are still a bit small and should be shot at f 20 The Ring Nebula is a good candi...

Страница 31: ...view 5 times larger and the object size 1 5 compared to that of f 10 see Figure 8 8 FIGURE 8 8 Telescope Standard f 10 f 2 Model Configuration Configuration 8 80 2032 mm 16 406 4 mm 9 25 93 2350 mm 1...

Страница 32: ...damage the optics If dust has built up on the corrector plate remove it with a brush made of camel s hair or a can of pressurized air Spray at an angle to the lens for approximately two to four second...

Страница 33: ...direction than simply repeat steps 2 through 6 as described above for the new direction FIGURE 9 3 A collimatedtelescope should appear symmetrical withthe central obstruction centered inthe star s di...

Страница 34: ...T shaped assembly that attaches to the rear cell of the telescope As light from the telescope enters the guider most passes straight through to the camera A small portion however is diverted by a pris...

Страница 35: ...122x Resolution Rayleigh Criterion 68 arc seconds 59 arc seconds 50 arc seconds Dawes Limit 57 arc seconds 49 arc seconds 42 arc seconds Light Gathering Power 843x 1127x 1593x Near Focus with Standard...

Страница 36: ...tude star or other celestial object as perceived by an observer on Earth Arc minute A unit of angular size equal to 1 60 of a degree Arc second A unit of angular size equal to 1 3 600 of a degree or 1...

Страница 37: ...celestial pole and ends at the South celestial pole and passes through the zenith If you are facing South the meridian starts from your Southern horizon and passes directly overhead to the North celes...

Страница 38: ...anet U Universe The totality of astronomical things events relations and energies capable of being described objectively V VariableStar A star whose brightness varies over time due to either inherent...

Страница 39: ...a Dec R34AB 12CE Scope must be aligned If command conflicts with slew limits there will be no action Get Azm Alt Z 12AB 4000 10 characters returned 12AB Azm comma 4000 Alt Get RA Dec E 34AB 12CE Scope...

Страница 40: ...38 www celestron com APPENDIXD MAPSOFTIMEZONES...

Страница 41: ...www celestron com 39...

Страница 42: ...40 www celestron com APPENDIXE SKYMAPS...

Страница 43: ...www celestron com 41...

Страница 44: ...42 www celestron com...

Страница 45: ...www celestron com 43...

Страница 46: ...44 www celestron com...

Страница 47: ...www celestron com 45...

Страница 48: ...EclipseType Duration Location 2001 Dec 14 Annular 03m53s North America Hawaii 2001 Jun 21 Total 04m57s South Africa Madagascar 2002 Dec 04 Total 02m04s S Africa Indonesia Australia 2002 Jun 10 Annula...

Страница 49: ...cted to abuse misuse mishandling or unauthorized repair Further product malfunction or deterioration due to normal wear is not covered by this warranty CELESTRON DISCLAIMSANYWARRANTIES EXPRESSOR IMPLI...

Страница 50: ...ars of age and older 2835 Columbia Street Torrance CA 90503 U S A Telephone 310 328 9560 Fax 310 212 5835 FCC Statement This device complies with Part 15 of FCC Rules Operation is subject to the follo...

Отзывы: