


www.usaprocom.com
200028-01A
14
NG
3-3.5"WC
LP
8-11"WC
INSTALLATION
Figure 11 - Settings for Propane/LP Gas
Selection
4. Remove hex plug (with wrench provided)
from propane/LP gas inlet of regulator
(see Figure 11). Install hex plug into NG
inlet of regulator. Install gas line into LP
inlet of regulator. Use thread sealant to
assure there are no leaks.
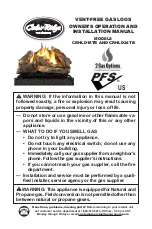
Figure 12 - Attaching Heater Base to
Fireplace Floor
Masonry
Screw
INSTALLING HEATER BASE ASSEMBLY
Installation Items Needed
• hardware package (provided with heater)
• electric drill with 3/16" masonry drill bit
1. Position heater base assembly in fire-
place. Center base assembly left to right
and front to back inside fireplace.
2. Mark screw locations through holes in
mounting brackets (see Figure 12). If
installing in a brick-bottom fireplace, mark
screw locations in mortar joint of bricks.
3. Remove heater base from fireplace.
4. Drill holes at marked locations using 3/16"
drill bit.
5. Attach base assembly to fireplace floor
using two masonry screws provided in
hardware package (see Figure 12).
6. Connect to gas supply. See
Connecting
To Gas Supply
, page 15.
WARNING: You must secure
this heater to fireplace floor. If
not, heater will move when you
adjust controls. Moving heater
may cause a gas leak.
WARNING: If installing in a
sunken fireplace, special care
is needed. You must raise the
fireplace floor to allow access to
heater control panel. This will in-
sure adequate air flow and guard
against sooting and controls
being damaged. Raise fireplace
floor with noncombustible mate-
rial. Make sure material is secure.
CAUTION: Do not pick up
heater base assembly by burners.
This could damage heater. Only
handle base assembly by grates.
IMPORTANT:
Make sure the heater burners
are level. If heater is not level, heater will not
work properly.
NG
LP
Right Side
of Heater
NG
LP
Fuel Selector Knob
Hex Plug
Gas Connection Fitting
For changing from natural gas
supply to propane supply:
1.
Remove bottom screw from cover plate.
Rotate to expose fuel selection device
(see Figure 11).
2. For propane gas, press in knob using a flat
screwdriver with a blade the thickness of
a quarter and turn knob counterclockwise
until the knob locks into the LP posi-
tion (see Figure 11). Fuel selection device
must be locked in the LP position. Do not
operate heater between locked positions.
3. Replace cover over fuel selection device
and reinstall screws.