4
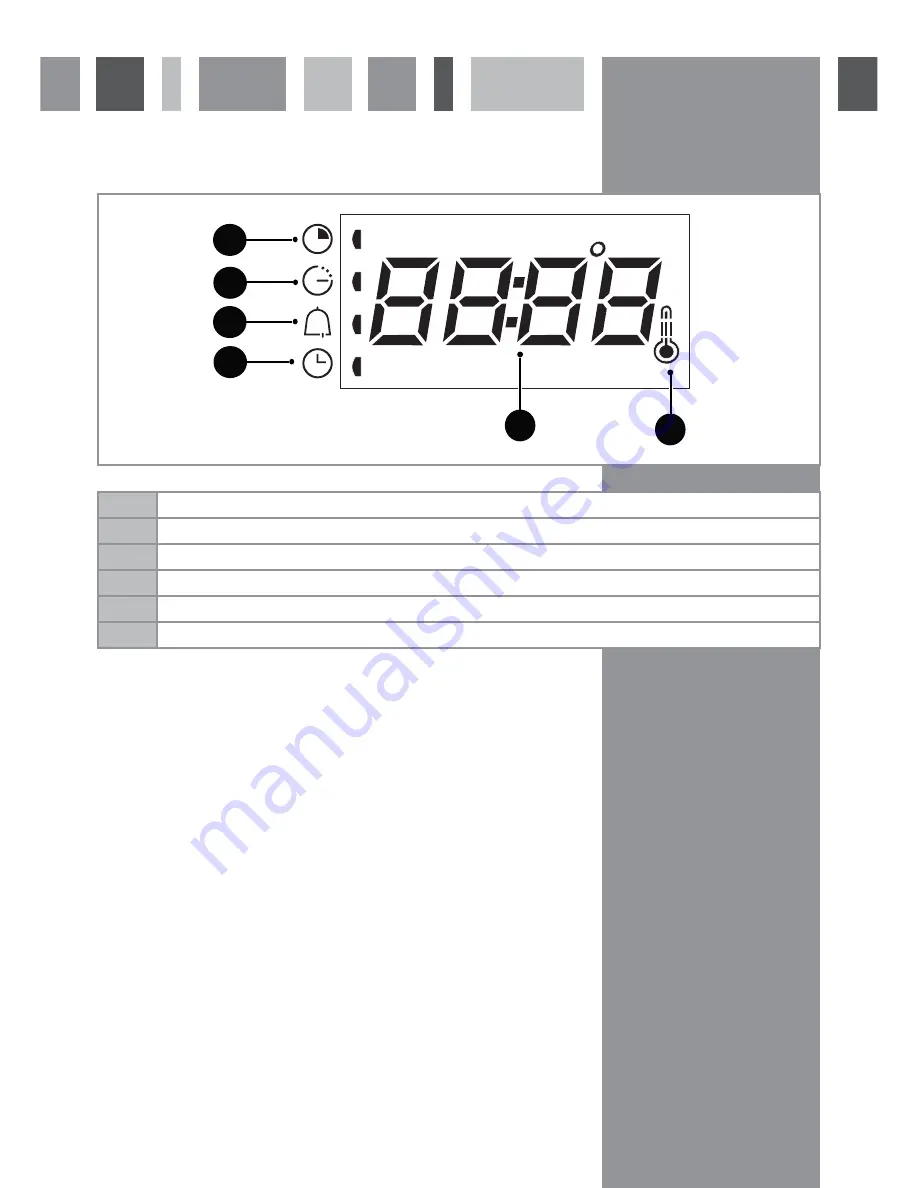
The Control Panel and Display
Fig.4
A
Cooking time indicator
B
End time indicator
C
Minute minder indicator
D
Clock indicator
E
Clock/temperature display
F
Temperature indicator
Страница 1: ...epartment The Group Ltd Harby Road Langar Nottinghamshire NG13 9HY T 01949 862 012 F 01949 862 003 E service cda eu W www cda eu Passionate about style SV430 Compact Oven Manual for Installation Use a...
Страница 2: ...the event of a fault with your appliance and to register your appliance for guarantee purposes Appliance Model Serial Number CE Declarations of Conformity This oven has been designed constructed and m...
Страница 3: ...luminium foil Do not perform maintenance or cleaning of the oven without first switching off the electricity supply If the oven has recently been used allow to cool Do not use steam cleaners to clean...
Страница 4: ...ction control knob This control knob allows you to select the programme required B Clock timer key This key activates the clock timer selection C Temperature key This key activates the temperature sel...
Страница 5: ...4 The Control Panel and Display Fig 4 A Cooking time indicator B End time indicator C Minute minder indicator D Clock indicator E Clock temperature display F Temperature indicator E F B C D A...
Страница 6: ...n is equipped with a minute minder to count down for a maximum of 60 minutes To set the timer touch so the display flashes 0 00 and the minute minder indicator flashes Turn the selection control knob...
Страница 7: ...isplay To set a delayed programme the cooking starts and finishes at a programmed time first set the cooking time as above then touch twice so the end time indicator flashes and the display flashes th...
Страница 8: ...he energy label in conformity with European standard EN50304 and European directive 2002 40 CE 4 Fan With Lower Heat preset 150 range available 75 250 This function circulates the heat produced by the...
Страница 9: ...vegetables moist 9 Fan Assisted Oven preset 175 range available 75 220 Using the fan to circulate the heat produced by the top and bottom heating elements this function circulates the heat around the...
Страница 10: ...cleaners are available We recommend the CDA E Cloth available from the CDA Sales Team for cleaning stainless steel surfaces Enamelled parts All enamelled parts must be cleaned with a sponge and soapy...
Страница 11: ...shown in figure 7 Then insert the other two red stoppers in the A slots as shown in figure 8 Lever the stoppers to lift the frame and the glass from the door as shown in figure 9 Remove the inner fra...
Страница 12: ...e glass to shatter Rinse with clean water and dry off with a lint free cloth Replace the clean panes in the door taking care to slot the frame under the spigot next to the hinge as shown in figure 11...
Страница 13: ...g Light fault Call CDA Customer Care The oven starts beeping during cooking The oven is at the required temperature The oven starts beeping at the end of the cooking programme The programme has finish...
Страница 14: ...the oven and adjacent furniture doors Lift the oven carefully into position on the shelf taking care NOT to lift it by the door handle If you open the oven door you will see 2 screw holes 1 on each si...
Страница 15: ...an 2m from the appliance This appliance is supplied with a 3 core mains cable the wires are in accordance with the following code Green and Yellow Earth Blue Neutral Brown Live Please note The mains c...
Страница 16: ...roup Ltd Harby Road Langar Nottinghamshire NG13 9HY T 01949 862 012 F 01949 862 003 E service cda eu W www cda eu Passionate about style To contact our Customer Care Department or for Service please c...