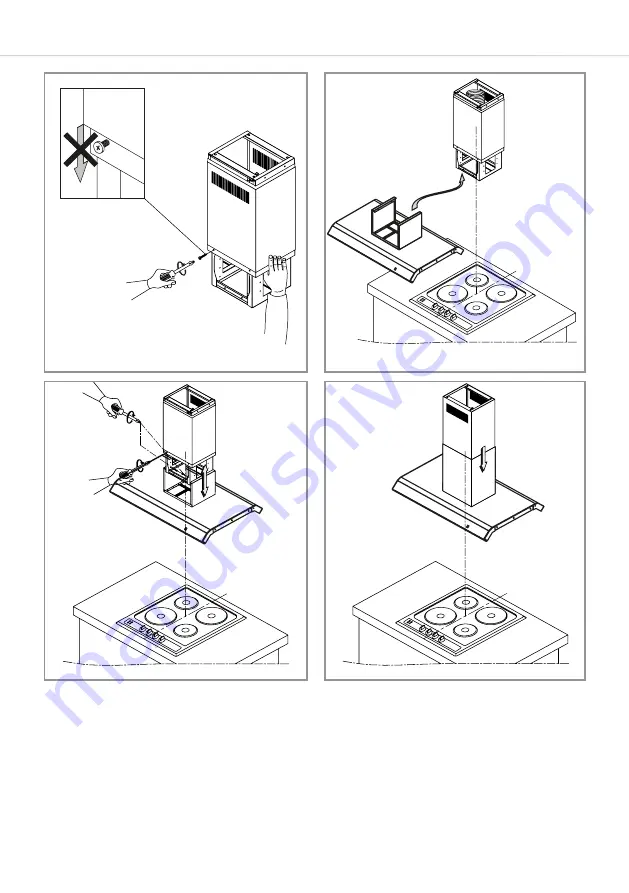
CDA EZTK90BL Скачать руководство пользователя страница 16

16

Fig. 15

Fig. 16

Fig. 17

  Remove the grease filters and connect the 10 pin connector to the 

10 pin lead in the extractor body. Refit the box to house the two.

  Switch on the mains supply to the extractor and double check that 

everything works.

Fig. 18

Содержание EZTK90BL

Страница 1: ...er Care Department The Group Ltd Harby Road Langar Nottinghamshire NG13 9HY T 01949 862 012 F 01949 862 003 E customer care cda eu W www cda eu www cda eu EZTK90BL Extractor Installation Use and Maint...

Страница 2: ...nce 8 Removing the grease filter s 9 Changing fitting the charcoal filter s 10 Changing the light 10 16 Installation 11 Installation preparation height 13 Ducting and ventilation 17 Mains electricity...

Страница 3: ...edge about it unless they have had supervision or instructions on how to use the appliance by someone who is responsible for their safety Under no circumstances should any external covers be removed f...

Страница 4: ...esources As a reminder of the need to dispose of household appliances separately the product is marked with a crossed out wheeled dustbin Please note Under no circumstances should the extractor be con...

Страница 5: ...on the environment When cooking with pots and pans always cover them with lids where possible Remember to switch the extractor off at the end of cooking or use the countdown timer available on some mo...

Страница 6: ...light button C To switch on the extractor or to change the speed at any time when the extractor is running Press the relevant speed button B for the first second third or fourth speed level as require...

Страница 7: ...re not to use water in excess when cleaning the extractor This will help to prevent water entering the internal workings of the extractor and therefore help to preserve its life span We recommend keep...

Страница 8: ...dishwasher see note on page 9 ensuring that you place it in an upright position to prevent damage from other items in the dishwasher After rinsing and drying refit the filters To remove the grease fil...

Страница 9: ...e charcoal filters every four to six months depending on use To attach a new charcoal filter first remove the grease filters as described above Then offer up the charcoal filter to the inside of the g...

Страница 10: ...r adjacent areas during or straight after prolonged use of the lights The light is designed for use during cooking and not for general room illumination Extended use of the light can reduce the life s...

Страница 11: ...ld be observed this is a legal requirement and may lead to your hob being disconnected from the gas supply and the installation being reported under RIDDOR the height should be measured from the top o...

Страница 12: ...mum distance from CDA Gas Hob 650mm Fig 5 Fig 6 Taking into account the extractor dimensions and the advice regard ing installation height as per page 11 mark where the installation cage will be Use t...

Страница 13: ...through any surfaces ensure that adequate measures have been taken to ensure no electrical cables or similar lie behind Prepare the ceiling ducting outlet Fig 7 and also the mains supply for the extr...

Страница 14: ...Taking care not to damage them slide the chimney sections over the installation cage Fig 14 Slide both sections up to the top of the installation cage Support the chimney sections and fit the four si...

Страница 15: ...heights are observed as per page 11 If not now is the time to make any adjustments Connect the black and white LED assembly leads from the extractor body to their respective leads from the installatio...

Страница 16: ...7 Remove the grease filters and connect the 10 pin connector to the 10 pin lead in the extractor body Refit the box to house the two Switch on the mains supply to the extractor and double check that e...

Страница 17: ...with the following code BLUE NEUTRAL BROWN LIVE GREEN YELLOW EARTH As the colours of the wires in the mains lead for the appliance may not correspond with the coloured markings identifying the termina...

Страница 18: ...your extractor is not working 1 Check that the mains supply has not been switched off 2 Check that the fuse in the spur has not blown If your lights are not working 1 Check that the mains supply has...

Страница 19: ...19 E O E All instructions dimensions and illustrations are provided for guidance only CDA reserve the right to change specifications without prior notice NOTES...

Страница 20: ...F 01949 862 003 E customer care cda eu W www cda eu www cda eu Please contact our Customer Care Department for Service on the details below Customer Care Department The Group Ltd Harby Road Langar No...

Отзывы: