29
Installation
•
Do not install this appliance if it is damaged in any way. Installing a
damaged appliance may invalidate the warranty and could cause
further damage to the surrounding area.
•
Do not hold the appliance by the door or control panel to move
it as this may cause damage.
We recommend seeking the help of
another individual when moving and installing this appliance.
•
We would recommend leaving a certain clearance either side of the
dishwasher so that removal of the appliance is easier, should the
need arise.
•
The water supply tap should be located in an adjacent cupboard so
that it can be accessed after installation.
•
Ensure the appliance is level by adjusting the feet as necessary.
Problems with the level seating of the appliance can lead to issues
with the door opening and closing.
•
Only use the water inlet supplied with the appliance.
•
If the water pressure is above 10 bar, a pressure relief valve should
be used.
•
After connecting the water supply, check to ensure there are no
leaks.
•
The water outlet can either be connected to a water drain or to
a sink outlet spigot.
Where the dishwasher drain hose is to be
connected to a sink spigot, ensure that the spigot is cut/opened
(if required) before attaching the drain hose.
•
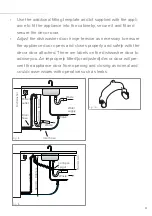
The drain connection (fig. 16) should be at a minimum of 600mm
and a maximum of 1100mm from the floor. The drain hose should be
no longer than 4m in length to ensure good performance from the
dishwasher
.
•
This appliance is cold fill only.
Содержание CDI6241
Страница 1: ...CDI6241 Integrated dishwasher Use and maintenance ...
Страница 34: ...34 NOTES ...
Страница 35: ...35 NOTES ...


