background image


78                                     

DIGITAL VIDEO RECORDER


IX.BACKUP 


1. Manual Back up   


1.1 Internal DVD- R/W


<Note>


Backup

  process  to  the  CD-RW  and  DVD-RW  only  works  on  manual  method  due  to  the  limited 

capacity of the medium.


1.  Insert a blank Media into Built-in CD. 

<Note>


Please note that CD/DVD-RW disks must be formatted before backup. Disk Format is discussed in 

Disk Manu.


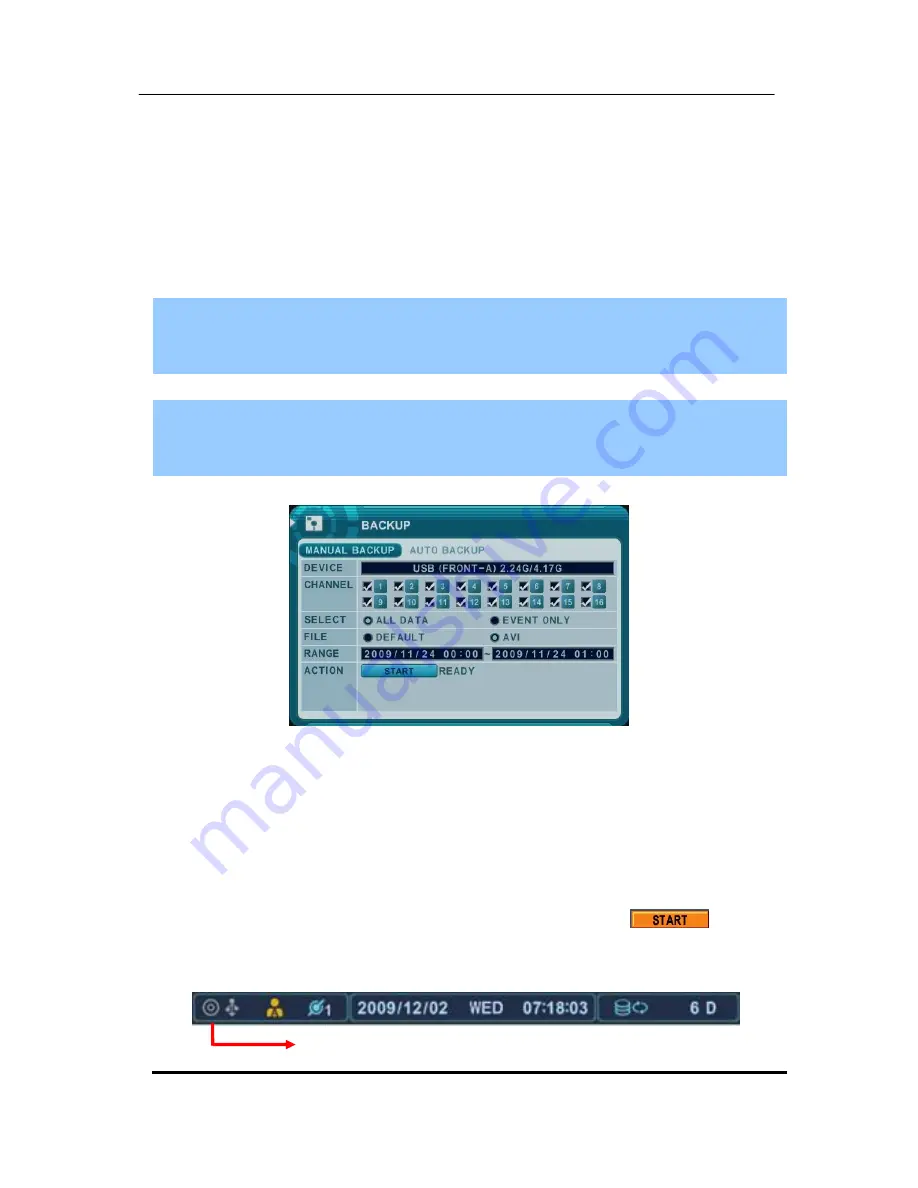
2.  Press [BACKUP] button on IR Remote and the backup menu will appear.   


3.  Use 

[-, +]

 button to change select device: Rack-CD/DVD RW 

4.  Use 

[-, +]

 button to select channel. All channels are set by default.   

5.  Please select the data for BACKUP. 

(1)  ALL DATA: Normal Recording Data   

(2)  Event Only : Event Recording Data.   

6.  File format will be saved as 

“.s”    AVI is not supported for CD/DVD 

7. 

Select the time range starting time and ending time. 


8. 

Enter the numbers as required in 24-hour format, then move to 

.


9. 

Press

 [+] 

button to start BACKUP. 

* CD/DVD indicator will be changed to 

[LIGHT BLUE]

 Color that the backup is in session.   


                                      RACK-CD/DVD ROM   

Содержание iDVR-RT16

Страница 1: ...iDVR RT16 Real Time Stand Alone Surveillance DVR User Manual...

Страница 2: ...alert the user to the presence of un insulated dangerous voltage within the product s enclosure that may be of sufficient magnitude to constitute a risk of electric shock to persons The exclamation po...

Страница 3: ...tion of N C Normally Close 17 3 PTZ and controller connection 18 3 1 Connecting the Speed Dome directly into DVR 18 3 2 Connecting Both Speed Dome and DVR via J box 18 3 3 Connecting Single User with...

Страница 4: ...41 4 SCHEDULE 42 4 1 CHART Setup 42 4 2 Holiday Setup 44 5 DISK 45 5 1 DISK Manager 45 5 2 Recording DISK 47 5 3 SMART STATUS 48 6 NETWORK 49 6 1 ETHERNET 49 6 2 GENERAL 50 6 3 EMAIL 51 6 4 SMTP 52 6...

Страница 5: ...review Search Single Channel Playback 73 2 3 Event Record Search 74 2 4 Event Source Search 74 2 5 Event Area Search Single Channel Playback 75 3 Go to Search 75 4 Log List Search 76 IX BACKUP 78 1 Ma...

Страница 6: ...electrical shock Qualified service personnel authorized by your equipment distributor should conduct internal inspections alterations and repairs Stop operating the equipment immediately if it emits s...

Страница 7: ...heat Neither should you immerse them in water Such exposure may damage the batteries and lead to the leakage of corrosive liquids fire electrical shock explosion or serious injury Do not attempt to d...

Страница 8: ...FCC Compliance This equipment has been tested and found to comply with the limits for a Class A digital device pursuant to part 15 of the FCC Rules These limits are designed to provide reasonable prot...

Страница 9: ...sing do not attempt to use the unit contact the supplier immediately If the unit must be returned it must be shipped in the original packing box CONTENTS QUANTITY REMARK DIGITAL VIDEO RECORDER 1 UNIT...

Страница 10: ...the Digital Video Recorder From the left Power red Recording red Scheduled Recording green Lock green and Network green 4 Playback Record Control Used to Start and Stop Recording or Playback 5 Shuttle...

Страница 11: ...Control Buttons DISPLAY Press this button to display the cameras in multi screen mode or to switch sequence function ZOOM Press this button to display zoom area box press ENTER to enlarge the image P...

Страница 12: ...11 DIGITAL VIDEO RECORDER 2 Rear Panel Connectors 8 Channel 16 Channel...

Страница 13: ...on 1 8 1 16 8 AUDIO Input connectors D SUB to RCA 8CH 1 8CH 16CH 1 8CH 9 16CH 9 AUDIO Output 1 connectors RCA 10 Composite Monitor Output BNC standard composite video output connector 11 VGA out conne...

Страница 14: ...er button within two seconds to select the system ID of the DVR If you set the System ID to Zero you can control multiple DVRs at the same time STOP PLAY BACK UP DVR ID MENU LOG FAST FORWARD DISPLAY M...

Страница 15: ...he control by mouse Connect a mouse via USB port before use If you click right button of your mouse in Live mode and Playback mode you will see following virtual controller This Virtual Keyboards oper...

Страница 16: ...15 DIGITAL VIDEO RECORDER II INSTALLATION CONNECTIONS 1 Camera Monitor Audio Alarm sensor and Power cord Audio Audio Input Output impedance 0 dB 10 k Ohm 300 ohm voltage range 1 Vpp 1 4 Vpp...

Страница 17: ...16 DIGITAL VIDEO RECORDER 2 Alarm inputs and Alarm outs 2 1 Connection of N O Normally Open The maximum of Alarm output is 1A 30VDC 0 5A 125V AC Alarm Input AI 8ch 1 8 16ch 1 16 G GND...

Страница 18: ...17 DIGITAL VIDEO RECORDER 2 2 Connection of N C Normally Close...

Страница 19: ...18 DIGITAL VIDEO RECORDER 3 PTZ and controller connection 3 1 Connecting the Speed Dome directly into DVR 3 2 Connecting Both Speed Dome and DVR via J box...

Страница 20: ...IGITAL VIDEO RECORDER 3 3 Connecting Single User with 2 DVR Configuration Multiple PTZ cameras are connected by daisy chaining the camera connection Multiple Keyboards are connected by cascade connect...

Страница 21: ...nt has limited function for Downloading Please use the proper version depends on computer account d 16MB Video Card e 10 100 1000 BaseT Ethernet Port f CAT 5 6 UTP Cable for LAN Crossover cable for di...

Страница 22: ...21 DIGITAL VIDEO RECORDER III QUICK START PAGE ADMIN and the default password is 000000 The Default User ID admin and password to run the EMS Client software is 0...

Страница 23: ...for the very first time the time and date are set as default to January 1 2009 Thursday 01 00 00 Before any other operation of the Digital Video Recorder it is important to setup the time and the dat...

Страница 24: ...Continues Recording 3 Black No Recording 2 Event Indicator 1 Indicate Alarm In terminal is triggered by an alarm sensor To appear Alarm window press UP button This button toggles between Shows or Hid...

Страница 25: ...panel It s changed to blue color while it s doing backup 4 Indicate Login or Locking status 5 Indicate Audio Data is stored the selected time during playback and turn to blue color 6 It shows Number...

Страница 26: ...lay 1 Press DISPLAY buttons to activate the multiscreen display It is changed the order as shown below among your choice of SPLIT MODE 2 To start Auto Sequence press DISPLAY buttons for 2 seconds to b...

Страница 27: ...sitioning It is possible to reposition the camera from the bigger window with the one from a smaller one It is used on 6 7 8 9 10 13 16 split mode Press F2 button on the remote controller Mark will be...

Страница 28: ...display of the camera you wish to zoom 2 Then press the ZOOM button on IR Remote controller Zoom area box pops up as shown below x2 3 Move the box to the desired position using Direction buttons 4 Pr...

Страница 29: ...auto sequence mode and spilt mode Spot Sequence Mode Press Spot button then Display for 2 seconds to start auto switch cameras Sequence interval can be set from the Sequential Setup Spot Split Mode Pr...

Страница 30: ...ess the power button 2 When the DVR is powered on it will start to scan DVR status 3 Live Viewing screen will appear after initialization about 50sec It can be delayed when you have defect HDD it will...

Страница 31: ...ted in color 4 Press ENTER button to select the menu and display Sub Menu Using the mouse double click 5 Use Left Right buttons to select on TAP menu Selected items changed into Orange color It is aut...

Страница 32: ...RDER LINE Select Board Line between cameras GRAY WHITE BLUE BLACK DARK GRAY BACKGROUND Select Background color on NO VIDEO status GRAY WHITE BLUE BLACK DARK GRAY OSD ALIGNMNET The main video output ca...

Страница 33: ...n different way MAIN SPOT1 SPOT2 SPOT3 2 Dwell Time Select the interval that each camera or Multi screen mode is displayed in a rotation Use button to change 1 second 30 second 3 Mode Select the appro...

Страница 34: ...ess CANCEL button 4 Press Display button for 2 seconds to start Auto Switch cameras on Main Monitor Press Spot button then Display for 2 seconds to start auto switch cameras on Spot Monitor 1 3 EVENT...

Страница 35: ...Motion Detection a Motion Level The sensitivity settings are 1 Low sensitivity Level 20 High sensitivity By default the level is set to 10 b Motion Grid The area property is highlighted and motion de...

Страница 36: ...e back of the unit Multiple PTZ cameras are connected by daisy chaining the camera connection This DVR allows you to address and control multiple PTZ cameras individually Press Enter to configure PTZ...

Страница 37: ...eate a camera title using the virtual keyboard or pressing appropriate Numeric button on IR Remote or front panel Virtual Keyboard by Mouse on IR Remote Controller or Front Panel 4 Save changes and ex...

Страница 38: ...h camera individually and then multiplexes them You can setup maximum recording speed for each channel as next page 5 Auto Delete Allows you to configure when the DVR automatically deletes all data fr...

Страница 39: ...buttons By default audio alarm motion recording are off The DVR records video data continuously over 24 hour period Recording setup is for normal recording Different settings can be configured for eac...

Страница 40: ...lity for each camera Determine whether Alarm Motion Video Loss for EVENT recording on DAY EVNET Tap 1 Alarm Recording One Alarm input can be configured to one channel One camera channel can be assigne...

Страница 41: ...using Wheel b indicate multiple alarm sources are selected c Please refer to CAMERA menu for Motion setup Note There may be cases when the recorder s built in motion detection function does not operat...

Страница 42: ...ous Event Motion Alarm Recording Both Continuous and Event recording can be set at the same time The DVR record video data continuously over 24 hour period but when Event occurs recording speed and pi...

Страница 43: ...bled By selecting Schedule USE on Record setup Night Mode will be activated 4 1 CHART Setup The schedule chart shows a graphical representation of the defined record mode Night mode will be set by def...

Страница 44: ...Day No Rec BEGIN The time of recording start END The time of recording end The ending time must not be before the starting time or the same as the starting time It must be any time over the starting...

Страница 45: ...hedule the holiday schedule will override the weekday schedule 1 A cursor highlighted menu can be moved using the Direction buttons 2 Select each day to configure press Enter or clicking by mouse 3 Us...

Страница 46: ...ently 4 Status a CD DVD CD or DVD is installed for back up usages b Unknown New installed Disk c Empty Formatted but not used in current DVR d Recording Data HDD stored Recording data but not used in...

Страница 47: ...uch as Media or External HDD formatted for backup usages Here is the guide for backing up data to various device Device ODD Media HDD CD DVD R CD DVD RW SATA USB Media can be formatted x o o x Device...

Страница 48: ...ys logical Master and Slave device in mirroring Upper device is Master and the other is used for slave If slave HDD is reached to 100 synchronize Master HDD can be removed as well 3 Status 1 Stable Th...

Страница 49: ...RT STATUS It displays HDD information such as Bad sector temperature HDD running time S M A R T information has slight different between different HDD manufactures It recommended exchanging the HDD wh...

Страница 50: ...ed by the other port 1 Ethernet 1 1 Static If the Static IP is selected the following settings are available a IP Address Enter the static IP address b Netmask Enter the IP address of subnet mask c Ga...

Страница 51: ...o ON the IP address Gateway and subnet Mask will be assigned by DHCP server i e The local area network Router 6 2 GENERAL 1 Access Port Select 0001 9999 Enter the port number that the client will use...

Страница 52: ...l notification on or off The default is off Press button to select Using the mouse click the option to select mail server 1 Default Default it is provided by manufacture Mail notification options and...

Страница 53: ...e mail server name or IP To server name using the virtual keyboard or pressing appropriate Numeric button on IR Remote or front panel 2 Port Define the port that the SMTP server will communicate thro...

Страница 54: ...or off The default is off Press button to select Using the mouse click the option to select DDNS provider 1 Default Default it is provided by manufacture We offer DDNS service for remote at http www d...

Страница 55: ...er the name you set for the DDNS web configuration 2 User ID Enter your user ID 3 Password Enter your password 4 Update Test Click the Update Test button to confirm the connection A success message wi...

Страница 56: ...ocol FTP Port 21 Telnet Port 23 and Post Office Protocol 3 POP3 Port 110 are used To solve the firewall problem and let visitor into the network the user instructs the router to allow traffic to pass...

Страница 57: ...network and if you know your Static IP address use the IP address to configure the S W Ex http 124 137 23 72 6000 2 Description of Symbols Connected x Not able to connect There s some limitation depen...

Страница 58: ...deice to VGA Output resolution 800 600 1024 768 1280 1024 2 Audio Record Select audio recording device usage ON or OFF The audio data is always recorded in real time unlike the video data that can be...

Страница 59: ...s 2 INPUT Change the input type Use button to change the values 3 OUTPUT you can configure how the relay outputs are controlled automatic or manual 1 Use Change the output type 2 Inactive Select turn...

Страница 60: ...Control Manual stops for relay output and buzzer 4 Buzzer 1 USE ON The buzzer Sounds if an alarm is triggered The buzzer will sound for the duration of the RECORD TIME This buzzer related with Alarm...

Страница 61: ...ur group when event detected 3 Inactive Select Camera position after event duration expires 4 Event Edit Press enter to edit multiple event The menus are displayed with options on the left hand column...

Страница 62: ...such Set the ID of IR controller on 00 to control DVRs at the same time whatever DVR ID are 2 DVR Name Type the DVR name to distinguish location when you have several DVRs on Network 3 KEY TONE By de...

Страница 63: ...o change in the system time stamp for recorded data When the Daylight saving End date and time occur the DVR s time goes back one hour 2 Date Format Select Date display format MM DD YYYY DD MM YYYY YY...

Страница 64: ...DMIN Select User 1 5 and then activate it by on a Name Length up to 10 characters b Characters A to Z numerals 0 to 9 2 Privilege Admin can define each user s Privilege such as PLAYBACK PTZ CONTROL BA...

Страница 65: ...oring 5 Password Enter the 6 numbers for the new password and then re enter the same password under COMFIRM section The asterisk is displayed for each character entered 2 Save changes and exit the men...

Страница 66: ...Press button to find upgrade file If the DVR find a valid update file update menu is activated 3 Press button to find proper upgrade file Version information is displayed If there are several valid up...

Страница 67: ...ed 8 5 INFO System information contains brief model information Mac address and installed HDD status Press info button on the remote control or front panel The system information is displayed Using Di...

Страница 68: ...ted operation 1 P T Z Menu 1 To activate the Pan Tilt Control select the full screen display of the camera you wish to control 2 Then press the P T Z FOCUS button Shortcut Menu box pops up as shown be...

Страница 69: ...SPOT OUT on remote controller a Move the PTZ into desired location b Press the Preset button c Custom 1 will illuminate d Set the for the Preset location e Press Enter to save and exit Go to preset po...

Страница 70: ...values Group 1 Group 2 Group 3 Group 4 3 This is sub menu of each Tour group The menus are displayed with options on the left hand column and settings in the right hand column a Group List Each Tour...

Страница 71: ...Tilt Power Button Function Auto Pan STOP on remote controller Auto Tilt REW on remote controller Power on off FF on remote controller 6 PTZ Camera Model PAN TILT ZOOM Camera List Model Name 3X Speed P...

Страница 72: ...e It supports three different search modes Date Time Event Event Area and Log search 1 Playback When the PLAY button is pressed the DVR starts to play back any recorded data from the latest data wheth...

Страница 73: ...in Minute 1min Use button to go back Minute 1min Minute 5min Hour Day Using mouse wheel is used for button Note Use Play button to move at the end of data Use Rewind or Fast forward button to move nex...

Страница 74: ...annel to review pressing by numeric button 3 Use button to navigate to the desired Day Hour Minute 5min Minute 1min Use button to go back Minute 1min Minute 5min Hour Day Using mouse wheel is used for...

Страница 75: ...plays the recorded events 1 Use the directional button to select Event type 2 Press Enter to set up Press button to select event record It s set by default 5 Save changes and exit the menu press MENU...

Страница 76: ...he matches the search area defined by selected cell Press Cancel button twice to exit Setup Time Search will display you selected time bar 6 Go to Search 1 Press Time Search button for 2 seconds Then...

Страница 77: ...tton on IR Remote then Log List Menu pops up as shown below MENU TAP CONDITION ALL It has a list of all the events since the initial power on procedure of DVR SYSTEM It shows All System List NETWORK I...

Страница 78: ...77 DIGITAL VIDEO RECORDER Detail log information icon means that there is more information in detail Press info button The window of detail information will be popped up like below picture...

Страница 79: ...ote and the backup menu will appear 3 Use button to change select device Rack CD DVD RW 4 Use button to select channel All channels are set by default 5 Please select the data for BACKUP 1 ALL DATA No...

Страница 80: ...n backup session please do not perform playback 10 When finished the CD icon will changed to Grey color and then eject the media If there is not enough space on the media the DVR will automatically ej...

Страница 81: ...ckup HDD in Window please use FAT32 or NTFS formats To backup as an AVI File set the file format to AVI using button 1 3 Back up Range Setup Press button to set backup Start time press button to set E...

Страница 82: ...P server Port Define the port that the FTP server will communicate through User ID Enter the user ID of FTP Server It is recognized as a small letter even it s displayed as a Capital Letter Password E...

Страница 83: ...p Plug in USB memory stick to USB port Press Log button to see Log list of DVR Press back up button to save log list to USB memory stick 1 Use button to select device 2 Slect type of log list among AL...

Страница 84: ...ime Display Split Mode 1 4 6 7 8 9 10 13 16 Recording Speed 480fps 720 x 480 NTSC 400fps 720 x 576 PAL Recording Mode Continuous Time Limit Alarm Motion Schedule Recording Quality Low Middle High Supe...

Страница 85: ...me Synchronization Supported via NTP server Miscellaneous Controls Mouse IR remote Front Key SMS EMS IE Firmware upgrade Via USB Power Consumption Free Voltage 60W Operation Temperature 0 40 Dimension...

Страница 86: ...DST GMT 06 30 Standard GMT 07 00 Standard Russian DST GMT 08 00 Standard Russian DST GMT 09 00 Standard Russian DST GMT 09 30 Standard Australian DST GMT 10 00 Standard Russian DST Australian DST GMT...

Страница 87: ...nvironment or human health from uncontrolled waste disposal please separate this from other types of wastes and recycle it responsibly to promote the sustainable reuse of material resources Household...

Страница 88: ...1 DIGITAL VIDEO RECORDER Memo...

Отзывы: