


EN-CAHDD2BU3-ZB
2
Quick Start Guide
USB 3.0 Dual-Bay Dock
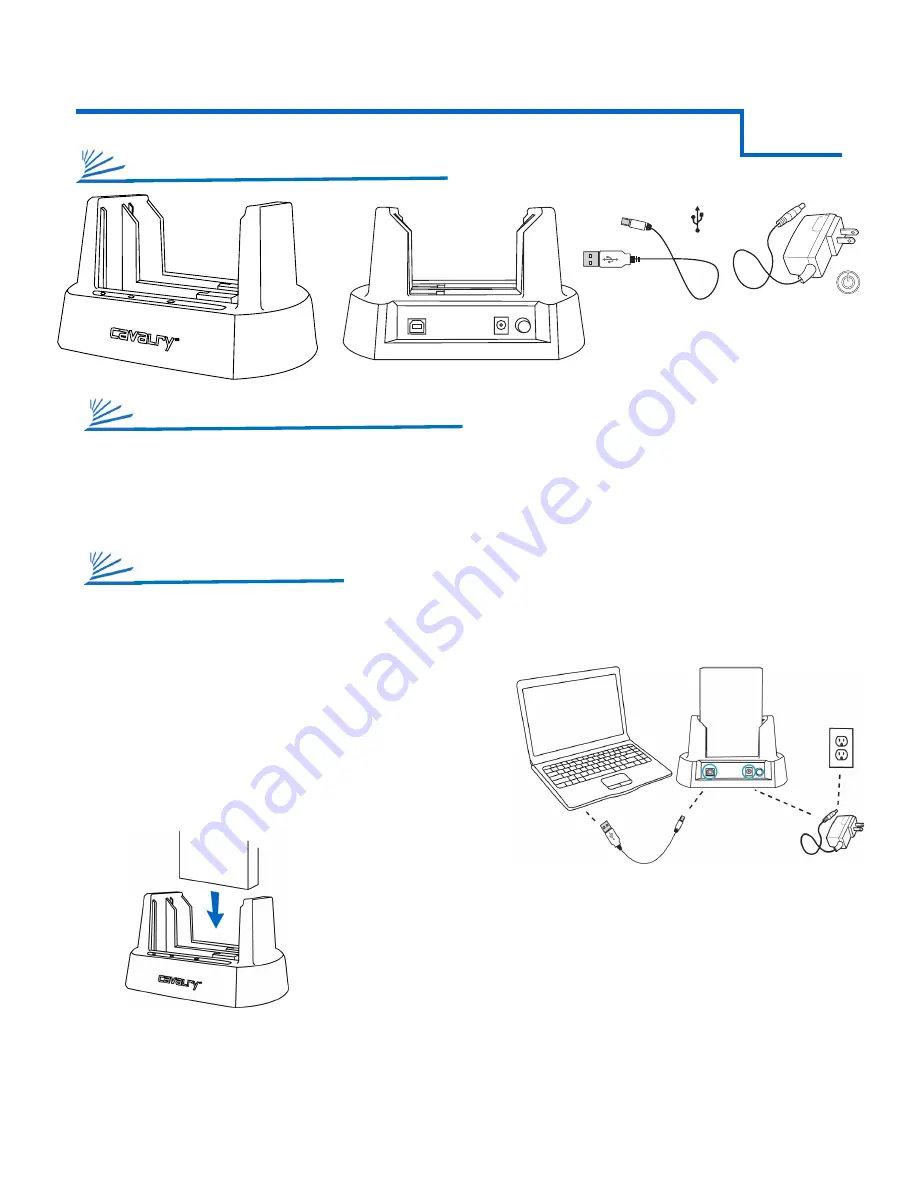
1. Insert 2.5” or 3.5” SATA drives into the dock. Before inserting 2.5” drives, remove the partition at the
bottom of the dock and insert the partition to the HDD slot.
1.
2.
3.
4.
Contact Us
Call:
800.238.4453 (toll-free, USA only)
805.426.1000
Email:
customer [email protected]
Website:
www.cavalry storage.com
5.
1. Power light
2. Drive activity lights
3. USB 3.0 port
4. Power input
5. Power
Note
: Depending on the
drives used, when
powering on, allow up to
30 seconds for both drives
to spin up to speed.
Note
: Ensure a proper connection
when inserting a drive by putting it
straight down and not tilting it. If a
drive is not being detected, turn off
the dock then remove and re-insert
the drive.
2. Connect the USB and power cables then turn the dock on with the power button. Wait until your
computer detects the dock then begin transferring files. New hard drives need to be initialized and
formatted.
Caution
: Removing the hard drives from the dock while it is on may result in data loss. Before turning off the dock, make
sure the hard drives are not busy as indicated by the solid green “Hard Disk Access” lights on the front of the dock.
Troubleshooting
I can’t see the hard drives.
Make sure the power is on and the SATA hard drives have been
inserted straight in and not tilted. Also check all the connection
points as well as the USB ports on the computer as they may be
defective.
How do I initialize / format the hard drives?
Hard drives that have not been initialized may not show up on
the computer. Go to Disk Management (Windows) or Disk Utility
(Mac) and follow the instructions to initialize and/or format the
hard drives.
Why can’t my Windows XP system recognize more than 2TB?
Due to operating system limitations. Windows XP can only
access up to 2TB, even if the actual total capacity is greater.
1. Power LED
2. HDD Status LED
3. USB 3.0 Interface Port
4. DC Power Input
5. Power Switch
1
2
3
4 5
JBOD mode is tech-speak for Just a Bunch Of Disks. In other words, the disks on this drive are not connected in an array. You
will see each disk separately in your computer like you would any other removable storage devices, except these are much
faster and much larger!
JBOD Mode
= Just a Bunch Of Disks.
Installation is a relatively simple process. It consists of two basic steps, all accomplished while your computer is already turned
on: Setup the dock, and initialize the attached blank HDDs in the disk utility of your given operating system.
Connect the Cavalry power supply.
Connect the USB cable to a port on your computer that you
have used recently and know to work well. Take this time to
temporarily eject and disconnect any other external storage
devices you have. This will make it easier to find your new
Cavalry dock.
Insert the hard drives that you are going to
use into the dock.* Make sure that you handle
them very carefully. Check that they are firmly
inserted into the dock. Be sure that you never touch any exposed circuitry or data ports on
the drive or the dock. Hard drives are very fragile devices!
Turn the dock on and proceed to the next step.
A)
B)
C)
D)
*Note:
Ensure a proper connection when inserting a drive by putting it straight down and not tilting it. If a drive is not being
detected, turn off the dock then remove and re-insert the drive.
Note:
Depending on the drives used when powering on, allow up to 30 seconds for both drives to spin up to speed.
Note:
Take a moment to label your power supply with the Cavalry Model # of your unit. A piece of light-colored masking tape
or an address label works great, and can save you tons of time and frustration down the road. Just make sure it is attached well.
Caution
: Removing the hard drives from the dock while it is on may result in data loss.
PRODUCT PART IDENTIFICATION
1
2
CHAPTER
INSTALLATION GUIDE
PRE-CONFIGURED DOCK SETTING
INSTALLATION STEPS
SET UP YOUR DOCK
(For both MAC and PC)


