Catler GR 7010 Скачать руководство пользователя страница 13

11

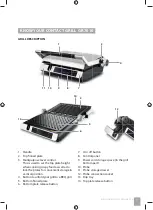
OPERATING YOUR CONTACT GRILL GR 7010

WARNING!
Never heat the grill 
if it’s completely 
closed. Otherwise 
the grilling surfaces 
and the heating 
element might be 
damaged.

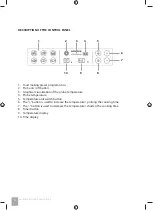
While the grill is being warmed up, the 
temperature on the display is fl ashing. As 
soon as the temperature stops fl ashing, the 
grill is ready for use.
While the grill is being warmed up, insert the 
probe into the thickest section of the meat 
slice or cube you are going to roast.
Put the raw materials to be roasted on the 
bottom grill plate and set the level control on 
the right to a position so that the top plate 
just slightly touches the raw materials on the 
bottom plate when folded down. 

Avoid the top plate fully resting on the raw 
materials.
The display will gradually show the 
temperature inside the meat in which 
it’s inserted. The bar under the “probe temp” 
will light gradually as the temperature 
is increasing, showing temperature 
visualization.
When the temperature reaches the required 
level (see the table below), lift the top plate 
and use wooden, plastic or silicon tools to 
remove meat from the grill plate. Be careful 
when handling the meat in which the probe 
is inserted.
Put the roasted meat on a board and let it 
rest before serving.
Remove the juice and fat residues from 
the bottom grill plate using a paper wipe if 
needed and you can continue cooking.
When the cooking is fi nished, press the 
power on / off  button to turn the grill off  
and unplug the power cord from the mains 
socket. Allow the grill to cool down properly 
before cleaning. Follow the instructions in 
the “Care and Cleaning” section.
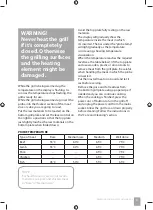
PROBE TEMPERATURE

Type of meat

Rare

Medium rare

Medium

Well done

Beef

55°C

60°C

65°C

75°C

Lamb

55°C

60°C

65°C

75°C

Pork

--

--

65°C

75°C

Chicken

--

--

65°C

75°C

Fish

45°C

50°C

55°C

65°C

NOTE
For health reasons, we do not recom-
mend to cook pork and chicken meat 
to “Rare” or “Medium rare".

Содержание GR 7010

Страница 1: ...GR 7010 SMART CONTACT GRILL Instruction Manual SMART CONTACT GRILL N vod k obsluze KONTAKTN GRIL N vod na obsluhu KONTAKTN GRIL Haszn lati tmutat KONTAKT GRILLS T Instrukcja obs ugi GRILL KONTAKTOWY...

Страница 2: ...SMART CONTACT GRILL...

Страница 3: ...afety first 7 Know your contact grill GR 7010 9 Operating your contact grill GR 7010 10 Using your contact grill with a probe 12 Using your contact grill 14 Using the open BBQ grille 14 Using the time...

Страница 4: ...mental impairments or by inexperienced persons if they are properly supervised or have been informed about how to use of the product in a safe manner and understand the potential dangers Children must...

Страница 5: ...according to the instructions in this user s manual Otherwise there is a risk of personal injury Do not put the appliance on the edge of the countertop or table Make sure that the surface the applian...

Страница 6: ...ate height Do not leave the appliance without supervision while it is in operation Do not put anything on the upper cover if it s closed in operation or stored If the appliance is not to be used or if...

Страница 7: ...ge the power cord or the power socket Disconnect the cord from the power socket by gently pulling the plug of the power cord IMPORTANT SAFETY INSTRUCTIONS FOR USING ELECTRICAL EQUIPMENT Fully unwind t...

Страница 8: ...at the nearest Catler authorised service centre Any maintenance other than standard cleaning must be performed at authorised Catler service centre We recommend to install a residual current device sta...

Страница 9: ...top plate height when cooking crispy food as well as to lock the plates for convenient storage in vertical position 4 Button to unfold your grill to a BBQ grill 5 Bottom finned plate 6 Bottom plate re...

Страница 10: ...Probe on off button 3 Graphical visualization of the probe temperature 4 Probe temperature 5 Temperature unit switch button 6 The button is used to increase the temperature prolong the cooking time 7...

Страница 11: ...ith the grill so that tabs at the back of the plate will engage in the grill body slots Lower the plate slowly then gently press the plate s outer edges until you hear a click NOTE If any plate top or...

Страница 12: ...RILL WITH A PROBE The probe is designed for you to reach stable results when cooking different types of meat CONNECTING THE PROBE Pull out the probe storage drawer on the grill front Remove the probe...

Страница 13: ...obe temp will light gradually as the temperature is increasing showing temperature visualization When the temperature reaches the required level see the table below lift the top plate and use wooden p...

Страница 14: ...ashing the grill is ready for use Put the raw materials to be roasted on the bottom grill plate and set the level control on the right to a position so that the top plate just slightly touches the raw...

Страница 15: ...cone tools designed for contact grills Do not use metallic tools as they might damage the grill plate surfaces PRESET PROGRAM TABLE Preset program Default temperature Suitable for 160 C Sliced or cube...

Страница 16: ...starts flashing on the display 6 Operating an open BBQ grill is the same as operating a contact grill described in the instructions above 7 Before lowering the top plate make sure that the grill has c...

Страница 17: ...deposits you can also use considerate liquid detergents or sprayed solutions for stainless surfaces Apply the cleaning agent on the sponge not on the appliance surface Wipe with a moistened sponge th...

Страница 18: ...plates NOTE Drip tray bottom and top plate can be also washed in a dishwasher STORAGE Before storing make sure that the appliance is clean dry and completely cooled down Make sure that the drip tray...

Страница 19: ...JECT remove the top plate and insert it again for more details please refer to Removing and attaching the grill plates Er2 The bottom plate is inserted incorrectly Press EJECT remove the bottom plate...

Страница 20: ...human health which could be caused as a result of improper liquidation of waste Please ask your local authorities or the nearest waste collection centre for further details The improper disposal of th...

Страница 21: ......

Отзывы: