


10
OPERATING YOUR CONTACT GRILL GR 7010
WARNING!
No not place
the grill on or in
the vicinity of
flammable surfaces
or materials.
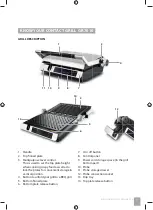
Lift the top plate to open the grill.
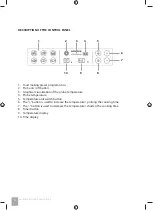
Insert the power plug into a mains socket
and OFF starts fl ashing on the display.
Press the grill on / off button and use the +/-
buttons to set the maximum temperature.
While the grill is being warmed up, the
temperature on the display is fl ashing. When
the temperature stops fl ashing, the grill is
heated to the set temperature.
Leave the grill powered on for about
5 minutes. During this time, you may notice
slight smoke and an unpleasant smell. This is
a normal event which disappears during use.
NOTE
Before switching on for the fi rst time,
you can apply a small amount of
quality vegetable oil on the grill plates
with a kitchen cloth. You can repeat
this process several times over the grill
lifetime. This will improve the grilling
result and prolong the grill plate
lifetime.
USING YOUR CONTACT GRILL WITH
A PROBE
The probe is designed for you to reach stable
results when cooking diff erent types of meat.
CONNECTING THE PROBE
Pull out the probe storage drawer on the grill
front.
Remove the probe from the drawer and
unwind the probe cord completely.
Insert the probe cord plug in the grill body
socket.
Correct probe connection is indicated by
icon lighting after turning the grill on.
WARNING!
Before connecting
/ disconnecting
the probe, always
make sure that
the power plug is
disconnected from
the mains socket.
OPERATING THE GRILL WITH THE PROBE
Put the grill on a fl at and fi rm surface with
easy reach of a power outlet. Make sure that
there is suffi
cient space around the grill to
allow proper air circulation.
Lift the top plate to open the grill.
Insert the power plug into a mains socket
and OFF starts fl ashing on the display.
Press the grill on / off button to turn the grill
on.
According to the type of food being made,
press the appropriate preset program icon
(
,
or
).
You can use the +/- buttons to adjust the
preset temperature.
Set the lever control on the grill right to
position 1 and lower the top plate. This will
speed up the grill warming up process.
Содержание GR 7010
Страница 2: ...SMART CONTACT GRILL...
Страница 21: ......


