background image

10

11

[04]

 x 2

[12]

 x 2

29

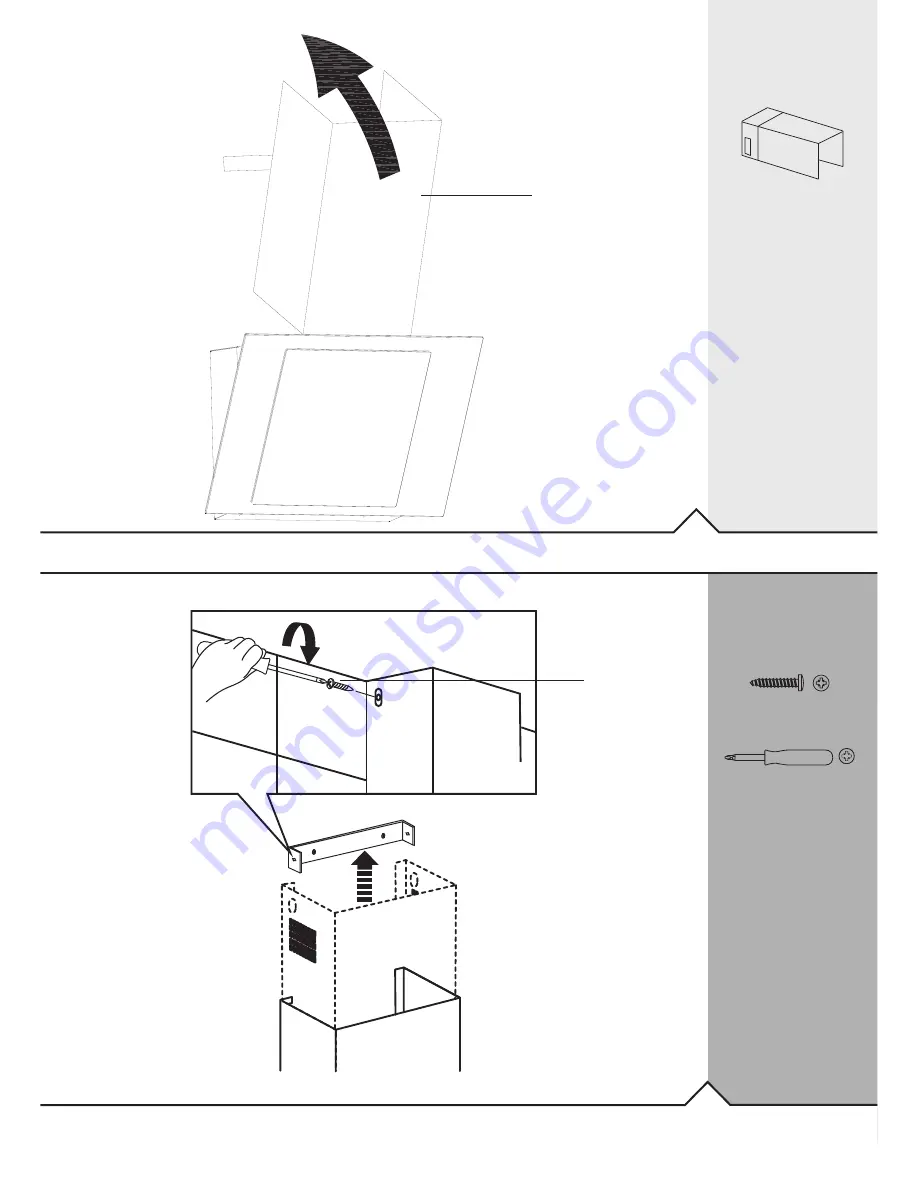
Fix to the wall the top bracket and place the decorative tubes.

[02]

[15]

Fix the decorative tube to the bracket. Connect top of the ducting tube to vent kit as per manufacturers 

instructions.

Содержание AGB60

Страница 1: ...AGB_ALPHA6 7 9BK WHK v1b GB IE ALPHA6 7 9 BK WHK AGB60 70 90 ...

Страница 2: ... 06 x 2 07 x 1 04 x 2 05 x 1 03 x 1 01 x 1 02 x 1 ...

Страница 3: ...1 1 10 x 5 08 x 1 09 x 1 11 x 5 3 9 x 32mm 12 x 8 3 4 x 8mm ...

Страница 4: ...GB IE Cooker Hood 05 Installation 23 ALPHA6 7 9 BK WHK AGB60 70 90 4 ...

Страница 5: ... start 06 Safety 09 In more detail 11 Product functions Operation Care and maintenance Troubleshooting Recycling and disposal Technical and legal information Guarantee CE Declaration of conformity 12 12 13 16 17 17 20 22 Appendix 23 Installation GB IE ...

Страница 6: ...Getting Started Getting started GB IE Before you start 06 Safety 08 6 ...

Страница 7: ...n 0844 800 1128 UK 01 4475261 Ireland and 01 56 48 02 60 France Check the package and make sure you have all of the parts listed Decide on the appropriate location for your product If this product contains glass please take care when fitting or handling to prevent personal injury or damage to the product The specifications plate is available on this appliance This plate displays all the necessary ...

Страница 8: ...fore you start SELF ADHESIVE ALUMINIUM TAPE Ø125mm or Ø150mm VENT PACK 2 UK IE Accessories not supplied CARBON FILTER ORDERING HOTLINE 0844 800 1128 UK 01 4475261 IE 02859396 Recirculation Extraction 8 Getting started GB IE ...

Страница 9: ...unless they have been given supervision and instruction concerning the use of the appliance by a person responsible for their safety Means for disconnection must be incorporated in the fixed wiring in accordance with the wiring rules An all pole disconnection switch having a contact separation of at least 3 mm in all poles should be connected in fixed wiring Do not allow the electric cables to tou...

Страница 10: ...ion must be complied with Warning before connecting the hood switch off the electricity supply and check that the supplied voltage and frequency coincide with that indicated on the appliance nameplate Warning the hood may stop working during an electrostatic discharge e g lightning This involves no risk of damage Switch off the electricity supply to the hood and reconnect after one minute To avoid...

Страница 11: ...tail In more detail GB IE Product functions 12 Operation 12 Care and maintenance 13 Troubleshooting 16 Recycling and disposal 17 Technical and legal information 17 Guarantee 20 CE Declaration of conformity 22 11 ...

Страница 12: ...rs and deactivated with a single press Button for setting the timer of the motor ref 2 The extractor will operate for 5 minutes at the current speed and 5 minutes at each of the lower speeds until coming to a complete stop Button for the light ref 3 Allows the light to be regulated by pressing and holding down On off button of the motor ref 4 Extractor fan speed button speed 1 Extractor fan speed ...

Страница 13: ...re and maintenance 10 FUSE OFF Note Please follow Active charcoal filter replacement steps on next page p13 before attempting to remove the bulb Warning always switch off the electricity supply before carrying out maintenance work on the hood In the event of a fault contact customer services FUSE OFF 13 In more detail GB IE ...

Страница 14: ...Care and maintenance Active charcoal filter replacement 1 X ACTIVE CHARCOAL FILTER MODEL NUMBER_02859396 14 In more detail GB IE ...

Страница 15: ...ers and wash with hot water and detergent If using a dishwasher position the filters vertically to improve the cleaning process 3 MONTH Active charcoal filters replace every 3 months Important increase the filter cleaning replacement frequency if the hood is used for more than 2 hours a day Always use genuine filters from the manufacturer FUSE OFF Warning Always switch off the electricity supply b...

Страница 16: ...nection loose Check power supply Suction performance reduced Speed may be too low Select a higher speed Distance between the cooker hood and the hob is too great Readjust the distance to Gas hobs 750mm Electric hobs 650mm Aluminium grease filter is dirty Clean filters see care and maintenance Top vent might be obstructed CLVH60SS C CLVH60W C Clear any obstruction Optional vent kit might be twisted...

Страница 17: ...st Check with your Local Authority or retailer for recycling advice The symbol on the product or its packaging indicates that this product cannot be treated as normal household waste This product must be handed over to an electric and electronic equipment collection point for recycling On ensuring that this product is disposed of correctly you will help to avoid possible negative consequences for ...

Страница 18: ...R OUTLET USE A 3AMP FUSE FUSE ON EUR UK Direct Connection If the appliance is being connected directly to the mains an omnipolar circuit breaker must be installed with a minimum opening of 3mm between contacts If the supply cord is damaged it must be replaced by the manufacturer its service agent or similarly qualified persons in order to avoid a hazard The installer must ensure that the correct e...

Страница 19: ...he rating plate inside the cooker hood WARNING THIS APPLIANCE MUST NOT BE EARTHED The appliance is supplied with a 2 core mains cable and must be connected to the electricity supply via a double pole switch having a 3mm minimum contact gap on each connector For UK only A Switched Fused Connection Unit to BS 1363 Part 4 is recommended The fuse must be rated at 3 Amps The wires in the mains lead are...

Страница 20: ...y remaining balance of the GAA guarantee will be valid and any further call outs during this prescribed period will be covered by GAA on the replacement appliance Should any person other than an authorized engineer modify or attempt to repair the appliance then the warranty will be invalid The guarantee applies to the UK mainland Scotland Ireland ROI and France but is not transferrable between EU ...

Страница 21: ...ted position If the appliance is glued grouted or tiled in such a manner that it cannot be removed it is the responsibility of the customer installer to remove and reinstall the appliance to facilitate the repair This Guarantee does not affect your statutory rights The guarantee is offered by GAA Ltd 1301 1303 Lu Plaza 2 Wing Yip St Kwun Tong Kowloon Hong Kong Customer Service To arrange an in gua...

Страница 22: ...ectrical appliances Standard EN 60335 part 2 31 particular requirements for range hoods Standard EN 55014 Limits and methods of measurement of radio disturbance Standard EN 61000 3 2 Electromagnetic compatibility limits for harmonic Standard EN 61000 4 5 Electromagnetic compatibility EMC APPLIED INTERNATIONAL TECHNICAL STANDARDS AND SPECIFICATIONS ISO9001 2008 APPLIED HARMONIZED STANDARDS MANUFACT...

Страница 23: ...Installation Appendix Appendix GB IE 23 ...

Страница 24: ...59396 02 02 Fit the metal box and motor to the glass and metal work Connect the electric cable 12 x 4 24 Installation You can choose two type of installation Ducted option Recirculation option Fit the metal box and motor to the glass and metal work ...

Страница 25: ... Electric MIN 650mm MIN 435mm MAX 880 DIM B Mark on the wall the hole positions as shown in diagram The Wall Plugs supplied are suitable for solid walls only When fixing to any other type of wall use suitable alternative fixings 25 ...

Страница 26: ...r all the 6 marked holes and fix the screws for the top two holes of the hood 11 x 2 10 x 5 2mm 10 11 Position the hood over the top two screw then fix the bottom screws from inside the hood Tighten the top 2 screws to secure 05 11 x 1 26 ...

Страница 27: ...07 06 11 x 2 05 05 11 MAX 880mm Fix the top bracket to the wall 07 x 1 03 x 1 27 Replace the aluminium filter and fix front glass panel ...

Страница 28: ...8 09 Ø125mm or Ø150mm VENT PACK 2 UK IE Fix the Collar and the reducer if required 08 09 09 12 x 2 08 09 28 Fix the Ducting Tube 125 or 150 using tape or clamp Fix the Collar and the reducer if required ...

Страница 29: ...11 04 x 2 12 x 2 29 Fix to the wall the top bracket and place the decorative tubes 02 15 Fix the decorative tube to the bracket Connect top of the ducting tube to vent kit as per manufacturers instructions ...

Страница 30: ...12 30 Remove the Protector film For electrical connection see Technical and legal information section ...

Страница 31: ...Notes 31 ...

Страница 32: ...CNA Trading U K Ltd Hillbrow House Hillbrow Road Esher Surrey KT10 9NW GB IE ...

Отзывы: