DELTA-PILOT
Page 3
Alterations / Errors reserved 11/PC/Wo/206A
Cassens & Plath GmbH, Kompasshaus, Am Lunedeich 131, 27572 Bremerhaven, Germany, Tel. +49 471 4839990, Fax +49 47148399910
www.cassens-plath.de
,
Furthermore navigational instruments may cause deflection of the compass, so a
loudspeaker should be at least 70 cm away from the compass, same with electro motors to
drive the window wipers or echo sounders.
These moving fields will cause compass deflections which are never adjustable because the
interference depend thereon if the instruments is switched on or off. In doubt the right
distance to these different instruments should be determind by trial.
Mounting
Set-up type:
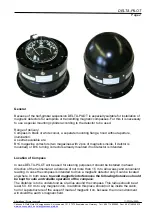
1. Pull from below the separate mounting flange to the compass binnacle. Refer to be
attached fotos. The oblong holes show to fore and aft. Fix the ring with the plastic
srews included to the compass binnacle in the lower position.
2. Fix the compass at the position as choosen according to the description before. Do
this provisorically by non magnetic screws (not included in the range of delivery) using
the ahead and aft oblong holes only. This is to allow alignment or A-error correction of
the compass later. The main lubber mark is orientated to the bow of the vessel.
3.
Adjust the compass if necessary. It is recommended to call a professional
compass adjuster for this, because a reliable adjustment is necessary for safe
navigation
. Part of the adjustment procedure is the correction of alignment error, the
A-error. If this is finished fix the compass by use of the remaining holes.
Hint:
If spray water or rain will enter the compass binnacle from above it will flow out at the bottom
of the compass again. Therfore don’t seal the bottom of the binnacle
Built-in type:
1. Cut a hole of 210 mm diameter at the compass place as choosen according to the
description before. Pull the separate mounting flange from below to the compass.
Remove the white plastic screws to be seen outside the binnacle. The oblong holes
show to fore and aft. Fix the ring with the plastic screws included to the compass
binnacle at the upper position.
2. Let down the compass into the hole. Fix the compass privisorically by non magnetic
screws (not included in the range of delivery) using the ahead and aft oblong holes
only. This is to allow alignment or A-error correction of the compass later. The main
lubber mark is orientated to the bow of the vessel.
3.
Adjust the compass if necessary. It is recommended to call a professional
compass adjuster for this, because a reliable adjustment is necessary for safe
navigation
. Part of the adjustment procedure is the correction of alignment error, the
A-error. If this is finished fix the compass by use the remaining holes.
Hint:
For the built-in type of compass choose a place protected of spray water or rain. The water
may enter the binnacle from above and come into the cabin.


