


V-R100
– 12 –
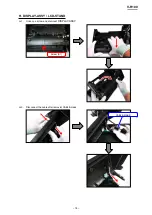
C-2. E840-E63 PCB
1. Peel off the tape.
2. Disengage the hooks and dismount E840-E63 PCB and TILT-SW-SUBASSY.
C. POWER-SW-ASSY / E840-E63 PCB
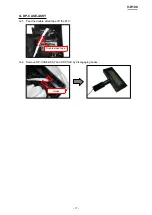
C-1. POWER-SW-ASSY
1. Remove cable tie.
2. Remove POWER-SW-ASSY.
Caution for assembly:
Assemble POWER-SW-ASSY with caution of its direction.
Caution for assembly:
Tie lead wires on POWER-SW-ASSY together with motor wires with a
cable tie.
E840-E63 PCB
TILT-SW-SUBASSY
POWER-SW-ASSY
E840-E63 PCB
Tape
Cable tie
Cable tie
Содержание V-R100
Страница 1: ...SERVICE MANUAL Ver 3 Aug 2013 V R100 EX 841 OCT 2011 ...
Страница 13: ...V R100 10 A 10 Undo three screws and disconnect three ground wires Screw S12 Screws S3 ...
Страница 43: ...V R100 40 5 3 PCB E840 1 PCB ...
Страница 44: ...V R100 41 E840 E61 PCB E840 E62 PCB E840 IOC PCB ...
Страница 45: ...V R100 42 E840 E22 PCB E840 COM PCB E840 ETH PCB E840 E64 PCB E840 E63 PCB E840 PRN PCB ...


