background image

255

APPENDIX

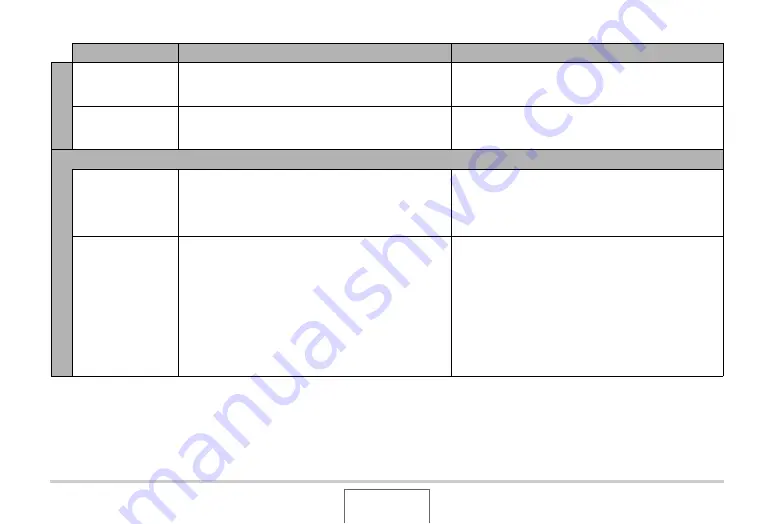
All buttons and 

switches are 

disabled.

Circuit problem caused by electrostatic charge, impact, 

etc. while the camera was connected to another device.

Remove the battery from the camera, reinsert it, and then 

try again.

The camera’s 

monitor screen is 

blank.

USB communication is in progress.

After confirming that the computer is not accessing the 

memory card, disconnect the USB cable.

Other

I can’t transfer 

images over a USB 

connection.

1) The camera is not set securely on the USB cradle.

2) The USB cable is not connected securely.

3) The USB driver is not installed.

4) The camera is turned off.

1) Check the connection between the camera and USB 

cradle.

2) Check all connections.

3) Install the USB driver (page 210).

4) Press the USB cradle’s [USB] button.

Display language 

setting screen 

appears when the 

camera is turned on.

1) Camera’s display language, Home city, date style, 

date and time, and other settings have not been 

configured.

2) A problem with the camera’s built-in memory 

management area.

1) Check the settings (pages 12, 188).

2) Perform the reset operation to initialize the camera’s 

setup (page 136). After that, configure each setting. If 

the language selection screen does not re-appear 

when you turn the camera on, it means that the 

camera’s built-in memory management area has been 

restored. If the same message appears after you turn 

power back on, contact your retailer or a CASIO 

service center.

Problem

Possible Causes

Action

C

Содержание Exilim EX-Z1000

Страница 1: ...asing this CASIO product Before using it be sure to read the precautions contained in this User s Guide Keep the User s Guide in a safe place for future reference For the most up to date information about this product visit the official EXILIM Website at http www exilim com ...

Страница 2: ...Ion Battery NP 40 USB Cradle CA 33 Strap CD ROM USB Cable AV Cable Basic Reference Note that the shape of the AC adaptor depends on the area where you purchased the camera To attach the strap to the camera Attach strap here Special AC Adaptor Inlet Type AD C52G AC Power Cord Special AC Adaptor Plug in Type AD C52J The shape of the AC power cord plug varies according to country or geographic area ...

Страница 3: ...battery 36 To charge the battery 37 Replacing the Battery 41 Battery Precautions 41 Turning Power On and Off 42 Using a Memory Card 45 Loading a Memory Card into the Camera 47 Replacing the Memory Card 48 Formatting a Memory Card 49 Using On screen Menus 51 Configuring Monitor Screen Settings 52 Selecting a Screen Layout Layout 53 Turning Display Information On and Off Info 56 Adjusting Monitor Sc...

Страница 4: ...inuous Shutter Mode 84 Recording with Normal speed Continuous Shutter High speed Continuous Shutter and Flash Continuous Shutter 84 Recording with Zoom Continuous Shutter 85 Continuous Shutter Precautions 86 Adding Audio to a Snapshot 87 SHOOTING A MOVIE 89 Movie Image Quality 89 Shooting a Movie 90 Movie Recording Precautions 91 USING BEST SHOT 93 Reducing the Effects of Hand and Subject Movement...

Страница 5: ...napshots 128 Using the On screen Histogram to Check Exposure 129 Other Useful Recording Functions 132 Using Key Customize to Assign Functions W and X 132 Displaying an On screen Grid 133 Displaying the Image You Just Recorded Image Review 134 Using Icon Help 134 Using Mode Memory to Configure Power On Default Settings 135 Resetting the Camera to Its Initial Factory Defaults 137 VIEWING SNAPSHOTS A...

Страница 6: ...age of a Snapshot 160 Editing a Movie on the Camera 161 Creating a Snapshot of a Movie Frame MOTION PRINT 166 USING AUDIO 168 Adding Audio to a Snapshot 168 Recording Audio Only Voice Recording 171 MANAGING YOUR FILES 174 Files and Folders 174 Protecting a File Against Deletion 175 Using the FAVORITE Folder 176 Copying Files 179 DELETING FILES 181 Deleting a Specific File 181 Deleting All Files 18...

Страница 7: ...to Specify Images to be Printed and the Number of Copies 200 Date Stamping 203 Supported Protocols 204 USING THE CAMERA WITH A COMPUTER 206 What you can do 206 Using the Camera with a Windows Computer 207 Viewing and Storing Images on a Computer 209 Managing Images on Your Computer 218 Retouching Reorienting or Printing Snapshots 220 Playing Movies 221 Viewing User Documentation PDF Files 222 User...

Страница 8: ...onitor Screen Contents 240 Menu Reference 243 Display Menu Reference 247 Indicator Lamps 248 Troubleshooting Guide 252 Find the Problem and Fixing It 252 If you have problems installing the USB driver 256 Display Messages 256 Specifications 258 ...

Страница 9: ...ing Images of Business Cards Documents and Meeting Information White Board Easier to Read Shooting Images of Business Cards and Documents Business Shot 101 Shooting ID Photos Shooting ID Photographs 103 Selecting the Best Focus Mode for Shooting Conditions Changing the Focus Mode 109 Eliminating Light Source Color Cast Controlling White Balance 120 Sharpening or Softening Subject Outlines Controll...

Страница 10: ...ge 36 Loading the Battery into the Camera 1 Open the battery cover 2 Load the battery into the camera 3 Close the battery cover First charge the battery While pressing lightly on the cover slide it in the direction indicated by the arrow to open ...

Страница 11: ...ptor depends on the area where you purchased the camera 1 Plug the USB cradle into a household power outlet 2 Place the camera onto the USB cradle Inlet Type Plug in Type AC adaptor AC adaptor CHARGE lamp Red Charging Green Charged Full It takes about three hours to achieve a full charge ...

Страница 12: ...o extend 2 Use S T W and X to select the language you want and then press SET 3 Use S T W and X to select the area where you will use the camera and then press SET 4 Use S and T to select the city where you will use the camera and then press SET 5 Use S and T to select the summer time DST setting you want and then press SET Configuring Display Language Date and Time Settings SET ON OFF Power BS ...

Страница 13: ...nth day hour minute and then use S and T to change the setting To switch between 12 hour and 24 hour format press BS 8 When all the settings are the way you want press SET 9 Press ON OFF to turn off the camera After finishing this procedure advance to the procedure on the next page To display the date like this Select this option 06 12 19 YY MM DD 19 12 06 DD MM YY 12 19 06 MM DD YY ...

Страница 14: ...e images in its built in memory if there is no memory card loaded If you prefer to use built in memory skip this procedure and go to Shooting a Snapshot on page 16 1 Open the battery cover 2 Load a memory card into the camera With the front of the memory card facing upwards towards the monitor screen side of the camera slide it into the card slot and press until it clicks securely into place 3 Clo...

Страница 15: ...slowed down or if you notice any other abnormality re format the card Be sure to perform the following procedure on the camera to format the memory card 1 Press ON OFF to turn on the camera 2 Press MENU 3 Use W and X to select the Set Up tab 4 Use T to select Format and then press X 5 Press S to select Format and then press SET To cancel formatting select Cancel and then press SET Wait until the B...

Страница 16: ...us the camera will beep the operation lamp will light green and the focus frame will turn green 4 Continuing to keep the camera still press the shutter button all the way down The recorded image will remain on the display for about one second and then it will be stored in memory After that the camera will be ready to shoot the next image Shooting a Snapshot AWB AF ISO 0 3EV 15 37 N 10 62 62 Auto i...

Страница 17: ...at suits the size of paper you plan to use for printing your images For details see pages 67 68 and 259 How do I half press the shutter button The shutter button is designed to stop about half way down when you press it lightly Stopping at this point is called a half press When you half press the shutter button the camera automatically adjusts exposure and focuses on the subject it is currently po...

Страница 18: ...18 QUICK START BASICS page 139 1 Press to enter the PLAY mode If there are multiple images in memory use W and X to scroll through them To return to the REC mode Press Viewing Snapshots PLAY W X ...

Страница 19: ... Icon Remaining Recording Time Recording Time REC Shutter Button Movie Recording Screen BS Movie Image Quality Your camera lets you select from among three image quality settings HQ Normal LP for movies For best camera performance use the HQ High Quality setting for movie recording Movie quality is a standard that determines the detail smoothness and clarity of the image during playback Reducing i...

Страница 20: ...When scrolling through images a movie is displayed on the monitor screen by showing its first frame 3 Press SET to start playback The monitor screen will return to the image selection screen in step 2 after the end of the movie is reached During movie playback you can adjust volume skip forward and back and perform other operations page 142 To return to the REC mode Press Viewing a Movie PLAY W X ...

Страница 21: ...his frees up memory for recording more images 1 Press 2 Press T 3 Use W and X to select the snapshot or movie you want to delete 4 Press S to select Delete To cancel the delete operation select Cancel 5 Press SET This deletes the selected snapshot or movie If you want to delete more repeat the above procedure from step 3 To quit the delete operation press MENU Deleting a File PLAY W X T S SET ...

Страница 22: ...mple scenes Direct Mode Power On A powerful collection of useful recording features Hand movement and subject movement reduction using high shutter speed page 98 High sensitivity recording avoids dark images even when the flash is not being used page 100 Quick Shutter for very high speed focus page 115 Features Example Select for skillful shots of a fast moving pet BEST SHOT Screen Example Select ...

Страница 23: ... 128 Support for PictBridge and USB DIRECT PRINT for easy at home printing on a printer that supports one of these standards without a computer page 197 Multi function USB Cradle You can place the camera on the USB cradle to perform the following operations Battery charging page 36 Photo Stand slideshow of images page 145 Connection to a TV for viewing on the TV screen page 147 Connection to a pri...

Страница 24: ...t permission of the copyright holder is strictly prohibited by copyright laws and international treaties Note that CASIO COMPUTER CO LTD shall not be held liable for any misuse of this product that infringes on the copyrights of others or that violates copyright laws The following terms which are used in this manual are registered trademarks or trademarks of their respective owners The SD logo is ...

Страница 25: ...nual either in part or its entirety is forbidden Except for your own personal use and other use of the contents of this manual without the permission of CASIO COMPUTER CO LTD is forbidden under copyright laws CASIO COMPUTER CO LTD shall not be held liable for any damages or loss suffered by you or any third party due to the use or malfunction of this product CASIO COMPUTER CO LTD shall not be held...

Страница 26: ...t Directly Viewing the Sun or Bright Light Never look at the sun or any other bright light through the cameras viewfinder Doing so can damage your eyesight Flash Never use the flash unit in areas where flammable or explosive gas may be present Such conditions create the risk of fire and explosion Never fire the flash in the direction of a person operating a motor vehicle Doing so can interfere wit...

Страница 27: ...his camera into connectors Connecting a non specified device creates the risk of fire and electric shock Transport Never operate the camera inside of an aircraft or anywhere else where operation of such devices is restricted Improper use creates the risk of serious accident Smoke abnormal odor overheating and other abnormalities Continued use of the camera while it is emitting smoke or strange odo...

Страница 28: ...y power remove the battery from the camera 3 Contact your dealer or nearest CASIO authorized service center Dropping and Rough Treatment Continued use of the camera after it is damaged by dropping or other rough treatment creates the risk of fire and electric shock Immediately perform the following steps whenever any of the above symptoms are present 1 Turn off the camera 2 If you are using the AC...

Страница 29: ...e sun or other areas subject to very high temperatures Never place the camera on an unstable surface on a high shelf etc Doing so can cause the camera to fall creating the risk of personal injury Backing Up Important Data Always keep backup copies of important data in camera memory by transferring it to a computer or other storage device Note that data can be deleted in the case of camera malfunct...

Страница 30: ...mpact hit it with a hammer step on it etc and never apply solder to it Never place the battery into a microwave oven heater high pressure generating device etc Should you ever notice leakage strange odor heat generation discoloration deformation or any other abnormal condition while using charging or storing a battery immediately remove it from the camera or charger unit and keep it away from open...

Страница 31: ...serve the following precautions when using the AC adaptor Use only the AC adaptor specified for this camera Use the AC adaptor to supply power only to devices that are specified for use with it Use a 100 to 240V AC 50 60Hz wall outlet as a power source Never plug the power cord into a wall outlet that is shared by other devices or into a shared extension cord Misuse of the AC adaptor can cause it ...

Страница 32: ...n the power cord Insert the plug into the wall outlet as far as it will go Unplug the AC adaptor from the wall outlet before leaving the camera unattended for long periods such as when leaving on a trip etc At least once a year unplug the AC adaptor from the wall outlet and clean off any dust built up around the prongs USB Cradle and AC Adaptor Precautions Make sure you always remove the camera fr...

Страница 33: ...ossible Leaving low or dead batteries in the camera can lead to battery leakage and data corruption Data Error Precautions Your digital camera is manufactured using precision digital components Any of the following creates the risk of corruption of data in camera memory Removing the battery or memory card from the camera or placing the camera on the USB cradle while the camera is performing an ope...

Страница 34: ...ng it to sudden temperature change Wait until the air in the bag has had enough time to become acclimated to the new temperature before removing the camera After that open the battery cover and leave it open for a few hours Power Supply Use only the special rechargeable lithium ion battery NP 40 to power this camera Use of any other type of battery is not supported The camera does not have a separ...

Страница 35: ... Avoid touching the flash If the flash becomes dirty wipe it clean with a soft dry cloth To clean the camera wipe it with a soft dry cloth Monitor Screen Images The images that normally appear on the monitor screen during image playback are smaller than normal and so you cannot see all of the detail of the actual image Your camera has an image zoom feature page 150 which you can use to enlarge the...

Страница 36: ...rted To load the battery 1 Open the battery cover 2 Load the battery into the camera Slide the stopper on the side of the camera in the direction indicated by the arrow and load the battery Press the battery in until the stopper secures it in place Charging the Battery While pressing the battery cover slide it in the direction indicated by the arrow Stopper NP 40 ...

Страница 37: ...charged when you use the camera for the first time after purchasing it Use the following procedure to charge it To charge the battery 1 Plug the USB cradle into a household power outlet Note the shape of the AC adaptor depends on the area where you purchased the camera AC Adaptor USB Cradle DC IN 5 3V AC Adaptor USB Cradle AC power cord Plug in Type Inlet Type DC IN 5 3V ...

Страница 38: ... charging conditions When charging is complete The CHARGE lamp which was lit red during charging changes to green Remove the camera from the USB cradle and unplug the AC adaptor from the power outlet If the CHARGE lamp lights amber This indicates that charging cannot be performed because you have just finished using the camera or because the temperature in your location is too hot or too cold If t...

Страница 39: ...ble lithium ion battery NP 40 The battery cannot be charged using any other type of charger device Attempting to use a different charger can result in unexpected accident Use only the AC adaptor that comes bundled with the camera Never use any other type of AC adaptor Use of the separately available AD C30 AD C40 AD C620 or AD C630 is not supported Battery Power Conservation Tips When you do not n...

Страница 40: ...ssible Recording is not possible when is indicated Charge the battery immediately IMPORTANT Due to differences in the power requirements of each mode the battery indicator may show a lower level in the PLAY mode than what it shows in a REC mode This is normal and does not indicate malfunction NOTE See page 263 for information about battery life Remaining Power High Low Battery Indicator Indicator ...

Страница 41: ...cautions during Use Operation provided by a battery under cold conditions is always less than operation under normal temperatures This is due to the characteristics of the battery not the camera Charge the battery in an area where the temperature is within the range of 10 C to 35 C 50 F to 95 F Charging outside this temperature range can cause charging to take longer than normal or even cause char...

Страница 42: ...he camera when you are not using it Leaving a battery in the camera can cause it to discharge and go dead which will require longer charging when you need to use the camera Store batteries in a cool dry place 20 C 68 F or lower Turning Power On To turn power on and enter the REC mode Press ON OFF Power or REC To turn power on and enter the PLAY mode Press PLAY Pressing a button causes the operatio...

Страница 43: ...while in the REC mode switches to the PLAY mode The lens retracts about 10 seconds after switching modes Auto Power Off page 44 will turn off power automatically if you do not perform any operation for a preset amount of time If this happens turn power back on Turning Power Off Press ON OFF Power NOTE You can configure the camera so power does not turn on when you press REC or PLAY You can also co...

Страница 44: ...about one day with no power supplied will cause the date and time settings to be cleared You will have to re configure the settings after power is restored The following conditions will result in no power being supplied to the camera Battery not loaded or dead battery Battery not loaded or dead battery with the camera on the cradle but without the cradle plugged into a power outlet If you make a m...

Страница 45: ... playback You can store images you shoot with the camera on a memory card It is up to you to purchase a commercially available memory card In addition to memory card storage the camera also has built in memory which is enough to hold a few snapshots or a short movie Use built in memory for test purposes emergency use etc NOTE Images can be copied between the camera s built in memory and a memory c...

Страница 46: ...you may not be able to record a movie using the HQ image quality setting Because of this use of an SD memory card with a maximum transfer speed of at least 10MB per second is recommended Certain types of memory cards take longer to record data which can cause movie frames to be dropped and flash on the monitor screen during recording to let you know when a frame has been dropped Use of an SD memor...

Страница 47: ...R CD RW MO disk hard disk etc Loading a Memory Card into the Camera IMPORTANT Make sure you always turn off the camera before loading or removing a memory card Be sure to orient the card correctly when loading it Never try to force a memory card into the slot when you feel resistance 1 Open the battery cover While pressing the battery cover slide it in the direction indicated by the arrow ...

Страница 48: ...y in until you hear it click securely into place 3 Close the battery cover Swing the battery cover closed and then slide it securely into place as you press it against the camera Replacing the Memory Card 1 Remove the memory card from the camera Press the memory card and then release it so it comes part way out Pull the card out the rest of the way by hand 2 Load the other memory card Front Back ...

Страница 49: ...you format a memory card you will not need to format it each time you use it Formatting a memory card that already has files on it will delete its contents IMPORTANT Note that data deleted by a memory card format operation cannot be recovered Double check to make sure that you really want to delete all the contents of the memory card before proceeding with the format operation Even if the file dat...

Страница 50: ...tting it However it is recommended that you always take along more than one memory card whenever using the camera far away from the home or office If you feel that images are not being recorded normally try re formatting the memory card As you record data to and delete data from an SD memory card a number of times it loses its ability to retain data Because of this periodic re formatting of an SD ...

Страница 51: ...LAY mode This screen shows a REC mode menu Menu Screen Operation Buttons The following is the procedure for menu operations in the REC mode 1 In the REC mode press MENU This displays the menu screen 2 Use W and X to select the tab where the item you want to configure is located Here we will select the REC tab Using On screen Menus Tabs Settings W X Select tabs X is also used to apply a setting S T...

Страница 52: ...nt To select another tab press W use S to return to the tab and then use W and X to switch to another tab Configuring Monitor Screen Settings You can use the display menu to configure various monitor screen settings See Display Menu Reference on page 247 for information about display menu contents Example Display Menu Screen Menu contents are different in the REC mode and PLAY mode This screen sho...

Страница 53: ... mode or the PLAY mode REC Mode Screen Layout For the REC mode the screen layout settings let you select the layout of icons Layout Type Description Panel Operation Panel Pressing SET in the REC mode while Panel Operation Panel is selected as the layout type will cause the top icon of the Operation Panel to become highlighted selected You can then use the Operation panel to change settings Since t...

Страница 54: ...an select date or time display The following procedure shows how to use Panel Operation Panel 1 In the REC mode press SET This highlights selects the top icon of the Operation Panel 2 Use S and T to select the icon of the setting you want to change 3 Use W and X to change the setting If you want to configure other settings repeat steps 2 and 3 4 After all the settings are the way you want press SE...

Страница 55: ...d Normal PLAY Mode Screen Layout The PLAY mode screen layout settings let you select how display images are shown on the monitor screen Layout Type Description Normal With this setting 100 of the display image is always visible With some aspect ratios black bands may appear above and below or to the left and right of the image ...

Страница 56: ...s the maximum possible size that allows the entire image to be displayed horizontally With some aspect ratios the top and bottom of the image will be cut off Layout Type Description Display Information Setting Description Show Turns on display of camera setting and other information Histogram Turns on display of camera setting and other indicators along with a histogram page 129 Hide Turns off dis...

Страница 57: ...57 GETTING READY REC Mode Layout Panel Operation Panel REC Mode Layout Normal Show Histogram Hide Show Histogram Hide ...

Страница 58: ...he camera detects available light levels and automatically adjusts the brightness of the monitor screen accordingly This is the setting you should normally use In the PLAY Mode the brightness of the monitor screen remains constant even if the available light level changes 2 Brightness that is greater than 1 which makes the screen easier to view This setting consumes more power 1 Bright setting for...

Страница 59: ... Low monitor screen brightness for nighttime use indoor use under dark conditions etc Brightness Setting Description Quality Setting Description Dynamic Increases contrast of the monitor screen image so the subject stands out for easier viewing and framing Vivid Makes the monitor screen image a bit brighter than the actual image for more clarity Real Displays the monitor screen image so it is as n...

Страница 60: ...ecording at night with a tripod Note however that this setting can cause movement of objects on the monitor screen image to become rough Power Saving Consumes slightly less power than the other settings and extends battery life Quality Setting Description If you lose your way Current Screen To return to the normal snapshot or movie recording screen press Menu screen MENU or Display Menu screen DIS...

Страница 61: ...tor that comes with the camera supports 100V to 240V AC power 50 60Hz Note however that the shape of the power plug differs from country to country Check with your travel agent for details before leaving on your trip Do not use a voltage adaptor with this camera Current Screen To return to the normal playback screen Menu screen MENU or Display Menu screen DISP or REC mode screen Press Delete scree...

Страница 62: ... you are operating the camera The supplied strap is intended for use with this camera only Never use it for any other purpose Never swing the camera around by its strap IMPORTANT Take care that your fingers and the strap do not cover any of the areas indicated in the illustration Holding the Camera Correctly Horizontal Vertical Hold the camera as shown in the illustration with your arms firmly aga...

Страница 63: ... take care that you do not move the camera as the shutter releases This is especially important when available lighting is low which slows down the shutter speed 1 Press REC to enter the REC mode Confirm that the subject people scenery etc and the Auto icon are displayed on the monitor screen If any icon other than the Auto icon is displayed switch to Auto page 93 Shooting a Snapshot AWB AF ISO 0 ...

Страница 64: ...eration lamp will turn green The shutter speed aperture and ISO sensitivity also will be set automatically See Monitor Screen Indicators on page 66 for more information 3 Shoot the image When the image is focused press the shutter button the rest of the way This will shoot the snapshot and save it to the memory card or the camera s built in memory Shutter Button Operation Lamp Shutter Button ...

Страница 65: ...s It comes in handy when shooting a fast moving subject It also eliminates worries of spoiled shots when you ask someone else to record and image for you and they press the shutter button all the way without waiting for Auto Focus Quick Shutter is turned on as the initial factory default setting In cases when you want to take a little time for accurate focus turn off Quick Shutter Checking a Snaps...

Страница 66: ...he opening The camera adjusts this setting automatically The slower the shutter speed the greater the amount of light entering through the lens Shutter speed is indicated on the monitor screen as seconds 1 1000 second etc The camera adjusts this setting automatically Remaining Shots Metering Continuous Shutter Mode ISO Sensitivity Aperture Value Shutter Speed Image Size and Quality Flash Mode Focu...

Страница 67: ...ly For information about movie image size see page 89 1 In the REC mode press MENU 2 On the Quality tab select Size and then press X 3 Use S and T to select an image size and then press SET NOTE You can also use the Panel Operation Panel page 53 to change the image size setting The following information changes on the display during the image size selection operation Image size in megabytes M 5M e...

Страница 68: ...es that are compatible with the aspect ratio of an HDTV screen Specifying Image Quality Your camera lets you select Fine maximum image quality Normal or Economy maximum memory economy for the image quality setting The initial setting is Normal Select Fine if you want to give priority to image quality or Economy to give priority to the number of images you can store in memory For information about ...

Страница 69: ...f the AF Assist Lamp The AF assist lamp emits light that helps the camera focus when you half press the shutter button under dark lighting conditions The AF assist lamp does not light when lighting is bright The initial factory default setting is AF assist lamp on Turning off the AF assist lamp using the following procedure is recommended when shooting the image of a nearby person AF Assist Self t...

Страница 70: ...n the battery cover or place the camera on the USB cradle while the operation lamp is flashing green Doing so can result in incorrect storage of the image you just shot damage to other images stored in memory malfunction of the camera etc Shooting a dark subject while Auto is selected for the ISO sensitivity page 123 setting will cause the camera to increase sensitivity and increase shutter speed ...

Страница 71: ...ckering of fluorescent lighting can affect the brightness or color of an image Auto Focus Restrictions Proper focus may not be possible when shooting the following types of subjects Solid color wall or other very low contrast subject Strongly back lit subject Very shiny subject Blinds or other subject with a repeating horizontal pattern Multiple subjects at varying distances from the camera Subjec...

Страница 72: ...r the image that is recorded However digital zoom can be used up to a certain point without causing deterioration of the image 1 Enter the REC mode 2 Slide the zoom controller to change the zoom factor For more information see Optical Zoom and Digital Zoom Switch Point on page 73 3 Press the shutter button to shoot Shooting with Zoom Zoom controller To do this Slide the zoom controller in this dir...

Страница 73: ...shooting your movie Optical Zoom and Digital Zoom Switch Point If you hold the zoom controller towards in step 2 of the above procedure the zoom operation will stop when the optical zoom factor reaches its maximum Momentarily releasing the zoom controller and then holding it again towards will switch to digital zoom which you can use to set an even higher zoom factor When the zoom pointer moves pa...

Страница 74: ...een only while Digital Zoom is turned on IMPORTANT Digital zoom is not supported while Timestamp page 128 is turned on Turning Off Digital Zoom You can turn off digital zoom if you want to use optical zoom only This will help to avoid deteriorated images due to accidentally switching over from optical zoom to digital zoom when shooting snapshots 1 In the REC mode press MENU 2 On the REC tab select...

Страница 75: ...lect Off if you do not want to use Instant Zoom Using Instant Zoom 1 Enter the REC mode 2 Press S This immediately changes the digital zoom to the preset Instant Zoom setting Performing the above operation after zooming with optical zoom will cause the subject to be zoomed to a level that is equivalent to the current optical zoom factor plus the preset Instant Zoom digital zoom factor 3 Press S Th...

Страница 76: ...xposure amount of light and brightness conditions Initial factory default setting Flash Off Flash does not fire Flash On Flash always fires This setting can be used to brighten a subject that normally comes out dark due to daylight or backlight daylight synchro flash Soft Flash Always use soft flash regardless of exposure conditions Use this setting when you want to suppress the flash to avoid ref...

Страница 77: ... mode press T once 2 Use W and X to select the flash setting you want and then press SET 3 Press the shutter button to shoot NOTE If you are using the Normal Screen Layout setting page 53 each press of T will cycle through the available flash settings Wide Angle 0 1 m to 3 6 m 0 3 to 11 8 Telephoto 0 4 m to 1 9 m 1 3 to 6 2 T Flash Mode ...

Страница 78: ... people who are in the image This is caused when the light from the flash reflects off of the retina of the eye When red eye reduction is selected as the flash mode the camera fires a pre flash to cause the irises in the eyes of any people in the image to close which reduces the chance of red eye IMPORTANT Note the following important points when using red eye reduction Red eye reduction does not ...

Страница 79: ...Intensity 1 In the REC mode press MENU 2 On the Quality tab select Flash Intensity and then press X 3 Use S and T to select the flash intensity setting you want and then press SET You can set one of five levels from 2 weakest to 2 strongest IMPORTANT Flash intensity may not change when the subject is too far away or too close Monitor Screen indicates flash will fire Operation Lamp Flashing Orange ...

Страница 80: ... you do not want to use it 1 In the REC mode press MENU 2 On the Quality tab select Flash Assist and then press X 3 Use S and T to select Off and then press SET When you want to use flash assist select Auto here IMPORTANT Flash assist may not produce the desired result for some types of subjects Any of the following can result in the flash assist effect being canceled out Changing the flash intens...

Страница 81: ...s not fire in areas where lighting is bright The presence of outdoor sunlight fluorescent lighting or some other light source can cause abnormal image colors With the self timer pressing the shutter button starts a timer and the shutter is released and the image is shot after a fixed amount of time Using the Self Timer Self Timer Type Description 10 sec 10 second self timer 2 sec 2 second self tim...

Страница 82: ...on to shoot NOTE You can also use the Panel Operation Panel page 53 to change the self timer setting Using the Self timer to Shoot an Image The image is not shot right away after you press the shutter button Instead shooting starts after the preset time elapses The AF assist self timer lamp flashes while the countdown is being performed You can interrupt an ongoing self timer countdown by fully pr...

Страница 83: ...to ID Photo and Movie Your camera has four continuous shutter modes Using Continuous Shutter Continuous Shutter Mode Description Normal Speed Normal speed Continuous Shutter Continually records images until memory becomes full High Speed High speed Continuous Shutter Record up to three consecutive images at high speed Flash Cont Flash Continuous Shutter Use this mode to record up to three consecut...

Страница 84: ...inuous Shutter and Flash Continuous Shutter 1 Press the shutter button to shoot With Normal speed Continuous Shutter images continue to be shot as long as you keep the shutter button depressed Releasing the shutter button stops shooting High speed continuous shutter and flash continuous shutter can shoot up to three images Shooting stops if you release the shutter button before three images are re...

Страница 85: ...e that with zoom continuous shutter you do not need to keep the shutter button depressed Digital zoom and instant zoom are disabled while shooting with zoom continuous shutter Zoom continuous shutter is not available when the image size setting is 3 2 3648 2432 pixels or 16 9 3648 2048 pixels When the image size setting is 10M 3648 2736 pixels or 5M 2560 1920 pixels the size of the zoomed image pr...

Страница 86: ... flash mode you want with normal speed continuous shutter mode With high speed continuous shutter the flash mode automatically becomes flash off With the flash continuous shutter mode the flash mode automatically becomes flash on You cannot use the self timer in combination with the normal speed continuous shutter mode Triple Self timer can be used in combination with the zoom continuous shutter m...

Страница 87: ...io Snapshot 1 In the REC mode press MENU 2 On the REC tab select Audio Snap and then press X 3 Use S and T to select On and then press SET Recording Audio for a Snapshot 1 Press the shutter button to shoot This monitor screen will show the image you just shot along with the icon If you do not want to record audio at this time press MENU This will display the monitor screen for shooting the next im...

Страница 88: ...the playback operation see page 140 IMPORTANT Audio snapshot capabilities are disabled while shooting with the Triple Self timer or with a continuous shutter mode You can however add audio to such a snapshot after you record it page 168 NOTE After transferring an audio snapshot to your computer s hard disk you can play back the audio using Windows Media Player The following shows the formats used ...

Страница 89: ... better image quality but it also shortens the amount of time you can shoot Movie Size The following shows the approximate movie file size for a one minute movie Movie Image Quality Image Quality Pixels Approximate Data Rate Frame Rate HQ 640 480 pixels 10 2 Megabits second 25 frames second Normal 640 480 pixels 6 1 Megabits second 25 frames second LP 320 240 pixels 2 45 Megabits second 12 5 frame...

Страница 90: ...lity tab select Quality and then press X 3 Use S and T to select the quality setting you want and then press SET Audio is also recorded while you shoot a movie Audio is monaural 1 In the REC mode press BS 2 Use S T W and X to select the Movie scene and then press SET This causes to appear on the monitor screen 3 Press the shutter button to start shooting the movie is displayed while movie recordin...

Страница 91: ...cautions You cannot use flash while shooting a movie The camera also records audio Note the following points when shooting a movie Take care that the microphone is not blocked by your fingers etc Good results are not possible when the camera is too far away from what you are trying to record Operating camera buttons while shooting can cause button noise to be picked up in the audio Microphone ...

Страница 92: ... of an SD memory card with a maximum transfer speed of at least 10MB per second is recommended Optical zoom is disabled while shooting a movie Digital zoom only is available while shooting a movie If you want to use a particular optical zoom setting make sure you select it before you press the shutter button to start movie recording page 72 The effects of camera movement in an image become more pr...

Страница 93: ...the main subject being too dark if set up improperly come out looking great Some Sample Scenes Selecting a Sample Scene 1 In the REC mode press BS This displays a screen showing thumbnails of 15 sample scenes The currently selected sample scene is the one with the red boundary around it The initial default selection is Auto Portrait Scenery Night Scene Night Scene Portrait Scene Number Red Boundar...

Страница 94: ...ne selection screen To return to Auto select Scene 1 which is Auto Pressing MENU while the scene selection screen or scene description text is on the monitor screen will cause the red boundary to jump directly to Auto 3 Press SET to apply the settings of the selected scene and return to the recording screen The settings of the scene you selected remain in effect until you select a different scene ...

Страница 95: ...s a good idea to use a tripod to avoid image blur due to camera movement when shooting at slow shutter speeds BEST SHOT scenes were not shot using this camera Images shot using a BEST SHOT scene may not produce the results you expected due to shooting conditions and other factors You can change the camera settings that are made when you select a BEST SHOT scene Note however that the BEST SHOT sett...

Страница 96: ...slide the zoom controller towards or The following are the different operations you can perform while the scene description screen is on the display To return to the scene selection screen slide the zoom controller towards or again To scroll through available BEST SHOT scenes use W and X To select the currently displayed scene and configure the camera with its settings press SET NOTE If you select...

Страница 97: ...MPORTANT Formatting the camera s built in memory page 194 deletes all the user BEST SHOT scene files NOTE You can check the settings of the currently selected BEST SHOT scene by displaying the camera s setting menus and looking at its settings Only the setup of a snapshot with this camera can be saved as a user BEST SHOT setup User snapshot scenes are assigned numbers in the sequence U1 U2 and so ...

Страница 98: ... User Scene 6 Use W and X to select another scene and then press SET This returns to the recording state You can turn on the camera s Anti Shake feature to reduce image blur due to subject movement or hand movement when shooting a moving subject using telephoto when shooting a fast moving subject or when shooting under dim lighting conditions You can turn on Anti Shake using BEST SHOT or by perfor...

Страница 99: ...ess the ISO setting page 123 is set to Auto Shooting with Anti Shake can cause an image to appear somewhat coarser than normal and can cause slight deterioration of image resolution Anti Shake may not be able to eliminate the effects of hand or subject movement when movement is severe Anti Shake is disabled while shooting a movie Anti Shake may not work with a very low shutter speed If this happen...

Страница 100: ... IMPORTANT Shooting with High Sensitivity can cause an image to appear somewhat coarser than normal and can cause slight deterioration of image resolution The desirable level of image brightness may not be possible under very dark conditions When shooting with slow shutter speeds use a tripod to protect against the effects of hand movement High Sensitivity is disabled following an automatic flash ...

Страница 101: ...ST SHOT has two Business Shot scenes from which to choose Selecting a Business Shot Scene 1 In the REC mode press BS 2 Use S T W and X to select the Business cards and documents or the White board etc scene and then press SET Whichever you select will remain in effect until you select a different BEST SHOT scene Shooting Images of Business Cards and Documents Business Shot Before Keystone Correcti...

Страница 102: ...k boundary it means that the black boundary is indicating a second possible candidate If there is no second candidate black boundary jump directly to step 3 If the camera is unable to detect any keystone correction candidate at all the message Cannot correct image will appear on the monitor screen momentarily and then the camera will save the image as is uncorrected 2 Use W and X to select the can...

Страница 103: ...um Business Shot image size is 2M 1600 1200 pixels even if the camera is configured for a larger image size When the camera is configured to record images smaller than 2M 1600 1200 pixels Business Shot scenes will produce images in accordance with the currently specified image size You can use this procedure to shoot a portrait and then print it out in a variety of different standard ID photo size...

Страница 104: ...ed in memory when you perform step 3 below 2 Align the guidelines that appear on the monitor screen with the subject in the recorded image Align the subject so the head fills the oval boundary Also make sure that the subject s head is within the head line and the chin line To do this Perform this operation Move the subject up down left and right Use S T W X Enlarge the subject Slide zoom controlle...

Страница 105: ...ze setting Printing an ID Photo Printing an ID photo image will print the same image in various sizes on a single sheet of paper Then you can cut out the image s you want to use IMPORTANT The ID photo sizes provided here are not exact Actual sizes may be slightly larger When printing an ID photo be sure to print on 4 6 size paper Images may not print at the proper sizes if another size of paper is...

Страница 106: ... off the surface of the original photograph when recording it If the old photograph is portrait orientation be sure to compose the image with the camera in landscape horizontal orientation NOTE When the camera is at an angle to the photograph you are recording the shape of the photograph may appear distorted in the recorded image Auto keystone correction corrects for this distortion which means th...

Страница 107: ...appear page 256 without displaying the photograph contour confirmation screen if the camera is unable to find the contour of the photograph 2 Use W and X to select the candidate you want to correct 3 Use S and T to select Trim and then press SET This displays a cropping boundary on the monitor screen To cancel the correction operation select Cancel 4 Move the zoom controller left and right to zoom...

Страница 108: ...sabled while recording with Old Photo However you can use optical zoom When recording the image of a photograph the camera will not be able to recognize the shape of the photograph in the following cases When part of the photograph extends outside of the monitor screen When the subject is the same color as the background it is placed upon The maximum Old Photo image size is 2M 1600 1200 pixels Whe...

Страница 109: ...c focus for distances that are closer than those for Auto Focus Used for close up shooting Auto adjustment 6 cm to 50 cm 2 4 to 19 7 Minimum distance position varies with optical zoom Pan Focus Pan Focus PF is available during movie recording only Fixed focus for relatively wide range focusing Use Pan Focus under conditions where Auto Focus is difficult Fixed distance Focus range varies with optic...

Страница 110: ...ess X 3 Use S and T to select the focus mode setting you want and then press SET An icon appears on the monitor screen to indicate the current focus mode See the following pages of this section for details about shooting with each focus mode NOTE You can also use the Panel Operation Panel page 53 to change the focus mode setting Focus Mode Icon ...

Страница 111: ...ra switches to the Pan Focus Mode automatically NOTE When proper focusing is not possible because the subject is closer than the Auto Focus range the camera will switch to the Macro Focus range automatically Auto Macro Whenever you perform an optical zoom operation while shooting with Auto Focus a value will appear on the monitor screen as shown below to tell you the focus range Example cm will be...

Страница 112: ...ash to become blocked which can produce unwanted lens shadows in your image Macro Focus becomes fixed focus while shooting a movie NOTE When Macro Focus cannot focus properly because the subject is too far away the camera will switch to the Auto Focus range automatically Auto Macro Whenever you perform an optical zoom operation while shooting with Macro Focus values will appear on the monitor scre...

Страница 113: ...in the center of the screen for metering This setting is best when you want to use focus lock page 114 Spot When the shutter button is half pressed have the camera automatically select one or more of nine possible focus frames If the camera is able to focus on multiple points all applicable focus frames turn green Multi NOTE When you select Multi as the focus area nine focus frames appear on the m...

Страница 114: ... the monitor screen s focus frame with the subject you want to focus on and then half press the shutter button 2 Keeping the shutter button half pressed re compose the image as you like 3 When the image is focused press the shutter button the rest of the way to shoot NOTE Focus lock also causes exposure AE to be locked AWB AF ISO 0 3EV 15 37 N 10 62 62 Focus Frame Subject to be focused on AWB AF I...

Страница 115: ...ut pausing Quick Shutter When Quick Shutter is turned on the camera immediately shoots the image without waiting for Auto Focus to be performed when you press the shutter release all the way down This helps to avoid missing a special moment while you wait for the camera to Auto Focus 1 In the REC mode press MENU 2 On the REC tab select Quick Shutter and then press X 3 Use S and T to select the set...

Страница 116: ... press the shutter button to shoot Using Manual Focus With Manual Focus the camera automatically enlarges the subject on the monitor screen which helps you manually adjust focus Manual focus can be used for shoot such images as moving trains Before the train arrives manually focus on an electric pole or some other object Then when the train passes the object you focused on you can shoot without wo...

Страница 117: ...tter button to shoot NOTE Whenever you perform an optical zoom operation page 72 while shooting with manual focus a value will appear on the monitor screen as shown below to tell you the focusing range Example MF cm will be replaced by the actual focus range values IMPORTANT While Manual Focus is selected as the focus mode the W and X keys are used to adjust the focus setting Any other functions a...

Страница 118: ... MENU 2 On the Quality tab select EV Shift and then press SET 3 Use S and T to adjust the exposure compensation value S Increases the EV value A higher EV value is best used for light colored subjects and backlit subjects Increasing the EV value also works well with the BEST SHOT Backlight scene T Decreases the EV value A lower EV value is best for dark color subjects and for shooting outdoors on ...

Страница 119: ...tion Panel page 53 to change the EV shift setting Performing an EV shift operation while using multi pattern metering will cause the metering mode to switch automatically to center weighted metering The metering mode will return to multi pattern metering when you change the exposure compensation value to 0 0 page 124 You can use the key customization feature to configure the W and X buttons so the...

Страница 120: ...do this Select this setting Let the camera adjust white balance automatically Auto Shoot outdoors on a clear day Daylight Shoot outdoors on an overcast rainy day in the shade etc Overcast Shoot in the shadow of a building in the shade of trees etc on a clear day Shade Suppress color cast when shooting under white or day white fluorescent lighting Day White Fluorescent Suppress color cast when shoo...

Страница 121: ...to with the control key when the control key is configured to select the auto white balance setting scroll through the settings until appears on the monitor screen Configuring the White Balance Setting Manually Under complex lighting conditions the preset white balance settings may not be able to produce natural looking colors When this happens you can configure the white balance setting manually ...

Страница 122: ...then press the shutter button The camera will adjust white balance settings for the current conditions and display Complete when it is finished 5 Press SET to register the white balance settings and return to the shooting screen NOTE After you adjust white balance manually the setting remains in effect until you change it or until you turn off the camera White sheet of paper ...

Страница 123: ...ensitivity setting can cause digital noise which makes an image appear rough For clean good quality images use the lowest possible ISO sensitivity setting 1 In the REC mode press MENU 2 On the Quality tab select ISO and then press X 3 Use S and T to select the setting you want and then press SET NOTE You can also use the Panel Operation Panel page 53 to change the ISO sensitivity setting Specifyin...

Страница 124: ...the subject is metered for exposure 1 In the REC mode press MENU 2 On the Quality tab select Metering and then press X 3 Use S and T to select the setting you want and then press SET Multi Multi Metering Multi pattern metering divides the image into sections and measures the light in each section for a balanced exposure reading The camera automatically determines shooting conditions according to t...

Страница 125: ...bject without being affected by surrounding conditions IMPORTANT The metering mode will change to Center Weighted automatically if you change the EV shift value page 118 to anything other than 0 0 while Multi is selected The metering mode will change back to Center Weighted when the EV shift value is changed back to 0 0 When Multi is selected as the metering mode the icon will not be displayed on ...

Страница 126: ... to select the setting you want and then press SET Available filter settings are Off B W Sepia Red Green Blue Yellow Pink and Purple Use the following procedure to adjust the sharpness of subject outlines in your images 1 In the REC mode press MENU 2 On the Quality tab select Sharpness and then press X 3 Use S and T to select the setting you want and then press SET You can specify one of five shar...

Страница 127: ...f five saturation settings from 2 most saturated to 2 least saturated i Use the following procedure to adjust the contrast of your images 1 In the REC mode press MENU 2 On the Quality tab select Contrast and then press X 3 Use S and T to select the setting you want and then press SET You can specify one of five contrast settings from 2 most contrast between light and dark to 2 least contrast betwe...

Страница 128: ...to specify the Year Month Day format of the date The recording date and time are determined in accordance with the camera s clock settings pages 12 188 when the snapshot is recorded Digital zoom and Instant Zoom are not supported while date stamping is turned on Date stamping is not supported for the following types of images Some BEST SHOT images Business cards and documents White board etc Old P...

Страница 129: ...either the REC mode or the PLAY mode You can turn histogram display on or off separately for the REC and PLAY modes 2 Press DISP 3 On the Info tab select Histogram and then press SET NOTE You can use key customization to configure the W and X buttons so they control the EV shift setting Then you can perform EV shift while viewing the results on the on screen histogram page 132 Using the On screen ...

Страница 130: ...e to the center as possible The histogram also includes RGB histogram lines that show the distribution of R red G green and B blue components These lines can be used to determine whether there is too much or too little of each of the color components in an image Example Histograms When the histogram is to the left it means that there are too many dark pixels This type of histogram results when the...

Страница 131: ... for particular subjects A centered histogram does not necessarily guarantee optimum exposure If you intentionally want to over expose or under expose the image you may not want a centered histogram Due to the limitations of exposure compensation you may not be able to achieve an optimum histogram configuration Use of the flash and certain shooting conditions can cause the histogram to indicate ex...

Страница 132: ...the five functions listed below to the W and X keys Once you do you will be able to use the assigned functions while shooting snapshots or movies without going through the menus For details about each of the functions see the referenced page numbers Other Useful Recording Functions When this function is assigned You can use W and X to do this Metering page 124 Change the metering setting EV Shift ...

Страница 133: ... using the W and X keys Selecting Off leaves the W and X keys with no function assigned Displaying an On screen Grid The on screen grid can be displayed on the REC mode monitor screen for easy alignment when composing images 1 In the REC mode press MENU 2 On the REC tab select Grid and then press X 3 Use S and T to select the setting you want and then press SET To to this Select this setting Displ...

Страница 134: ...layed for the following functions metering flash mode white balance self timer EV shift Note however that metering white balance self timer and EV shift icon help text appears only when Metering White Balance Self timer or EV shift respectively is assigned to the W and X keys with the key customization feature page 132 1 In the REC mode press MENU 2 On the REC tab select Icon Help and then press X...

Страница 135: ...electing Off for a setting will cause that setting to return to its optimal default whenever the camera is turned off and then back on again Selecting On will cause its setting when power is turned off to be restored when the camera is turned back on again The following lists all of the settings that can be configured with mode memory The ones marked with an asterisk have mode memory turned on tha...

Страница 136: ...current setting when the camera turned off and restore it when the camera is turned back on On Restore the optimum default when the camera is turned on Off Setting Mode Memory On Mode Memory Off BEST SHOT 1 Setting at power off Exits BEST SHOT when camera is turned off Flash Auto Focus Auto White Balance Auto ISO Auto AF Area Spot Metering Multi Self timer Off Flash Intensity 0 Digital Zoom On MF ...

Страница 137: ... of any of the mode memory on off settings of each individual setting except for Zoom Position Resetting the Camera to Its Initial Factory Defaults Use the following procedure when you want to return to the camera to its initial factory default settings which are the ones that are configured when you first purchase the camera See Menu Reference on page 243 for the initial factory default setting f...

Страница 138: ...138 ADVANCED SETTINGS IMPORTANT The following are not initialized when you reset the camera page 245 Home Time setup World Time setup Adjust Date Style Language Video Out ...

Страница 139: ...gs used to shoot it The file type icon that appears at the top of the monitor screen depends on the type of file snapshot movie audio only etc that is currently displayed Snapshot page 139 Movie page 141 Audio snapshot page 140 For information about folder names and file names see page 174 See page 56 information about how to hide the image information and view the image alone Viewing a Snapshot F...

Страница 140: ...ion Note that if you copy an image from another type of digital camera only a rough image may be shown on the monitor screen To switch to the REC mode Press Listening to the Audio of an Audio Snapshot You can use the following procedure to play the audio of an audio snapshot An audio snapshot is indicated by the file type icon 1 Enter the PLAY mode and then use W and X to display the audio snapsho...

Страница 141: ...ay the movie you want to play Check the file type icon The file type icon of a movie is Movie icon The film like frame that appears on the monitor screen indicates that this is an image from a movie For information about folder names and file names see page 174 To do this Do this Fast forward or fast reverse playback Hold down X or W Pause or restart playback Press SET Adjust volume Press S or T C...

Страница 142: ...rse operation up to three steps Hold down X or W Return from fast forward fast reverse to normal playback Press SET Pause or restart playback Press SET When paused scroll forward or back frame by frame Hold down either button to scroll non stop Press X or W Adjust volume Volume can be adjusted only while movie playback is in progress Press S or T Toggle on screen indicators on or off Press DISP Zo...

Страница 143: ...ludes snapshots and audio snapshots only Only Includes movies only One Image Includes only one specific image selected using W and X Favorites Includes snapshots in the FAVORITE folder page 176 Time Specify the time of the slideshow from start to finish Use W and X to select one of the following times in minutes 1 2 3 4 5 10 15 30 60 Interval Select the interval between slides Use W and X to selec...

Страница 144: ... the volume To stop a slideshow Press SET This will return to the PLAY mode Pressing MENU instead of SET stops the slideshow and returns to the menu screen Pressing instead of SET stops the slideshow and switches to the REC mode Effect Select a special effect Use S and T to select the effect you want Pattern 1 2 3 4 Applies preset effects in sequence Random Applies preset effects Pattern 1 2 3 4 i...

Страница 145: ...me specified by the slideshow Time setting In image copied from a computer or an image recorded with a different type of digital camera may remain on the screen longer than the time specified by Interval Playing a Slideshow on the USB Cradle Photo Stand You can play a slideshow on the camera while it is mounted on the USB cradle This is a good way to enjoy a long slideshow without worrying about t...

Страница 146: ... a slideshow is in progress After configuring the settings press MENU again to restart the slideshow To adjust the level of audio volume during a slideshow use S and T to adjust the volume To stop a slideshow Press the USB cradle s PHOTO button This will turn off the camera IMPORTANT The battery does not charge while a slideshow is in progress To charge the battery stop the slideshow NOTE You can ...

Страница 147: ...e the USB cradle is connected 4 Press to turn on the camera and enter the PLAY mode Pressing ON OFF or will not turn on the camera on the PLAY mode When the camera turns on in the PLAY mode an image will appear on the TV screen The camera s monitor screen will not turn on 5 Now you can perform the applicable operation on the camera for the type of file you want to play At this point you could pres...

Страница 148: ...ely low level and then adjust it as required NOTE After using an optionally available AV cable EMC 3A to connect the camera s cradle connector directly to the VIDEO IN terminal of a TV without using the USB cable you can view recorded images on the TV You can use the camera s USB cradle to connect to a DVD recorder or video deck and record images from the camera The following explains how to use t...

Страница 149: ...pect ratio setting on your TV as well Incorrect aspect ratio settings on the camera and or the TV can result in abnormal image display Images will not display correctly unless the camera s video signal output setting matches the video signal system of the TV or other video equipment Images will not display correctly on a TV or video equipment that is not NTSC or PAL For this type of TV Select this...

Страница 150: ... and X to move to a different part of the image after zooming To zoom back out slide the zoom controller towards If display indicators are turned on an indicator in the lower right corner of the monitor screen shows what part of the zoomed image is currently displayed To return to image to normal size Press MENU or BS IMPORTANT Depending on the image size some images may not be able to be zoomed t...

Страница 151: ...and X to move the selection boundary to it and then press SET Use the following procedure to display a calendar which shows the first image recorded on each date of a particular month This screen helps to make searching for an image quicker and easier 1 In the PLAY mode press S This displays the calendar screen You can also display the calendar by pressing MENU selecting the PLAY tab selecting Cal...

Страница 152: ...ou selected for the Date Style setting page 189 IMPORTANT Note following points about how certain editing functions of the camera affect the date with which the image is associated on the calendar screen Performing this type of editing operation Will associate the resulting image with this date Keystone Color Correction Resize Trimming Copy The date that the editing operation was performed Editing...

Страница 153: ...mage size and then press SET When you select an image size it will start to cycle through the following information Image Size Number of Pixels Print Size The print size indicates the optimum paper size for printing a snapshot of the selected image size 5 After you press SET in step 4 to resize the image the monitor screen returns to step 3 From there you can repeat steps 3 and 4 to resize another...

Страница 154: ... is not enough memory to store the resized version of the snapshot The recording date of the resized version of the snapshot will be the same as the recording date of the original snapshot You can crop a snapshot to trim parts you do not need and save the result in a separate file The original snapshot is also retained 1 In the PLAY mode display the snapshot you want to crop 2 Press MENU 3 On the ...

Страница 155: ...ted image The recording date of the extracted image will be the same as the recording date of the original snapshot Use the following procedure to correct the snapshot of a blackboard document poster photograph or other rectangular object that is out of square because it was recorded at an angle Performing keystone correction on an image causes a new corrected 2M 1600 1200 pixels size image to be ...

Страница 156: ...orrection cannot be performed on the following types of images Movie images Images created with MOTION PRINT Images recorded with another camera The keystone correction operation cannot be performed if there is not enough memory to store the corrected image When you display a corrected image on the camera s monitor screen the date and time indicate when the image was originally recorded not when t...

Страница 157: ...T This displays a cropping boundary on the monitor screen To exit color restoration without storing anything select Cancel 6 Move the zoom controller left and right to zoom the cropping boundary The size of the area you can select with the cropping boundary will depend on the size of the currently displayed image 7 Use S T W and X to move the cropping boundary to the location you want and then pre...

Страница 158: ...olor correct operation cannot be performed if there is not enough memory to store the corrected image When you display a restored image on the camera s monitor screen the date and time indicate when the image was originally recorded not when the image was corrected When a corrected image appears on the full month calendar screen it is displayed on the date that it was corrected page 151 NOTE If yo...

Страница 159: ...e page 189 1 In the PLAY mode use W and X to display the image whose date and time you want to edit 2 Press MENU 3 On the PLAY tab select Date Time and then press X 4 Set the date and the time you want 5 When all the settings are the way you want press SET to apply them After editing the time and date display the image to confirm that the date and time are correct Editing the Date and Time of an I...

Страница 160: ...n This feature comes in handy with a snapshot that you shot using portrait vertical orientation After rotating a snapshot you can return it to its original orientation if you want Note that this procedure does not actually change the image data It simply alters how the snapshot is displayed on the camera s monitor screen 1 In the PLAY mode press MENU 2 On the PLAY tab select Rotation and then pres...

Страница 161: ...of a snapshot shot using MOTION PRINT The original unrotated version of a snapshot s image will be displayed on the 12 image screen and the calendar screen You can perform the following cut operations on the camera to edit movies you have recorded Editing a Movie on the Camera Operation Description Cut To Point Cut Cuts everything from the current location to the beginning of the movie Cut Point T...

Страница 162: ...ou want to edit If there is not enough memory available delete any files you no longer need to free up more Cutting a movie into two parts or splicing of two movies in to a single movies cannot be performed on the camera Editing with To Point Cut or From Point Cut 1 Play back the movie you want to edit 2 Press SET to pause playback Check to make sure that cut icon is displayed on the monitor scree...

Страница 163: ...which or to which you want to cut the movie the cut point The part of the movie indicated in red on the displayed indicator bar is the part that will be cut To cancel the cut operation press MENU This will return to the screen in step 3 6 When the frame where you want the cut point to be is displayed press T To do this Press this button Fast forward or fast reverse playback X or W Pause or unpause...

Страница 164: ...l the Busy Please wait message disappears from the monitor screen before performing any operation on the camera Note that a cut operation can take a very long time if the movie being edited is long Using Point To Point Cut 1 Play back the movie you want to edit 2 Press SET to pause playback 3 Press T You could also perform the following steps in place of steps 1 through 3 above 1 In the PLAY mode ...

Страница 165: ... cancel the cut editing operation press MENU This will return to the screen in step 3 6 When the frame where you want the first From cut point to be is displayed press T 7 Repeat step 5 to select the frame you want to use as the second To cut point The part of the movie indicated in red on the displayed indicator bar is the part that will be cut To do this Press this button Fast forward or fast re...

Страница 166: ...Wait until the Busy Please wait message disappears from the monitor screen before performing any operation on the camera Note that a cut operation can take a very long time if the movie being edited is long MOTION PRINT lets you capture a movie frame and use it to create a snapshot The snapshot you create can be either of the two formats described below Creating a Snapshot of a Movie Frame MOTION ...

Страница 167: ... Holding down W or X scrolls at high speed 6 After displaying the movie frame you want press SET If you selected 9 frames in step 4 the camera will create a 9 frame snapshot with the frame you selected in step 6 in the center If you selected 1 frame in step 4 the camera will create a snapshot of the frame you selected in step 6 IMPORTANT MOTION PRINT is not possible using a movie that was recorded...

Страница 168: ...dio to a Snapshot 1 In the PLAY mode display the snapshot to which you want to add audio 2 Press MENU 3 On the PLAY tab select Dubbing and then press X This operation can be performed only while a snapshot is on the monitor screen 4 Press the shutter button to start audio recording 5 Press the shutter button again to stop audio recording Recording will stop automatically after about 30 seconds if ...

Страница 169: ... and then press X 4 Use S and T to select Delete and then press SET If you just want to delete the audio of the snapshot without re recording anything press MENU here and skip the rest of this procedure 5 Press the shutter button to start audio recording This deletes the previous recording and replaces it with the new one 6 Press the shutter button again to stop audio recording Recording will stop...

Страница 170: ...rying to record You may not be able to record audio if remaining memory capacity is too low Adding audio dubbing is not possible for the following types of images Movies Snapshots created using MOTION PRINT Protected snapshots NOTE Your camera supports the following audio data formats Audio Format WAVE ADPCM WAV extension Approximate Audio File Size 165KB 30 second recording at 5 5KB per second Mi...

Страница 171: ... SET This causes to appear on the monitor screen 3 Press the shutter button to start recording The operation lamp flashes green while recording is in progress You can press DISP during recording to turn off the monitor screen Pressing SET during recording will insert a marker into the recording During later playback you will be able to jump to the markers in the recording Recording Audio Only Voic...

Страница 172: ...ocedure by pressing BS and selecting another BEST SHOT scene When exiting this procedure select Auto for normal image recording IMPORTANT Take care that you do not block the camera s microphone with your fingers while recording Good recording results are not possible when the camera is too far away from what you are trying to record NOTE You can also play back Voice Recording data on your computer...

Страница 173: ...back Controls The following are the different operations you can perform while a Voice Recording is playing To do this Do this Fast forward or fast reverse playback Hold down X or W Pause or restart playback Press SET Jump to a marker in the audio data while playback is paused Press X or W Adjust volume You can adjust volume only while playback is in progress or paused Press S or T Toggle on scree...

Страница 174: ...e names are displayed on the camera s monitor screen see page 240 The total number of folders and files that is allowed depends on the image size and quality and capacity of the memory card being used for storage Files and Folders Name and Maximum Number Allowed Example File Each folder can contain up to 9999 files named CIMG0001 through CIMG9999 The extension on the file name depends on the file ...

Страница 175: ...PLAY tab select Protect and then press X 3 Use W and X to scroll through images until the one you want to protect is on the monitor screen 4 Use S and T to select On and then press SET An image that is protected is indicated by the icon 5 Now you can repeat steps 3 and 4 to protect another image or exit this procedure by pressing MENU To unprotect a specific file Perform the procedure under Protec...

Страница 176: ...g All Files in Memory but in step 3 select All Files Off instead of All Files On The FAVORITE folder is located in the camera s built in memory and you can use it to store personal snapshots that you do not want displayed during normal PLAY mode operations FAVORITE folder snapshots remain in camera memory even if you change to a different memory card IMPORTANT The FAVORITE folder can be used for s...

Страница 177: ...of the snapshot to the FAVORITE folder 6 Now you can repeat steps 4 and 5 to save another image or press MENU twice to exit this procedure IMPORTANT The snapshot copied to the FAVORITE folder is converted to QVGA size 320 240 pixels A snapshot in the FAVORITE folder cannot be restored to its original size Snapshots in the FAVORITE folder cannot be copied to a memory card NOTE The number of snapsho...

Страница 178: ...folder 5 After you are finished viewing the FAVORITE folder snapshots press MENU twice to exit this procedure Perform the following steps to view FAVORITE folder contents on your computer 1 Remove the memory card from the camera 2 Place the camera on the USB cradle which is connected to the computer 3 Perform the required operations on your computer to navigate to the camera s memory and display t...

Страница 179: ...u recorded with your camera You cannot copy a snapshot that is in the FAVORITE folder Copying All Files in Built in Memory to a Memory Card The following operation copies all files from built in memory to a memory card You cannot copy files individually 1 Load the memory card to which you want to copy the files into the camera 2 Turn on the camera enter the PLAY mode and then press MENU 3 On the P...

Страница 180: ... in and then press SET 5 Use W and X to select the file you want to copy 6 Use S and T to select Copy and then press SET This starts the copy operation Wait until the Busy Please wait message disappears from the monitor screen before performing any operation on the camera The copied image reappears on the monitor screen after the copy operation is complete 7 Now you can repeat steps 5 and 6 to cop...

Страница 181: ...done Always make sure that you really no longer need a file before deleting it A protected file cannot be deleted To delete a protected file first remove its protection page 175 Deleting an audio snapshot deletes both the snapshot and the audio file 1 In the PLAY mode press T 2 Use W and X to scroll through the images until the one for the file you want to delete is on the monitor screen 3 Use S a...

Страница 182: ...files and displays the message There are no files You can delete a single snapshot or you can delete all the snapshots currently in the FAVORITE folder Deleting a Specific Snapshot 1 In the PLAY mode press MENU 2 On the PLAY tab select Favorites and then press X 3 Use S and T to select Show and then press SET 4 Press T 5 Use W and X to select the snapshot you want to delete 6 Use S and T to select...

Страница 183: ...wice Deleting All FAVORITE Folder Snapshots 1 In the PLAY mode press MENU 2 On the PLAY tab select Favorites and then press X 3 Use S and T to select Show and then press SET 4 Press T 5 Use S and T to select All Files Delete and then press SET NOTE All snapshots in the FAVORITE folder are also deleted whenever you format built in memory page 194 ...

Страница 184: ...Recording playback Selecting the Operation Sound 1 Press MENU 2 On the Set Up tab select Sounds and then press X 3 Use S and T to select the operation whose sound you want to configure Startup Half Shutter Shutter Operation and then press X 4 Use S and T to select the setting you want and then press SET Configuring Camera Sound Settings To do this Select this setting Sound one of the built in soun...

Страница 185: ...re is also applied to video output page 147 Setting the Playback Volume Level You can use this procedure to set the playback volume level for movies and audio snapshots independent of the operation tone volume 1 Press MENU 2 On the Set Up tab select Sounds and then press X 3 Use S and T to select Play 4 Use W and X to specify the operation tone volume setting you want and then press SET You can se...

Страница 186: ...ect the setting you want and then press SET NOTE The following are the types of images that you can select for the startup screen Special startup screen images built into the camera Snapshots Audio snapshots Audio does not play Only one startup screen image can be in effect at any time To change the startup screen to another image simply overwrite the current image with the new one Formatting buil...

Страница 187: ...188 to change the current time setting only if you want IMPORTANT Changing the time and date setting without correctly configuring your Home City setting first will cause all of the World Time page 189 dates and times to be off Selecting Your Home City 1 Press MENU 2 On the Set Up tab select World Time and then press X This displays the current World Time settings Specifying the File Name Serial N...

Страница 188: ...After the setting is the way you want press SET to exit the setting screen Setting the Date and Time for Your Home City 1 Press MENU 2 On the Set Up tab select Adjust and then press X 3 Set the date and the time 4 After all of the settings are the way you want press SET to exit the setting screen To do this Press this button Move the cursor between settings W or X Change the setting at the cursor ...

Страница 189: ...use the World Time screen to view the current time in zone that is different from your Home City when you go on a trip etc World Time displays the current time in 162 cities in 32 time zones around the globe Configuring World Time Settings 1 Press MENU 2 On the Set Up tab select World Time and then press X 3 Use S and T to select World and then press X To display the date like this Select this for...

Страница 190: ...S T W and X to select the area where the city you want to view is located and then press SET 6 Use S and T to select the city you want and then press SET 7 After the setting is the way you want press SET to exit the setting screen Switching between the Home Time and World Time Screens 1 Press MENU 2 On the Set Up tab select World Time and then press X 3 Use S and T to select World for the World Ti...

Страница 191: ... select the setting you want and then press SET You can use the procedure below to change the USB communication protocol that is used when exchanging data with a computer printer or other external device Select the protocol that suits the device to which you are connecting 1 Press MENU 2 On the Set Up tab select USB and then press X Changing the Display Language Changing the USB Port Protocol ...

Страница 192: ...to connect to this type of device Select this setting Computer or a printer that supports USB DIRECT PRINT page 197 With this setting the computer sees the camera as an external storage device Use this setting for normal transfer of images from the camera to a computer using the bundled Photo Loader application Mass Storage USB DIRECT PRINT Printer that supports PictBridge page 197 This setting si...

Страница 193: ... mode REC or PLAY Pressing REC or PLAY while the camera is on switches immediately to the applicable mode REC or PLAY even if you are performing a menu operation The initial factory default for this setting is Power On Change this setting to anything besides Disable before connecting to a TV for image viewing To configure both keys to do this when pressed Select this setting Turn on the camera Pow...

Страница 194: ...correctly and the camera may stop operating normally if the camera powers down while formatting is in progress Never open the battery cover while formatting is in progress Doing so can cause the camera to stop operating normally 1 Check to make sure there is no memory card loaded in the camera If there is a memory card loaded in the camera remove it 2 Press MENU 3 On the Set Up tab select Format a...

Страница 195: ... at Home Printing on a Printer page 197 Print on a printer that supports PictBridge or USB DIRECT PRINT or on a printer equipped with a memory card slot You can use DPOF settings to specify which images you want to print the number of copies and date stamp settings before printing Printing with a Computer Windows Computer Install the software Photohands that comes bundled with the camera See Using...

Страница 196: ...etc Never disconnect cables or perform any camera or USB cradle operation while printing is in progress Doing so can cause a printer error Take a memory card that contains the images you want to print to the professional print service Before taking in a memory card you can use the camera s DPOF settings page 200 to specify which images you want printed the number of copies and whether or not the i...

Страница 197: ...DPOF settings page 200 For details see the user documentation that comes with your printer Printing on a Printer that Supports PictBridge or USB DIRECT PRINT You can connect the camera directly to a PictBridge or USB DIRECT PRINT compliant printer and print images without going through a computer The camera s USB cradle also allows easy connection to a printer Before connecting to a printer via th...

Страница 198: ...g appears on the camera s monitor screen if the camera is on the USB cradle while the bundled AV cable is connected to the cradle Be sure to disconnect the AV cable from the cradle if you want to use the camera s monitor screen to view images 5 Turn off the camera and place it onto the USB cradle 6 Turn on the printer 7 Load paper into the printer 8 Press the USB cradle s USB button This displays ...

Страница 199: ...nter For full details see the user documentation that comes with your printer 11 Use S and T to specify the print option you want If you want to print a specific image Select 1 Image and then press SET After that use W and X to display the image you want to print If you want to print multiple images Select DPOF and then press SET Next use the DPOF settings page 200 to specify the images you want t...

Страница 200: ...int Order Format lets you specify which images you want to print the number of copies and whether date stamping is turned on or off The settings you configure are recorded on the memory card After configuring settings you can use the memory card to print on a home printer that supports DPOF or take the memory card to a professional print service With DPOF you can configure settings while viewing t...

Страница 201: ...o print is on the monitor screen 5 Use S and T to specify the number of copies You can specify up to 99 for the number of copies Specify 0 if you do not want to print the image 6 If you want to include the date in the image press BS to toggle date stamping on and off To turn off date stamping press BS so Off is displayed Repeat steps 4 through 6 to configure settings for other images if you want 7...

Страница 202: ...em DPOF settings are not cleared automatically after printing is complete This means that if you perform another printing operation without clearing DPOF settings printing will be performed in accordance with the last settings you configured If you no longer need the currently configured DPOF settings use the procedure under Configuring the Same DPOF Settings for All the Images to change the numbe...

Страница 203: ...o it using the camera s Date Stamping feature turning on DPOF date stamping will cause the two dates to be stamped in the same location Be sure to turn off DPOF date stamping when printing an image that is stamped with the camera s Date Stamping function Some printers may ignore time stamp settings or may not support DPOF at all Check the user documentation that comes with your printer for details...

Страница 204: ...e information Your camera supports the protocols described below PictBridge and USB DIRECT PRINT PictBridge Camera and Imaging Products Association CIPA USB DIRECT PRINT Seiko Epson Corporation PRINT Image Matching III Using image editing software and printing on a printer that also supports PRINT Image Matching III makes it possible to use information about shooting conditions that is recorded wi...

Страница 205: ... that also supports Exif Print Exif 2 2 uses information about shooting conditions recorded with the image to enhance printed image quality Contact your printer manufacturer for information about models that support Exif Print printer upgrades etc ...

Страница 206: ...he Macintosh Windows users should refer to Using the Camera with a Windows Computer on page 207 Macintosh users should refer to Using the Camera with a Macintosh on page 223 What you can do View and store images You can use your computer to view camera images and for long term storage of images With some versions of Windows you need to install the USB driver that comes bundled with the camera Inst...

Страница 207: ...tX 9 0c When DirectX 9 0 or higher is not installed on the computer already 218 Retouch rotate print snapshots XP 2000 Me 98SE 98 Photohands 1 0 220 Play movies XP 2000 Me 98SE 98 DirectX 9 0c Windows 2000 98SE 98 Users of the above operating systems also need to install DirectX 9 0c if DirectX 9 0 or greater is not already installed on your system page 219 Windows Media Player is not included on ...

Страница 208: ...d USB driver Type B Installation is not required in the case of Windows XP 2000 and Me Correct operation is not guaranteed on a computer that has been upgraded from Windows 95 or 3 1 Photo Loader 3 0 Photohands 1 0 View the User s Guide XP 2000 Me 98SE Adobe Reader 6 0 Not required if already installed 222 98 If your computer does not have Adobe Reader or Adobe Acrobat Reader installed already go ...

Страница 209: ...the camera via its USB cradle Depending on what version of Windows your computer is running you may need to install the USB driver from the bundled CD ROM first General Procedure HD 65MB for installation 18MB on hard disk CPU Pentium Memory 32MB HD 60MB Other Internet Explorer 5 01 or higher 1 If your computer is running Windows 98SE or 98 install the USB driver page 210 If your computer is runnin...

Страница 210: ...splay the menu screen 2 On the menu screen click the English tab You could also click another language tab if you prefer 3 Click Install for USB driver B to start installation 4 Follow the instructions that appear on the dialog box and click Next Do not try to establish a connection between the camera and computer before installing the USB driver on the computer If you do the computer will not be ...

Страница 211: ...mputer Depending on what version of Windows your computer is running your computer may restart automatically If this happens the CD ROM menu may re appear after the restart Click Exit to exit the CD ROM menu and then remove the CD ROM from your computer Connecting the Camera to Your Computer the First Time IMPORTANT If you are not using the AC adaptor to power the camera the battery may go low and...

Страница 212: ...n to use the AC adaptor make sure that the camera s battery is fully charged 2 Connect the USB cable that comes bundled with the camera to the USB cradle and the USB port of your computer Orient the USB plug so it correctly matches the shape of the USB port when you connect them Plug the USB cable into the ports securely as far as it will go Proper operation is not possible if connections are not ...

Страница 213: ...5 Use S and T to select Mass Storage and then press SET 6 Press the camera s ON OFF button to turn it off and then place the camera on the USB cradle Do not place the camera onto the USB cradle while it is turned on If you plan to transfer images from the camera s built in memory to your computer make sure there is no memory card loaded in the camera 7 Press the USB cradle s USB button USB Lamp US...

Страница 214: ...n the above procedure when you connect the camera to your computer unless you change the camera s USB settings for some reason With some Windows setups you may see a guidance message appear on your display to let you know about the new removable disk If this happens simply close the guidance message dialog box IMPORTANT Never disconnect the USB cable or remove the camera from the USB cradle withou...

Страница 215: ... Press the USB cradle s USB button Pressing the cradle s USB button puts it into the USB mode which is indicated by the USB lamp lighting green Viewing Camera Images on Your Computer After connecting the camera to your computer you can view camera images on your computer screen For information about connecting to a computer see Connecting the Camera to Your Computer after the First Time on page 21...

Страница 216: ...put it into an album you must first save it to your computer To save a camera image to your computer you must first establish a connection between them via the camera s USB cradle For information about connecting to a computer see Connecting the Camera to Your Computer after the First Time on page 215 1 Windows XP users Click Start and then My Computer Windows 2000 Me 98SE 98 users Double click My...

Страница 217: ...all the image files it contains into your My Documents folder You now have a copy of the files that are in camera memory on your computer IMPORTANT Never use your computer to modify delete move or rename any image files that are in the camera s built in memory or memory card Doing so can cause problems with the camera s image management data which will make it impossible to play back images on the...

Страница 218: ...our computer you need to install the Photo Loader application from the CD ROM that comes with the camera NOTE If you already have Photo Loader installed on your computer check its version If the bundled version is newer than the one you have uninstall the old version of Photo Loader and then install the newer version Installing Photo Loader 1 Start up your computer and place the bundled CD ROM int...

Страница 219: ...rosoft Data Access Components 2 8 installation dialog box appears after installation of Photo Loader is complete follow the instructions on the screen to perform the installation The installation dialog box will not appear if MDAC 2 8 or higher installed is already installed on your computer IMPORTANT See the Read me file that comes with Photo Loader for information about what you need to do to be...

Страница 220: ... need to install Microsoft DirectX 9 0c from the bundled CD ROM If your computer does not have Microsoft DirectX 9 0 or higher installed install Microsoft DirectX 9 0c from the bundled CD ROM Retouching Reorienting or Printing Snapshots In order to retouch reorient or print snapshots on your PC you need to install Photohands from the CD ROM that comes bundled with the camera IMPORTANT If you alrea...

Страница 221: ...nstallation conditions and computer system requirements 4 Click Install for Photohands 5 Follow the instructions that appear on your computer screen to install Photohands Playing Movies Windows Media Player which is already installed on most computers can be used for movie playback Movie Playback Precautions Be sure to move the movie data to the hard disk of your PC before trying to play it Proper...

Страница 222: ...nu screen automatically navigate to the CD ROM on your computer and then double click the MENU exe file 2 On the menu screen click the tab for the language you want 3 In the Manual area click the name of the manual you want to read IMPORTANT You must have Adobe Reader or Adobe Acrobat Reader installed on your computer in order to view the contents of a PDF file If you do not already have Adobe Rea...

Страница 223: ...ftware in accordance with what version of the Macintosh OS you are running and what you want to do Using the Camera with a Macintosh Objective OS Version Install this software See page Viewing images on your Macintosh Storing images on your Macintosh OS 9 OS X USB driver not required 225 Manage images stored on your Macintosh OS 9 Photo Loader 1 1 231 OS X Use iPhoto which comes bundled with your ...

Страница 224: ...e trying to use Note that the values provided here are minimum requirements for running each application Actual requirements are greater depending on the number of images and the sizes of the images being handled Photo Loader 1 1 USB connection is supported on a Macintosh running Mac OS 9 or OS X Operation is supported using the standard USB driver that comes with the operating system so all you n...

Страница 225: ...not support operation under Mac OS X Viewing and Storing Images on a Macintosh You can view and store images snapshot and movie files on your Macintosh by connecting to the camera via its USB cradle IMPORTANT Connection is not supported to a Macintosh running Mac OS 8 6 or lower or Mac OS X 10 0 Connection is supported to a Macintosh running Mac OS 9 or OS X 10 1 10 2 10 3 10 4 only Use the standa...

Страница 226: ...e camera If you do not plan to use the AC adaptor make sure that the camera s battery is fully charged 2 Connect the USB cable that comes bundled with the camera to the USB cradle and the USB port of your Macintosh Orient the USB plug so it correctly matches the shape of the USB port when you connect them Plug the USB cable into the ports securely as far as it will go Proper operation is not possi...

Страница 227: ...5 Use S and T to select Mass Storage and then press SET 6 Press the camera s ON OFF button to turn it off and then place the camera on the USB cradle Do not place the camera onto the USB cradle while it is turned on If you plan to transfer images from the camera s built in memory to your Macintosh make sure there is no memory card loaded in the camera 7 Press the USB cradle s USB button USB Lamp U...

Страница 228: ...he USB cradle without exiting the USB mode first Doing so can corrupt image data See Removing the Camera from the USB Cradle on page 231 for the correct steps you need to perform to remove the camera from the cradle safely Connecting the Camera to Your Macintosh after the First Time Since you need to configure menu settings only the first time you connect the camera to your Macintosh later connect...

Страница 229: ...e on page 228 1 Double click the camera s drive icon 2 Double click the DCIM folder 3 Double click the folder that contains the image you want to view 4 Double click the file that contains the image you want to view This displays the image IMPORTANT Do not leave the same image displayed on your Macintosh screen for a long time Doing so can cause image burn in NOTE An image that was rotated on the ...

Страница 230: ...o the folder where you want to store it This copies the DCIM folder to the folder on your Macintosh IMPORTANT Never use your computer to modify delete move or rename any image files that are in the camera s built in memory or memory card Doing so can cause problems with the camera s image management data which will make it impossible to play back images on the camera and can drastically alter rema...

Страница 231: ...stem If you are running Mac OS 9 install the Photo Loader application from the CD ROM that comes with the camera Installing Photo Loader Before starting installation be sure to read any readme file that accompanies Photo Loader readme files contain important information about installation including installation conditions and computer system requirements 1 Place the CD ROM that comes bundled with ...

Страница 232: ...o display existing library information or calendar format HTML files with Photo Loader or imported image files may be deleted Playing Movies You can use QuickTime which comes bundled with your operating system to play back movies Movie Playback Precautions Proper movie playback may not be possible on some Macintosh models If you experience problems try the following Change the movie image quality ...

Страница 233: ...e included on its label 2 Open the Digital Camera folder and then open the folder for the language whose user s guide you want to view 3 Open the file named camera_xx pdf xx is the language code Example camera_e pdf is for English Viewing the Photo Loader User s Guide 1 On the CD ROM open the Manual folder Use the CD ROM that has Photo Loader on its label 2 Open the Photo Loader folder and then op...

Страница 234: ...mory Card and MMC to insert the memory card into the slot For full details see the user documentation that comes with the PC card adapter and your computer Other types of computers Use either of the method described below Use a commercially available SD memory card reader writer See the user documentation that comes with the SD memory card reader writer for details about how to use it Use a commer...

Страница 235: ...ructure Indicates files that can be created in built in memory only Memory Card Data DCIM Folder Recording Folder Image File Movie File Audio File Audio Snapshot Image File Audio Snapshot Audio File Recording Folder Recording Folder FAVORITE Folder Recording File Recording File DPOF File Folder DPOF File Snapshot BEST SHOT Folder Snapshot BEST SHOT User Setup File Snapshot BEST SHOT User Setup Fil...

Страница 236: ...E Folder Folder that contains Favorites image files Size of images is 320 240 pixels DPOF File Folder Folder that contains DPOF files etc Snapshot BEST SHOT Folder Folder that contains snapshot BEST SHOT user setup files Snapshot BEST SHOT user setup file File of a snapshot BEST SHOT user setup Startup Screen File File for storing the startup screen image This file is created when you specify an i...

Страница 237: ...t to your computer is a good way to keep track of multiple DCIM folders When moving the folder back to the camera however be sure to change its name back to DCIM This camera does not recognize any folder name besides DCIM All of the other folders inside the DCIM folder must also have their original names if you transfer them back to the camera Folders and files must be stored in accordance with th...

Страница 238: ...st Self timer Lamp pages 62 69 81 248 5 Lens 6 Microphone pages 91 170 3 4 2 1 5 6 7 DISP Button page 52 8 PLAY Button pages 42 192 9 REC Button pages 42 192 bkZoom Controller pages 72 150 151 blOperation Lamp pages 42 64 248 bmStrap Hole page 2 bnControl Button S T W X bo SET Button bp BS Button page 93 bq MENU Button page 51 brMonitor Screen pages 52 66 bkbl 789 bm bn bo bp br bq S W T X SET ...

Страница 239: ...hole when attaching to a tripod clSpeaker page 140 bt ck cl bs 1 Camera Contact page 38 2 USB Lamp pages 213 227 251 3 USB Button pages 200 213 227 4 PHOTO Button pages 146 147 5 CHARGE Lamp pages 38 251 6 AV OUT AV output port page 147 7 USB Connector pages 198 212 226 8 DC IN 5 3V External Power Terminal page 37 5 1 2 3 4 6 8 7 ...

Страница 240: ... Flash Mode page 76 2 Focus Mode page 109 3 White Balance Setting page 120 4 Continuous Shutter Mode page 83 5 Self timer Mode page 81 6 Recording Mode 7 Digital zoom indicator page 73 8 Metering Mode page 124 9 Snapshot Image Size page 67 bkRemaining Snapshot Memory Capacity page 259 blSnapshot Image Quality page 68 bmISO Sensitivity page 123 bnAperture Value page 66 boShutter Speed page 66 bpDat...

Страница 241: ...e Balance Setting page 120 3 Recording Mode 4 Remaining Movie Memory Capacity page 90 5 Movie Image Quality page 89 6 Exposure Compensation page 118 7 Battery Level Indicator page 40 8 Histogram page 129 Normal Panel Operation Panel 1 4 5 6 7 8 2 3 4 6 7 8 2 3 1 5 ...

Страница 242: ...ime page 187 bkMetering Mode page 124 blWhite Balance Setting page 120 bmFlash Mode page 76 bnRecording Mode boBattery Level Indicator page 40 bpHistogram page 129 bqExposure Compensation page 118 3 2 1 bp bq bo blbk bm bn 4 7 5 8 9 6 Movie Playback Mode 1 File Type page 141 2 Protect Indicator page 175 3 Folder Name File Name page 174 4 Movie Recording Time page 141 5 Movie Image Quality page 89 ...

Страница 243: ... want page 134 Icon Help text is displayed for the following functions Flash Mode Metering White Balance Self timer EV Shift Metering White balance self timer and EV shift icon help text appears only when Metering White Balance Self timer or EV Shift is assigned to the W and X keys with the key customization feature page 132 Menu Reference Focus Auto Focus Macro Pan Focus Infinity Manual Focus Con...

Страница 244: ... Zoom Position On Off Size 10M 3648 2736 3 2 3648 2432 16 9 3648 2048 5M 2560 1920 3M 2048 1536 2M 1600 1200 VGA 640 480 Quality Snapshots Fine Normal Economy Quality Movies HQ Normal LP EV Shift 2 0 1 7 1 3 1 0 0 7 0 3 0 0 0 3 0 7 1 0 1 3 1 7 2 0 White Balance Auto Daylight Overcast Shade Day White Fluorescent Daylight Fluorescent Tungsten Manual ISO Auto ISO 50 ISO 100 ISO 200 ISO 400 Metering M...

Страница 245: ...ome World Home Time setup city DST etc World Time setup city DST etc Timestamp Date Date Time Off Adjust Time setting Date Style YY MM DD DD MM YY MM DD YY Language English Français Deutsch Español Italiano Português Sleep 30 sec 1 min 2 min Off Auto Power Off 2 min 5 min REC PLAY Power On Power On Off Disable USB Mass Storage USB DIRECT PRINT PTP PictBridge Video Out NTSC 4 3 NTSC 16 9 PAL 4 3 PA...

Страница 246: ...ancel Calendar MOTION PRINT 9 frames 1 frame Cancel Movie Editing Cut Before Cut Between Cut After Cancel Keystone Color Correction Favorites Show Save Cancel DPOF Select images All images Cancel Protect On All Files On Cancel Date Time Rotation Rotate Cancel Resize 5M 2560 1920 3M 2048 1536 VGA 640 480 Cancel Trimming Dubbing Copy Built in Card Card Built in Cancel ...

Страница 247: ...ncluded on the menus depend on whether the camera is in the REC mode or PLAY mode An asterisk indicates reset default settings REC Mode PLAY Mode Display Menu Reference Layout Panel Operation Panel Normal Info Show Histogram Hide Brightness Auto 2 1 0 1 Type Dynamic Vivid Real Night Power Saving Layout Normal Wide Info Same as REC Mode settings Brightness Same as REC Mode settings Type Same as REC...

Страница 248: ...elow explains what each flash pattern indicates REC Mode Indicator Lamps Operation Lamp AF assist self timer Lamp Operation Lamp AF Assist Self timer Lamp Meaning Green Red Amber Red Lit Operational Power on recording enabled Pattern 3 Flash is charging Lit Flash charging is complete Lit Auto Focus operation was successful Pattern 3 Cannot Auto Focus Lit LCD is off or in sleep state Pattern 2 Imag...

Страница 249: ...u shot to be lost Pattern 1 Cannot charge flash Pattern 2 Memory card problem Memory card is unformatted BEST SHOT setup cannot be registered Lit Memory card is locked Cannot create folder Memory is full Write error Pattern 3 Low battery alert Pattern 3 Card is being formatted Pattern 3 Powering down Operation Lamp AF Assist Self timer Lamp Meaning Green Red Amber Red ...

Страница 250: ...is in progress Delete DPOF protect copy format resize trimming adding audio to snapshot keystone correction color correction MOTION PRINT movie editing power down Pattern 2 Memory card problem Memory card is unformatted Lit Memory card is locked Cannot create folder Memory is full Pattern 3 Low battery alert Operation Lamp AF Assist Self timer Lamp Meaning Green Red Amber Red ...

Страница 251: ...s light and flash to indicate the current operational status of the cradle and camera CHARGE lamp USB Lamp CHARGE Lamp USB Lamp Meaning Color Status Color Status Red Lit Charging Green Lit Charging complete Amber Lit Charge standby Red Flashing Charge error Green Lit USB connection Green Flashing Memory being accessed ...

Страница 252: ... when the shutter button is pressed 1 Camera is in the PLAY mode 2 Flash is charging 3 Memory is full 1 Press REC to enter the REC mode 2 Wait until the flash finishes charging 3 Transfer images your computer delete images you no longer need or use a different memory card Auto Focus does not focus properly 1 The lens is dirty 2 The subject is not in the center of the focus frame when you compose t...

Страница 253: ...ty Focus when shooting a close up shot 1 Focus the image page 116 2 Use Auto Focus for scenery and portrait shots 3 Use the Macro Focus for close ups An image I shot was not saved 1 Power was cut off to the camera before the save operation was complete 2 The camera s memory card was removed before the save operation was complete 1 When the battery indicator shows charge the battery as soon as poss...

Страница 254: ...h the image in the case of a snapshot but it is recorded in the case of a movie Images are out of focus The subject is outside the range of the camera Shoot within the allowable range There is digital noise in images Sensitivity is increased automatically for dark subjects which increases the chance of digital noise Use a light or some other means to illuminate the subject Playback The color of th...

Страница 255: ...nnection between the camera and USB cradle 2 Check all connections 3 Install the USB driver page 210 4 Press the USB cradle s USB button Display language setting screen appears when the camera is turned on 1 Camera s display language Home city date style date and time and other settings have not been configured 2 A problem with the camera s built in memory management area 1 Check the settings page...

Страница 256: ...orrection of the image cannot be performed for some reason The image will be stored as is without correction page 101 Cannot find the file The image you specified with the slideshow Images setting cannot be found Change the Images setting page 143 and try again Cannot register any more files You are attempting to save a BEST SHOT scene when there are already 999 scenes in the SCENE folder page 97 ...

Страница 257: ...rinter generated an error etc Record Error Image compression could not be performed for some reason during image data storage Shoot the image again Replenish ink During printing the printer is running low on ink or is out of ink RETRY POWER ON If the lens comes into contact with some obstacle this message appears and the camera turns off Take action to remove the obstacle and try turning on power ...

Страница 258: ...ompliant Movies Motion JPEG AVI format Audio WAV Recording Media Built in Memory 8 0 MB SD Memory Card MultiMediaCard This function cannot be used You attempted to copy images from built in memory to a memory card while there is no memory card loaded in the camera page 179 This function is not supported for this file The function you are trying to use cannot be performed for some reason Specificat...

Страница 259: ...B 3 images 106 images Economy 1 1 MB 6 images 203 images 5M 2560 1920 Fine 2 8 MB 2 images 84 images Normal 2 0 MB 3 images 116 images Economy 1 0 MB 7 images 221 images 3M 2048 1536 Normal 1 92 MB 4 images 121 images Economy 1 28 MB 5 images 180 images Economy 640 KB 11 images 348 images 2M 1600 1200 Fine 1 17 MB 6 images 196 images Normal 780 KB 9 images 286 images Economy 390 KB 17 images 530 i...

Страница 260: ...r of images as a percentage of 256 MB Image Size Pixels Maximum Recording Time Per File Approximate Data Rate Frame Rate Approximate Built in Memory 8 0MB Capacity ApproximateSD Memory Card 256MB Capacity HQ 640 480 Until memory full 10 2 Megabits second 25 frames second 6 seconds 3 minutes 16 seconds Normal 640 480 Until memory full 6 1 Megabits second 25 frames second 10 seconds 5 minutes 27 sec...

Страница 261: ... 6 cm to 2 4 to Range is affected by optical zoom Exposure Control Metering Multi pattern center weighted and spot by imaging element Exposure Program AE Exposure Compensation 2EV to 2EV in 1 3EV steps Shutter CCD shutter mechanical shutter Snapshot Auto 1 2 to 1 2000 second with ISO 50 Snapshot Night Scene 4 to 1 2000 second with ISO 50 The shutter speed range may be different for some BEST SHOT ...

Страница 262: ...lf timer Continuous Shutter BEST SHOT movie with audio audio Voice Recording Audio is monaural Approximate Audio Recording Times Audio Snapshot 30 seconds per image After Recording 30 seconds per image Voice Recording 24 minutes when using built in memory Monitor Screen 2 8 inch TFT color LCD 230 400 960 240 pixels Viewfinder Monitor Screen Timekeeping Functions Built in quartz digital clock Date ...

Страница 263: ...m operation between full wide and full telephoto every 30 seconds during which two images are shot with flash power turned off and back on every time 10 images are shot 2 Continuous Playback Time Standard temperature 23 C 73 F one image scroll approximately every 10 seconds 3 Approximate continuous recording time The above values are based a new battery starting from a full charge Repeated chargin...

Страница 264: ...V Cable Strap CD ROM Basic Reference Rechargeable Lithium Ion Battery NP 40 Rated Voltage 3 7 V Rated Capacitance 1300 mAh Operating Temperature 0 to 40 C 32 to 104 F Dimensions 38 5 W 38 0 H 9 3 D mm 1 53 W 1 50 H 0 37 D Weight Approximately 34 g 1 2 oz USB Cradle CA 33 Input Output Terminals Camera contact USB port external power supply terminal DC IN 5 3 V AV terminal AV OUT NTSC PAL standards ...

Страница 265: ...50 W 20 H 70 D mm 2 0 W 0 8 H 2 8 D excluding projections excluding cable Weight Approximately 90 g 3 2 oz Special AC Adaptor Plug in Type AD C52J Input Power 100 to 240 V AC 50 60Hz 83 mA Output Power 5 3 V DC 650 mA Dimensions 50 W 18 H 70 D mm 2 0 W 0 7 H 2 8 D excluding projections excluding cable Weight Approximately 90 g 3 2 oz ...

Страница 266: ...266 CASIO COMPUTER CO LTD 6 2 Hon machi 1 chome Shibuya ku Tokyo 151 8543 Japan MA0607 C ...

Отзывы: