background image

GETTING READY

23

 File Memory

The term “file memory” in this manual is a general term that
refers to the location where your camera is currently storing
the images you record. File memory can be any one of the
following three locations.

• The camera’s built-in memory
• An SD memory card loaded in the camera
• A MultiMediaCard loaded in the camera

For more information about how the camera stores images,
see page 195.

 Front

General Guide

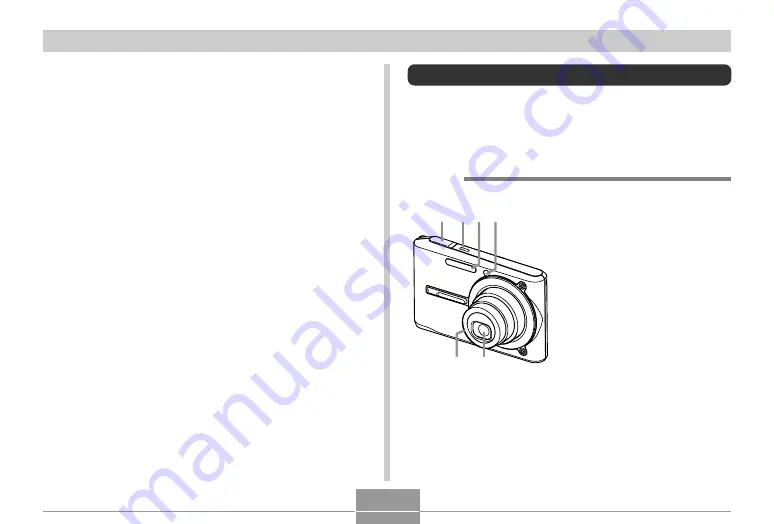
The following illustrations show the names of each
component, button, and switch on the camera.

Camera

1

Shutter button

2

Power button

3

Flash

4

AF assist light/
self-timer lamp

5

Lens

6

Microphone

5

3 4

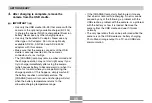
2

1

6

B

Содержание EX-S500GY

Страница 1: ...ing this CASIO product Before using it be sure to read the precautions contained in this User s Guide Keep the User s Guide in a safe place for future reference For the most up to date information about this product visit the official EXILIM Website at http www exilim com ...

Страница 2: ...geable Lithium Ion Battery NP 20 USB Cradle CA 28 USB Cable Basic Reference Camera Strap Special AC Adaptor Inlet Type AD C51G or AD C52G AC Power Cord The shape of the AC power cord plug varies according to country or geographic area Note that the shape of the AC adaptor depends on the area where you purchased the camera Special AC Adaptor Plug in Type AD C51J or AD C52J CD ROMs 2 AV Cable ...

Страница 3: ...itor Screen 30 Attaching the Strap 31 Power Requirements 32 Loading the Rechargeable Battery 32 To charge the battery 33 To replace the battery 38 Power Supply Precautions 39 Turning the Camera On and Off 42 Configuring Power Saving Settings 44 Using the On screen Menus 45 Configuring Display Language and Clock Settings 48 To configure display language and clock settings 49 51 BASIC IMAGE RECORDIN...

Страница 4: ...ubject Movement 90 Shooting with High Sensitivity 91 Recording Images of Business Cards and Documents Business Shot 92 To use Business Shot 93 Recording a Movie 94 Specifying Movie Image Quality 95 Recording a Movie 96 Recording a Short Movie 97 Recording a Past Movie 99 Recording a Snapshot during Movie Recording 101 Recording Audio 102 Adding Audio to a Snapshot 102 Recording Your Voice 104 Usin...

Страница 5: ...mage 137 Using Image Roulette 138 Adding Audio to a Snapshot 139 To re record audio 140 Playing Back a Voice Recording File 141 Displaying Camera Images on a TV Screen 142 Selecting the Video Output System 144 145 DELETING FILES Deleting a Single File 145 Deleting All Files 146 147 FILE MANAGEMENT Folders 147 Memory Folders and Files 147 Protecting Files 148 To protect a single file 148 To protect...

Страница 6: ...igure World Time settings 158 Changing the Display Language 159 Changing the USB Port Protocol 160 Configuring REC and PLAY Power On Off Functions 161 Formatting Built in Memory 162 163 USING A MEMORY CARD Using a Memory Card 164 To insert a memory card into the camera 164 To replace the memory card 165 Formatting a Memory Card 166 Copying Files 167 To copy all the files in built in memory to a me...

Страница 7: ...Requirements 200 Managing Images on a PC 202 Retouching Reorienting and Printing a Snapshot 205 Playing a Movie 207 Editing a Movie 210 Viewing User Documentation PDF Files 212 User Registration 212 Exiting the Menu Application 212 Using the Camera with a Macintosh Computer 213 About the bundled CD ROM 213 Computer System Requirements 214 Managing Images on a Macintosh 215 Viewing User Documentati...

Страница 8: ...the example screens and product illustrations shown in this User s Guide may differ somewhat by the screens and configuration of the actual camera The SD logo is a registered trademark Windows Internet Explorer Windows Media and DirectX are registered trademarks of Microsoft Corporation Macintosh is a registered trademark of Apple Computer Inc MultiMediaCard is a trademark of Infineon Technologies...

Страница 9: ...the camera and enter the mode you want to use AF assist light page 54 Improves auto focus accuracy when shooting under dim lighting 12X zoom page 57 3X optical zoom 4X digital zoom LCD Panel The LCD panel is a product of the latest LCD manufacturing technology that provides a pixel yield of 99 99 This means that less than 0 01 of the total pixels are defective they do not turn on or always remain ...

Страница 10: ...utomatically for beautiful images every time New BEST SHOT sample scenes include setups for backlighting and Anti Shake Business Shot page 92 Business Shot automatically corrects rectangular shapes when recording the image of a business card document whiteboard or similar subjects from an angle High resolution movie recording with audio page 94 VGA size 30 fps MPEG 4 AVI format A choice of movie r...

Страница 11: ...bnail of the first file recorded for that date which helps to make searching for a particular file quicker and easier After Recording page 139 Use this mode to add audio to snapshots after you record them Selectable Sound Settings page 153 You can configure different sounds to play whenever you turn on the camera press the shutter button half way or all the way or perform a key operation World Tim...

Страница 12: ...tended when you recorded them DCF Data Storage page 194 DCF Design rule for Camera File system data storage protocol provides image compatibility between the digital camera and printers Bundled with Photo Loader and Photohands pages 202 205 215 Your camera comes bundled with Photo Loader the popular application that automatically loads images from your camera to your PC It also comes with Photohan...

Страница 13: ...isture creates the risk of fire and electric shock Never use the camera outdoors in the rain or snow at the seashore or beach in the bathroom etc Should foreign matter or water ever get into the camera immediately turn it off Next remove the camera s battery and or unplug the AC adaptor power cord from the power outlet and contact your dealer or nearest CASIO authorized service center Using the ca...

Страница 14: ... this camera can cause the data stored in its memory to be deleted Always keep backup copies of data by transferring them to personal computer memory Never open the battery cover disconnect the AC adaptor from the camera or unplug the AC adaptor from the wall socket while an image is being recorded Doing so will not only make storage of the current image impossible it can also corrupt other image ...

Страница 15: ...USB cradle or disconnecting the AC adaptor from the USB cradle while a data communication operation is being performed Low battery power Other abnormal operations Any of the above conditions can cause an error message to appear on the monitor screen page 228 Follow the instructions provided by the message to eliminate the cause of the error Operating conditions This camera is designed for use in t...

Страница 16: ...rmer or colder than your current location Leave it in the plastic bag until the air inside the bag has a chance to reach the same temperature as the new location If condensation does form remove the battery from the camera and leave the battery cover open for a few hours Power Supply Use only the special NP 20 rechargeable lithium ion battery to power this camera Use of any other type of battery i...

Страница 17: ...ther soiling of the lens can interfere with proper image recording Never touch the lens with your fingers You can remove dust particles from the lens surface by using a lens blower to blow them off Next wipe the surface of the lens with a soft lens cloth Fingerprints dirt and other foreign matter on the flash can interfere with proper operation of the camera Avoid touching the flash If the flash b...

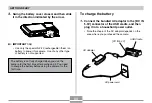
Страница 18: ...ace the camera onto the USB cradle to charge the battery page 33 Note that the shape of the AC adaptor depends on the area where you purchased the camera It takes about 120 minutes to achieve a full charge 1 2 3 2 1 Inlet Type 1 Plug in Type CHARGE lamp Charging Lights red Charging Complete Lights green Stopper ...

Страница 19: ...ty you want and then press SET 6 Use 왖 and 왔 to select the summer time DST setting you want and then press SET 7 Use 왖 and 왔 to select the date format setting you want and then press SET 8 Set the date and the time 9 Press SET to register the clock settings and exit the setting screen To configure display language and clock settings Be sure to configure the following settings before using the came...

Страница 20: ...es its Auto Focus operation the focus frame will turn green and the operation lamp lights green 3 Holding the camera still gently press the shutter button all the way down 3 1200N 1200N 1600 1600 10 10 05 05 12 12 24 24 12 12 58 58 2 1 Operation lamp Focus frame Auto recording icon Before using a commercially available memory card be sure to first format it using the camera s formatting procedure ...

Страница 21: ...elect Delete To exit the image delete operation without deleting anything select Cancel 5 Press SET to delete the image To delete an image See page 145 for details 1 Press PLAY This enters the PLAY playback mode 2 Use 왗 and 왘 to scroll through the images To view a recorded image See page 120 for details 1 2 1 2 3 4 5 ...

Страница 22: ...ouble quotation marks Supplementary Information IMPORTANT indicates very important information you need to know in order to use the camera correctly NOTE indicates information that is useful when operating the camera This term as used in this manual Means this digital noise Tiny flecks or snow in a recorded image or on the monitor screen which makes the image look grainy This section contains info...

Страница 23: ...three locations The camera s built in memory An SD memory card loaded in the camera A MultiMediaCard loaded in the camera For more information about how the camera stores images see page 195 Front General Guide The following illustrations show the names of each component button and switch on the camera Camera 1 Shutter button 2 Power button 3 Flash 4 AF assist light self timer lamp 5 Lens 6 Microp...

Страница 24: ... button B Strap ring C Speaker D 왖 왔 왗 왘 E SET button F BS BEST SHOT button G MENU button H Monitor Screen Bottom I Stopper J Memory card slot K Battery compartment L Battery cover M Connector N Tripod screw hole Use this hole when attaching to a tripod A B C D E F H G 890 7 왖 왔 왗 왘 SET I L M N KJ ...

Страница 25: ...ity for viewing of images on a television screen page 142 Direct connection to a printer for printing page 175 Automatic transfer of images to a computer page 180 IMPORTANT Use only the USB cradle CA 28 that comes with the camera Other USB cradles are not supported 1 Camera connector 2 USB lamp 3 USB button 4 PHOTO button 5 CHARGE lamp Back 6 DC IN 5 3V AC adaptor connector 7 USB port 8 AV OUT AV ...

Страница 26: ...timer 10 sec 2s Self timer 2 sec x3 Triple self timer 1 Flash mode indicator page 61 None Auto Flash Off Flash On Red eye reduction If the camera detects that flash is required while auto flash is selected the flash on indicator will appear when the shutter button is pressed half way 2 Focus mode indicator page 71 None Auto Focus Macro Pan Focus Infinity Manual Focus 5 Metering mode indicator page...

Страница 27: ...712 3 2 pixels 2304 1728 pixels 2048 1536 pixels 1600 1200 pixels 640 480 pixels 8 Memory capacity Snapshots pages 53 230 9 Image quality Snapshots page 70 F Fine N Normal E Economy 0 Remaining recording time Movies page 96 A Image quality Movies page 95 HQ High Quality NORMAL Normal LP Long Play B Aperture value page 53 C Shutter speed value page 53 D ISO sensitivity page 114 E Date and time page...

Страница 28: ...e name page 147 Example When a file named CIMG0023 JPG is stored in a folder named 100CASIO 100 0023 Folder name File name 4 Snapshots Image quality page 70 F Fine N Normal E Economy Movies Recording time page 96 L Digital zoom indicator page 59 M Zoom indicator page 59 Left side indicates optical zoom Right side indicates digital zoom L M 12 3 E 0 A B 4 9 6 F 8 7 D 5 C B ...

Страница 29: ...lity page 95 HQ High Quality NORMAL Normal LP Long Play 6 Aperture value page 53 7 Shutter speed value page 53 8 ISO sensitivity page 114 9 Date and time page 156 0 Metering mode indicator page 115 Multi Center Weighted Spot A White balance indicator page 81 AWB Auto Daylight Cloudy Shade Day White Daylight Tungsten Manual B Flash mode indicator page 61 Flash On Flash Off Red eye reduction C Recor...

Страница 30: ...ors on Histogram Details on Indicators off PLAY Mode Indicators off Indicators on Histogram on Changing the Contents of the Monitor Screen Each press of 왖 DISP changes the contents of the monitor screen as shown below REC Mode ...

Страница 31: ...to turn off the monitor screen only when voice recording in the REC mode You cannot turn off the monitor screen for any other recording function Pressing 왖 DISP in the Voice Recording REC mode toggles the monitor screen on indicators on and off While a Voice Recording file is displayed in the PLAY mode pressing 왖 DISP toggles between indicators on and indicators off When playing back the content o...

Страница 32: ...era and slide the battery into the camera NP 20 Push the bottom of the battery and make sure that the stopper securely locks the battery in place Stopper Power Requirements Your camera is powered by a rechargeable lithium ion battery NP 20 Loading the Rechargeable Battery 1 Slide the battery cover in the direction indicated by the arrow and then swing it open Arrow marks ...

Страница 33: ...a AC Adaptor DC IN 5 3V USB Cradle AC power cord 3 Swing the battery cover closed and then slide it in the direction indicated by the arrow IMPORTANT Use only the special NP 20 rechargeable lithium ion battery to power this camera Use of any other type of battery is not supported The battery is not fully charged when you use the camera for the first time after purchasing it You need to charge the ...

Страница 34: ...hen charging is complete the CHARGE lamp will turn green It takes about 120 minutes to achieve a full charge Actual charging time depends on current battery capacity and charging conditions NOTE The bundled AC adaptor is designed for operation with any power supply in the range of 100V to 240V AC Note however that the shape of the AC power cord plug varies according to country or geographic area I...

Страница 35: ... 10L to charge the special NP 20 rechargeable lithium ion battery Never use any other charging device Use only the bundled AC adaptor Never use any other type of AC adaptor Do not use optionally available AD C40 AD C620 and AD C630 AC adaptors with this camera Make sure that the camera connector of the USB cradle is securely inserted into the camera s connector as far as it will go The CHARGE lamp...

Страница 36: ...A Standard 1 Operating Time Number of Shots Continuous Recording 2 Operating Time Continuous Snapshot Playback 3 Continuous Movie Recording 4 Continuous Voice Recording 5 If the camera does not work normally This can mean there is a problem with how the battery is loaded Perform the following steps 1 Remove the battery from the camera and check the battery contacts for dirt If the contacts are dir...

Страница 37: ...upported Battery NP 20 Rated Capacitance 700mAh Storage Medium SD Memory Card 1 Number of Shots CIPA Standard Temperature 23 C 73 F Monitor Screen On Zoom operation between full wide to full telephoto every 30 seconds during which two images are recorded one image with flash power turned off and back on every time 10 images are recorded 2 Continuous Recording Conditions Temperature 23 C 73 F Monit...

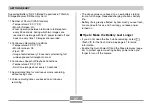
Страница 38: ...o you do not drop the battery 4 Load a new battery into the camera page 32 Stopper Low Battery Indicator The following shows how the battery capacity indicator on the monitor screen changes as battery power is used The indicator means that remaining battery power is low Note that you will not be able to record images while the battery indicator is Charge the battery immediately whenever either of ...

Страница 39: ...cklaces pencil lead etc Never try to take the battery apart modify it in any way or expose it to strong impact Do not immerse the battery in fresh water or salt water Do not use or leave the battery under direct sunlight in an automobile parked in the sun or in any other area subject to high temperatures Power Supply Precautions Note the following precautions when handling or using the battery and...

Страница 40: ... the following conditions while using charging or storing a battery immediately remove it from the camera or charger and keep it away from open flame Fluid leaking Emission of a strange odor Heat emission Battery discoloration Battery deformation Any other battery abnormality If the battery does not achieve full charge after the normal charging time has passed stop charging Continued charging crea...

Страница 41: ...n cords or wall outlets Doing so creates the risk of fire and electric shock Should the cord of the AC adaptor become damaged exposed internal wiring contact your dealer or nearest CASIO authorized service center A damaged AC adaptor cord creates the risk of fire or electric shock Caution BATTERY STORAGE PRECAUTIONS Make sure you remove the battery from the camera when you do not plan to use it fo...

Страница 42: ...with water Water creates the risk of fire and electric shock Do not place a vase or any other container filled with liquid on top of the AC adaptor Water creates the risk of fire and electric shock Make sure you always remove the camera from the USB cradle before connecting or disconnecting the AC adaptor Charging USB data communication and using the Photo Stand feature can cause the AC adaptor to...

Страница 43: ...mera enters the REC mode while pressing PLAY enters the PLAY mode Pressing PLAY while in the REC mode switches to the PLAY mode The lens retracts about 10 seconds after switching modes IMPORTANT If camera power is turned off by the Auto Power Off feature press the power button REC or PLAY to turn it back on again Pressing the power button or REC to turn on the camera also causes the lens to extend...

Страница 44: ... do not perform any operation for a specified amount of time 1 Turn on the camera 2 Press MENU 3 Use 왗 and 왘 to select the Set Up tab 4 Use 왖 and 왔 to select the feature whose setting you want to configure and then press 왘 5 Use 왖 and 왔 to change the currently selected setting and then press SET Available Sleep settings are 30 sec 1 min 2 min and Off Available Auto Power Off settings are 2 min and...

Страница 45: ...hows an example menu procedure in the REC mode 1 Press the power button or REC If you want to enter the PLAY mode instead press PLAY Power button The Auto Power Off and Sleep features are disabled in the following cases When the camera is connected to a computer or some other device through the USB cradle While a slideshow is in progress While playing back a voice recording file While a movie is b...

Страница 46: ...play the options available for a setting Select an option Apply the setting and exit the menu screen Apply the setting and return to tab selection Exit the menu screen Do this Press 왗 and 왘 Press 왔 Press 왖 Press 왖 and 왔 Press 왘 or press SET Press 왖 and 왔 Press SET Press 왗 Press MENU Settings Tab Selection cursor indicates the currently selected item 2 Press MENU MENU 왘 SET 왖 왗 왔 ...

Страница 47: ...setting and return to tab selection in step 3 Perform this key operation Press SET Press 왗 1 Press 왗 2 Use 왖 to move back up to tab selection 3 Press 왗 or 왘 to select the tab you want and then press SET to move the selection cursor from the tab to the settings 4 Use 왖 and 왔 to select the feature whose setting you want to configure and then press 왘 Instead of pressing 왘 you could also press SET 5 U...

Страница 48: ...k with the following procedure you will need to use the camera s menu to individually change the language page 159 or clock page 156 settings You will not be able to edit time data stored with images that are recorded while the camera s time setting is wrong Even if you configure date and time settings the date and time are not stamped into the images themselves Note however that you can specify i...

Страница 49: ... When you want to do this Keep time using summer time Daylight Saving Time Keep time using standard time Select this setting On Off To configure display language and clock settings 1 Press the power button REC or PLAY to turn on the camera 2 Use 왖 왔 왗 and 왘 to select the language you want and then press SET Japanese English English Français French Deutsch German Español Spanish Italiano Italian Po...

Страница 50: ...ursor between settings Toggle between 12 hour and 24 hour timekeeping Do this Press 왖 and 왔 Press 왗 and 왘 Press BS 7 Set the current date and the time 6 Use 왖 and 왔 to select the date format setting you want and then press SET Example December 24 2005 Select this format YY MM DD DD MM YY MM DD YY To display the date like this 05 12 24 24 12 05 12 24 05 ...

Страница 51: ...amera vertically make sure that the flash is above the lens Hold the camera still with both hands IMPORTANT Make sure your fingers and the strap do not block the flash microphone AF assist light self timer lamp or lens NOTE Moving the camera as you press the shutter button or while the Auto Focus operation is being performed when you press the shutter button half way can cause blurring of the imag...

Страница 52: ...rding icon to appear on the monitor screen and then enters the currently selected recording mode If the auto recording icon is not displayed use the procedure on page 85 to select the Auto scene This should cause the auto recording icon to appear If the camera is in the PLAY mode when it turns on the message There are no files will appear if you do not have any images stored in memory yet In addit...

Страница 53: ...tter button Operation lamp It means this The image is in focus The image is not in focus When you see this Green focus frame Green operation lamp Red focus frame Flashing green operation lamp Operation Lamp and Focus Frame Operation The monitor screen uses various indicators and icons to keep you informed of the camera s status ISO sensitivity Aperture value 1 Shutter speed value 2 Image quality S...

Страница 54: ...at the image is focused properly press the shutter button the rest of the way down to record The number of images you can record depends on the image size and the image quality setting you are using pages 69 70 230 IMPORTANT When the REC tab s Quick Shutter setting is turned on page 73 the camera immediately records the image without waiting for Auto Focus to be performed when you press the shutte...

Страница 55: ...ttery cover or place the camera onto the USB cradle while the operation lamp is flashing green Doing so not only causes the current image to be lost it can also corrupt images already stored in file memory and even lead to malfunction of the camera Never remove the memory card while an image is being recorded to the memory card Fluorescent lighting actually flickers at a frequency that cannot be d...

Страница 56: ...d focus frame do not necessarily guarantee that the resulting image will be in focus If Auto Focus does not produce the results you want for some reason try using focus lock page 78 or manual focus page 77 When recording a dimly lit subject while Auto is selected for the ISO sensitivity setting page 114 the camera increases sensitivity and uses a faster shutter speed Because of this you need to gu...

Страница 57: ...mage can cause a vertical band to appear in the monitor screen image This is a CCD phenomenon known as vertical smear and does not indicate malfunction of the camera Note that vertical smear is not recorded with the image in the case of a snapshot but it is recorded in the case of a movie page 94 Using Zoom Your camera is equipped with two types of zoom optical zoom and digital zoom Normally the c...

Страница 58: ...g the telephoto setting zoom in Whenever you perform an optical zoom operation while recording with the Auto Focus mode Macro mode or manual focus a value will appear on the monitor screen to tell you the focusing range pages 72 75 77 Optical zoom is disabled during movie recording Digital zoom only is available Make sure you select the optical zoom setting you want to use before you press MOVIE t...

Страница 59: ...appears coarser than the original To record an image using digital zoom 1 In the REC mode hold down the telephoto side of the zoom button This causes the zoom indicator to appear on the display 2 When the zoom pointer reaches the optical digital zoom switch over point it will stop The above shows what the zoom indicator looks like when digital zoom is turned on page 60 The digital zoom range is no...

Страница 60: ... hold down its wide angle side again to move into the digital zoom range 4 Compose the image and then press the shutter button Select this setting On Off To do this Turn on digital zoom Turn off digital zoom To turn digital zoom on and off 1 In the REC mode press MENU 2 Use 왗 and 왘 to select the REC tab 3 Use 왖 and 왔 to select Digital Zoom and then press 왘 4 Use 왖 and 왔 to select the setting you w...

Страница 61: ...o Depends on zoom factor 1 In the REC mode press 왔 Each press of 왔 cycles through the flash mode settings described below on the monitor screen To do this Have the flash fire automatically when required Auto Flash Turn off the flash Flash Off Always fire the flash Flash On Fire a pre flash followed by image recording with flash reducing the chance of red eye in the image Red eye reduction In this ...

Страница 62: ...owever that this also has the effect of shortening the flash range the range that is covered by the light from the flash page 114 During movie recording you can press 왔 to cycle through the flash mode settings for snapshot recording page 61 Flash On Select Flash On as the flash mode when backlighting causes your subject to appear dark even though there is enough light to keep the flash from firing...

Страница 63: ... pre flash operation is performed Red eye reduction may not work very well if the subjects are located far away from the camera Flash Unit Status You can find out the current flash unit status by pressing the shutter button half way and checking the monitor screen and operation lamp Operation lamp It means this Flash unit is charging Flash unit is ready to fire When the operation lamp is this Flas...

Страница 64: ...close to the camera To make flash intensity Stronger Normal Weaker Select this setting 2 1 0 1 2 1 In the REC mode press MENU 2 Use 왗 and 왘 to select the Quality tab 3 Use 왖 and 왔 to select Flash Assist and then press 왘 Flash assist used Flash assist not used Using Flash Assist Recording a subject that is outside the flash range can cause the subject to appear dark in the resulting image because n...

Страница 65: ... do not block the flash when you hold the camera Covering the flash with your finger can greatly reduce its effectiveness You may not be able to achieve the desired results using the flash if the subject is too close or too far away The flash takes anywhere from a few seconds to as long as 10 seconds to attain full charge after being fired The actual time required depends on the battery level temp...

Страница 66: ... lit Using flash in combination with another light source daylight fluorescent light etc can result in abnormal image colors Using the Self timer The self timer lets you select either a 2 second or 10 second delay of the shutter release after you press the shutter button A Triple Self timer feature lets you perform three consecutive self timer operations to record three images 1 In the REC mode pr...

Страница 67: ...ges in the sequence described below 1 The camera performs a 10 second countdown and then records the first image 2 The camera prepares to record the next image The amount of time required for preparation depends on the camera s current Size and Quality settings the type of memory built in or card you are using for image storage and whether or not the flash is charging 3 After preparation is comple...

Страница 68: ...ds You can interrupt an ongoing self timer countdown by pressing the shutter button while the AF assist light self timer lamp is flashing NOTE The 2 sec self timer setting is best when shooting with a slow shutter speed because it helps to avoid blurring of images due to hand movement You cannot use the self timer to record a snapshot during movie recording The following functions are not availabl...

Страница 69: ... you want and then press SET When selecting the image size the image size value pixels will alternate on the display with a corresponding print size The print size indicates the optimum paper size when you print an image that is the image size you select The above print sizes are all approximate values when printing at a resolution of 200 dpi dots per inch Use a larger setting when you want to pri...

Страница 70: ...for snapshots only For information about movie image quality see page 95 1 In the REC mode press MENU 2 Use 왗 and 왘 to select the Quality tab 3 Use 왖 and 왔 to select Quality and then press 왘 4 Use 왖 and 왔 to select the setting you want and then press SET IMPORTANT Actual file size depends on the type of image you record This means that the remaining image capacity noted on the monitor screen may n...

Страница 71: ... this Adjusts focus automatically Close up recording Focus adjusted on a certain subject distance Infinity recording Manual focus recording Select this setting Auto Focus Macro Close up Pan Focus Infinity Manual Focus Focus mode indicator The exposure compensation value is displayed on the monitor screen IMPORTANT Focus is fixed while recording a movie in the Auto Focus mode and Macro mode You can...

Страница 72: ...tab select Focus and then press 왘 3 Use 왖 and 왔 to select 4 Compose the image so the main subject is within the focus frame and then press the shutter button half way You can tell whether the image is focused by observing the focus frame and the operation lamp 1 1000 1 1000 F2 7 F2 7 ISO100 ISO100 Focus frame When you see this Green focus frame Green operation lamp Red focus frame Flashing green o...

Страница 73: ...ou the focusing range Example AF 40cm Quick Shutter When Quick Shutter is turned on the camera immediately records the image without waiting for Auto Focus to be performed when you press the shutter release all the way down This helps to avoid missing a special moment while you wait for the camera to Auto Focus 1 In the REC mode press MENU 2 Select the REC tab select Quick Shutter and then press 왘...

Страница 74: ...en press SET For this type of Auto Focus area Very limited range in the center of the screen This setting works well with focus lock page 78 Automatic selection of the focus area where the subject closest to the camera is located With this setting a wide focus frame which contains nine focus points appears on the monitor screen first When you press the shutter button half way the camera automatica...

Страница 75: ...cord the image The focus and image recording operations are identical to those in the Auto Focus mode NOTE When the Macro mode cannot focus properly because the subject is too far away the camera automatically switches to the Auto Focus range page 72 Whenever you perform an optical zoom operation page 57 while recording with the Macro mode a value will appear on the monitor screen as shown below t...

Страница 76: ... Focus and then press 왘 3 Use 왖 and 왔 to select 4 Press the shutter button to record the image NOTE If you press the shutter button half way the focus distance will appear on the monitor screen Example 1 1m Using the Infinity Mode The Infinity mode fixes focus at infinity Use this mode when recording scenery and other faraway images 1 In the REC mode press MENU 2 Select the REC tab select Focus an...

Страница 77: ...age manually The following shows focus range in the Manual Focus mode Boundary Optical Zoom Factor 1X 3X Approximate Focus Range 17cm 6 7 to infinity 40cm 15 7 to infinity Pressing 왗 or 왘 causes the area inside of the boundary displayed in step 1 to fill the monitor screen momentarily to aid in focus The normal image will reappear a short while later 6 Press the shutter button to record the image ...

Страница 78: ... is a technique you can use to focus on a subject that is not located within the focus frame when you record an image You can use focus lock in the Auto Focus mode and the Macro mode 1 Using the monitor screen compose the image so the main subject is within the focus frame and then press the shutter button half way This locks the focus on the subject that is currently within the focus frame 1 1000...

Страница 79: ...locks the exposure 1 1000 1 1000 F2 7 F2 7 ISO100 ISO100 Main subject Exposure Compensation EV Shift Exposure compensation lets you change the exposure setting EV value manually to adjust for the lighting of your subject This feature helps to achieve better results when recording a backlit subject a strongly lit subject indoors or a subject that is against a dark background EV Shift Range 2 0EV to...

Страница 80: ...mage IMPORTANT When shooting under very dark or very bright conditions you may not be able to obtain satisfactory results even after performing exposure compensation NOTE Performing an EV shift operation while using multi pattern metering page 115 will cause the metering mode to switch automatically to center weighted metering Returning the EV shift value to 0 0 causes the metering mode to change ...

Страница 81: ...ess 왘 3 Use 왖 and 왔 to select the setting you want and then press SET When shooting under these conditions Normal conditions Outdoor daylight on a clear day Outdoor daylight on an overcast or rainy day in the shade of a tree etc In the shade of a building or any other area where the color temperature is high Under white or daylight white fluorescent light suppresses color fogging Under daylight fl...

Страница 82: ...while in the REC mode If you have key customization configured to control white balance and you have Icon Help turned on page 111 select AWB Auto WB to change the white balance mode to auto Configuring the White Balance Setting Manually Certain complex light sources or other environmental conditions can make it impossible to obtain good results when Auto or one of the fixed light source settings i...

Страница 83: ...ite paper or similar object under the lighting conditions for which you want to set the white balance and then press the shutter button This starts the white balance adjustment procedure The message Complete appears on the monitor screen after white balance adjustment is complete 5 Press SET This registers the white balance settings and returns to the currently selected recording mode NOTE After y...

Страница 84: ...U 2 Select the REC tab select Continuous and then press 왘 3 Use 왖 and 왔 to select On and then press SET This causes to appear on the monitor screen With Off the snapshots are recorded one at a time 4 Press the shutter button to record Recording continues as long as you keep the shutter button depressed Release the shutter button to stop recording IMPORTANT The speed of continuous shutter recording...

Страница 85: ...enes snapshot and movie scenes snapshot only scenes movie only scenes and the voice record scene Sample scenes are arranged in sequence starting from the upper left corner 2 Use 왖 왔 왗 and 왘 to select the sample scene you want and then press SET Use 왖 왔 왗 and 왘 to move the selection boundary around the display Scrolling past the last or the first scene scrolls to the next screen of 12 sample scenes...

Страница 86: ...ou may not be able to record a still image or movie Due to shooting conditions and other factors an image recorded using the setup of a BEST SHOT scene may not produce exactly the results you expect You can change the camera settings that are made when you select a BEST SHOT scene Note however that the BEST SHOT settings revert to their defaults when you select another BEST SHOT scene or turn off ...

Страница 87: ... return to the 12 scene screen hold down the wide angle side of the zoom button 3 Use 왗 and 왘 to select the sample scene you want and then press SET Pressing MENU jumps to the first sample scene Auto 4 Press the shutter button to record the image When recording the image of a night scene fireworks or some other image using a slow shutter speed use of a tripod is recommended to prevent hand movemen...

Страница 88: ... to select your user setup for recording IMPORTANT BEST SHOT user setups are located in the camera s built in memory following the built in sample scenes Registering a snapshot creates a snapshot setup while registering a movie creates a movie setup A snapshot setup can be used to record snapshots only and a movie setup can be used to record movies only Selecting a user snapshot setup displays the...

Страница 89: ... You can have up to 999 BEST SHOT user setups in the camera s built in memory at one time You can check the current setup of a scene by displaying the various setting menus BEST SHOT snapshot user setups are stored in camera built in memory in the folder named SCENE BEST SHOT movie user setups are stored in camera built in memory in the folder named MSCENE File names are assigned automatically usi...

Страница 90: ... press SET Anti Shake indicator is displayed on the monitor screen while Anti Shake is turned on 2 Press the shutter button to record the image B IMPORTANT Anti Shake is disabled automatically when any setting other than Auto is selected for ISO sensitivity If you want Anti Shake to be operational after turning it on be sure to change the ISO sensitivity setting to Auto page 114 Recording with Ant...

Страница 91: ...igh Sensitivity is disabled automatically when any setting other than Auto is selected for ISO sensitivity If you want High Sensitivity to be operational after turning it on be sure to change the ISO sensitivity setting to Auto page 114 Recording with high sensitivity can cause an image to appear somewhat coarser than normal and can cause slight deterioration of image resolution A desirable level ...

Страница 92: ...e correction White board etc Business cards and documents Setup Sample Images IMPORTANT Before recording compose the image so outline of the item you want to record fits entirely within the monitor screen The camera will not be able to detect the shape of the subject correctly unless it is enclosed entirely within the monitor screen The camera also will be unable to detect the shape of the subject...

Страница 93: ...an angle To use Business Shot 1 In the REC mode press BS BEST SHOT 2 Use 왖 왔 왗 and 왘 to select the Business Shot image you want and then press SET 3 Press the shutter button to record the image This displays a screen that shows all of the objects in the image that qualify as candidates for keystone correction An error message will appear page 228 if the camera is unable to find any suitable keysto...

Страница 94: ... pixels records images at the specified size Recording a Movie You can record high resolution movies with audio Movie length is limited only by the amount of memory available for storage You can select a resolution setting to suit your needs and a variety of different movie recording functions provide plenty of movie making versatility File Format MPEG 4 AVI format Maximum Movie Length The length ...

Страница 95: ...pplicable sample scene Select one of the BEST SHOT scenes and the camera automatically configures itself with the setup for that scene page 85 NOTE You can play movie files on your computer using Windows Media Player 9 Specifying Movie Image Quality The image quality setting determines how much the camera compresses movie images before storing them Image quality is expressed as image size in pixel...

Страница 96: ...per second Frame Rate 30 frames second 30 frames second 15 frames second Recording a Movie 1 In the REC mode point the camera at the subject 2 Press MOVIE This starts movie recording Movie recording continues as long as remaining memory capacity allows 3 To stop movie recording press MOVIE again When movie recording is complete the movie file is stored in file memory Remaining recording time Recor...

Страница 97: ...basically of two parts as shown in the illustration below When 4 second past part and 4 second future part is specified Store Stores the previous 4 seconds Recording of the future part starts Recording stops automatically 4 seconds after MOVIE is pressed Storage complete Operation Press MOVIE Record Action You can specify the length of the past part and the future part independently The total leng...

Страница 98: ...st part can be from 0 to five seconds 5 Use 왖 and 왔 to specify the length of the future part the after part MOVIE is pressed and then press 왘 6 Use 왖 and 왔 to select the MOTION PRINT layout format you want and then press SET Past part Future part MOTION PRINT Select this setting 9 frames 1 frame Off To do this Store a capture of the image at the point MOVIE is pressed to start Short Movie recordin...

Страница 99: ...on starts future part recording the monitor screen will show a countdown of the remaining recording time Recording continues until the end of the countdown is reached Recording a Past Movie Past Movie uses a 5 second buffer that is continually updated Pressing MOVIE starts recording from five seconds prior to the point MOVIE is pressed Use Past Movie when you want to make sure you do not miss fast...

Страница 100: ...le to store data 4 To stop recording press MOVIE again Movie Recording Precautions The flash does not fire during movie recording This camera also records audio Note the following points when recording a movie Take care that you do not block the microphone with your fingers Good recording results are not possible when the camera is too far from the subject Operating camera buttons during recording...

Страница 101: ...ake sure you select the optical zoom setting you want to use before you press MOVIE to start movie recording page 57 The effects of camera movement in an image become more pronounced when you record close ups or recording with a large zoom factor Because of this use of a tripod is recommended when recording close ups or recording with a large zoom factor Images may be out of focus if the subject i...

Страница 102: ...ization feature page 109 to assign functions to 왗 and 왘 that can be accessed during snapshot and movie recording Recording Audio Adding Audio to a Snapshot You can add audio to a snapshot after you record it Image Format JPEG JPEG is an image format that provides efficient data compression The file extension of a JPEG file is JPG Audio Format WAVE ADPCM recording format This is the Windows standar...

Страница 103: ...screen and displays a indicator You can cancel audio recording standby by pressing MENU Remaining recording time 5 Press the shutter button to start audio recording The operation lamp will flash green while recording is in progress If you have the monitor screen turned off the monitor screen turns on while you are adding audio to a snapshot 6 Recording stops after about 30 seconds or when you pres...

Страница 104: ...cording on your computer using Windows Media Player 1 In the REC mode press BS BEST SHOT 2 Use 왖 왔 왗 and 왘 to select the Voice Recording scene and then press SET Selecting the Voice Recording scene causes to appear on the monitor screen 3 Press the shutter button to start voice recording The remaining recording time value counts down on the monitor screen and the operation lamp flashes green as re...

Страница 105: ...the microphone with your fingers Good recording results are not possible when the camera is too far from the subject Pressing the power button or pressing PLAY stops recording and stores any audio recorded up to that point You can also perform after recording to add audio to a snapshot after recording it and also change the audio recorded for an image See page 139 for more information Microphone ...

Страница 106: ...g right required to bring out sufficient image detail If the histogram appears too lopsided for some reason you can use EV shift exposure compensation to move it left or right in order to achieve better balance Optimum exposure can be achieved by correcting exposure so the graph is as close to the center as possible An RGB histogram that shows the distribution of R red G green and B blue component...

Страница 107: ...the dark areas of an image When the histogram is too far to the right it means that there are too many light pixels This type of histogram results when the overall image is light A histogram that is too far to the right may result in white out of the light areas of an image A centered histogram indicates that there is good distribution of light pixels and dark pixels This type of histogram results...

Страница 108: ... histogram configuration due to the limitations of EV shift Use of the flash as well as certain shooting conditions can cause the histogram to indicate exposure that is different from the actual exposure of the image when it was recorded The RGB color component histogram is displayed for snapshots only REC Mode Camera Settings The following are the settings you can configure before recording an im...

Страница 109: ...s page 70 Quality Movies page 95 White Balance page 81 Flash Intensity page 64 Flash Assist page 64 Assigning Functions to the 왗 and 왘 Keys A key customization feature lets you configure the 왗 and 왘 keys so they change camera settings whenever they are pressed in the REC mode After you configure the 왗 and 왘 keys you can change the setting assigned to them without going through the menu screen 1 In...

Страница 110: ...ng a snapshot or movie you can use 왗 and 왘 to set the functions assigned to them However you cannot set the self timer during movie recording Turning the On screen Grid On and Off You can display gridlines on the monitor screen to help you compose images and ensure that the camera is straight when recording To do this Display the grid Hide the grid Select this setting On Off 1 In the REC mode pres...

Страница 111: ...REC tab select Review and then press 왘 3 Use 왖 and 왔 to select the setting you want and then press SET Using Icon Help Icon Help displays guidance text about an icon when you select it on the monitor screen while in the REC mode page 27 Icon Help text is displayed for the following functions Flash mode focus mode white balance self timer recording type EV shift Note however that EV shift self time...

Страница 112: ...ge 81 Specifying Power On Default Settings The camera s mode memory feature lets you specify the power on default settings individually for the BEST SHOT mode flash mode focus mode white balance mode ISO sensitivity AF Area metering self timer flash intensity digital zoom mode manual focus position and zoom position Turning on mode memory for a mode tells the camera to remember the status of that ...

Страница 113: ...oom Position 2 On Setting when camera is turned off Off BEST SHOT status cancel Auto Auto Auto Auto Spot Multi Off 0 On Last Auto Focus position that was in effect before you switched to manual focus Wide 1 In the REC mode press MENU 2 Select the REC tab select Memory and then press 왘 3 Use 왖 and 왔 to select the item you want to change and then press 왘 4 Use 왖 and 왔 to select the setting you want ...

Страница 114: ...ing for better images in places where lighting is dim or when you are using faster shutter speeds ISO sensitivity is expressed in terms of values that originally indicated the sensitivity to light for photographic film A larger value indicates higher sensitivity which is better for recording when available lighting is dim 1 In the REC mode press MENU 2 Select the Quality tab select ISO and then pr...

Страница 115: ... subject Auto ISO sensitivity always is used for movie recording regardless of the current ISO sensitivity setting NOTE You can use the key customization feature page 109 to configure the camera so the ISO sensitivity setting changes whenever you press 왗 and 왘 while in the REC mode Selecting the Metering Mode The metering mode determines what part of the subject is metered for exposure You can use...

Страница 116: ...me control over exposure without leaving settings totally up to the camera Spot Spot metering takes readings at a very small area Use this metering method when you want exposure to be set according to the brightness of a particular subject without it being affected by surrounding conditions IMPORTANT When Multi is selected as the metering mode certain procedures cause the metering mode setting to ...

Страница 117: ...ettings are Off B W Sepia Red Green Blue Yellow Pink Purple IMPORTANT Using the camera s filter feature produces the same effect as attaching a color filter to the lens Specifying Outline Sharpness Use the following procedure to control the sharpness of image outlines 1 In the REC mode press MENU 2 Select the Quality tab select Sharpness and then press 왘 3 Use 왖 and 왔 to select the setting you wan...

Страница 118: ...s High color saturation intensity Normal color saturation intensity Low color saturation intensity Select this setting 2 1 0 1 2 Specifying Contrast Use this procedure to adjust the relative difference between the light areas and dark areas of the image you are recording 1 In the REC mode press MENU 2 Select the Quality tab select Contrast and then press 왘 3 Use 왖 and 왔 to select the setting you w...

Страница 119: ...set all of the camera s settings to their initial defaults as shown under Menu Reference on page 217 1 Press MENU 2 Select the Set Up tab select Reset and then press 왘 3 Use 왖 and 왔 to select Reset and then press SET To cancel the procedure without resetting select Cancel and press SET ...

Страница 120: ...age The actual display image appears a short while after the preview image This does not apply to images copied from another digital camera You can use the camera s built in monitor screen to view images after you record them Basic Playback Operation Use the following procedure to scroll through files stored in the camera s memory 1 Press PLAY to turn on the camera This enters the PLAY mode and ca...

Страница 121: ...udio that accompanies the displayed image You can perform the following operations while audio is playing IMPORTANT Audio volume can be adjusted only when playback is being performed or is paused To do this Fast forward or fast reverse the audio Pause and unpause audio playback Adjust audio volume Changing display contents Cancel playback Do this Hold down 왗 or 왘 Press SET Press 왔 and then use 왖 a...

Страница 122: ...r appears in the lower right corner that shows what part of the original image is currently displayed on the monitor screen You can toggle display of the zoom factor on and off by pressing BS 3 Use 왖 왔 왗 and 왘 to shift the image up down left or right 4 Press MENU to return the image to its original size IMPORTANT Depending on the original size of the recorded image you may not be able to zoom a di...

Страница 123: ... to resize 4 Use 왖 and 왔 to select the setting you want and then press SET To cancel the resize operation select Cancel IMPORTANT Resizing an image creates a new file that contains the image in the size you select The file with the original image also remains in memory Note that you cannot resize the following types of images 640 480 pixel and smaller images Movie images and the voice recording fi...

Страница 124: ... of the original image is currently displayed on the monitor screen Note that this operation is possible only when a snapshot image is on the monitor screen 4 Use the zoom button to zoom the image The part of the image displayed on the monitor screen is the cropped part 5 Use 왖 왔 왗 and 왘 to to scroll the part to be cropped up down left and right 6 Press SET to extract the part of the image enclose...

Страница 125: ...IMPORTANT Trimming an image causes the original pre trimmed image and the new trimmed version to be stored as separate files Note that you cannot crop the following types of images Movie images and the voice recording file icon Images created with MOTION PRINT Images recorded with another camera The cropping operation cannot be performed when there is not enough memory to store the cropped image W...

Страница 126: ...he movie file you are cutting If this happens delete any files you no longer need to free up more memory Splicing of two different movies into a single movie or cutting one movie into multiple parts are not supported by camera operations However you can splice movies and cut movies into multiple parts on your computer using the bundled Ulead Movie Wizard SE VCD application To do this Fast forward ...

Страница 127: ... also display the same screen while in the PLAY mode by pressing MENU selecting the PLAY tab selecting Movie Editing and then pressing 왘 3 Use 왖 and 왔 to select the operation you want to perform To do this Fast forward or fast reverse playback Pause or unpause movie playback Scroll paused playback one frame Cancel the cut operation Do this Press 왗 or 왘 Press SET Press 왗 or 왘 Press MENU 4 Display t...

Страница 128: ...ete when the message disappears Select No to exit the cut mode To cut everything between two specific frames 1 While the movie is playing press SET This will pause movie playback 2 Press 왔 You can also display the same screen while in the PLAY mode by pressing MENU selecting the PLAY tab selecting Movie Editing and then pressing 왘 3 Use 왖 and 왔 to select Cut and then press SET Select Cancel to exi...

Страница 129: ...Cancel the cut operation Do this Press 왗 or 왘 Press SET Press 왗 or 왘 Press MENU 6 Repeat step 4 to display the ending frame where you want the second cut to be located The red portion of the indicator bar shows what part will be cut 7 Use 왖 and 왔 to select Yes and then press SET The message Busy Please wait will remain on the display as the cut operation is performed Cutting is complete when the m...

Страница 130: ...e size 9 frames 1600 1200 pixel final image size 1 frame 640 480 pixel final data size Selected main image Background images Selected main image To capture a still image from a movie 1 In the PLAY mode use 왗 and 왘 to scroll through movies on the monitor screen and display the one that contains the frames you want 2 Press MENU 3 Select the PLAY tab select MOTION PRINT and then press 왘 4 Use 왖 and 왔...

Страница 131: ...4 an image of the frame you selected in step 6 appears here Displaying the 9 image View The following procedure displays nine images on the monitor screen at the same time 1 In the PLAY mode press the zoom button This displays the 9 image screen with the image that was on the monitor screen in step 2 in the center with a selection boundary around it If there are fewer than nine images in memory th...

Страница 132: ...selection boundary is located Date selection cursor Displaying the Calendar Screen Use the following procedure to display a 1 month calendar Each day shows the first file recorded on that day which makes it easy to find the file you want 1 In the PLAY mode press the zoom button twice Use the procedure under Changing the Date Format on page 157 to specify the date format The file displayed on the c...

Страница 133: ...t and then press SET This displays an image of the first file that was recorded on the selected date Playing a Slideshow A slideshow automatically plays back images in sequence at a fixed interval 1 In the PLAY mode press MENU 2 Select the PLAY tab select Slideshow and then press 왘 ...

Страница 134: ...k time you want 1 to 5 minutes or 10 15 30 or 60 minutes Use 왗 and 왘 to specify the interval you want MAX or 1 to 30 seconds When playback reaches a movie file while MAX is selected as the interval only the first frame of the movie is displayed 4 Use 왖 and 왔 to select Start and then press SET This starts the slideshow 5 To stop the slideshow press SET The slideshow will also stop automatically aft...

Страница 135: ...hen MAX is specified for the slideshow Interval setting With all other Interval settings movies and all audio movies audio snapshots voice recording files are played back regardless of their length During audio playback you can adjust volume by pressing 왔 and then using 왗 and 왘 Note that effect settings are disabled when the slideshow Images setting is Favorites or when the slideshow Interval sett...

Страница 136: ...how settings to suit your needs 1 Turn off the camera 2 Set the camera onto the USB cradle 3 Press the USB cradle s PHOTO button This starts the Photo Stand slideshow with the images or image you specified PHOTO Pressing MENU displays a screen for configuring slideshow settings To restart the slideshow press MENU while the menu screen is displayed or select Start and then press SET During audio pl...

Страница 137: ... PLAY mode press MENU 2 Select the PLAY tab select Rotation and then press 왘 Note that this operation is possible only when a snapshot image is on the monitor screen 3 Use 왗 and 왘 to scroll through images until the one you want to rotate is on the monitor screen 4 Use 왖 and 왔 to select Rotate and then press SET Each press of SET rotates the image 90 degrees 5 After you are finished configuring set...

Страница 138: ...image screen or an image on the calendar screen Using Image Roulette Image Roulette cycles images like a slot machine on the display before stopping at one of them The image that finally appears is random 1 While the camera is turned off hold down 왗 as you press PLAY to turn it on Keep 왗 held down until images appear on the monitor screen This starts the Image Roulette operation scrolling images o...

Страница 139: ...ut one minute after the final image appears the camera will automatically cancel Image Roulette and enter the normal PLAY mode You can use Image Roulette while Power On or Power On Off is selected for the REC PLAY setting page 161 Adding Audio to a Snapshot The after recording feature lets you add audio to snapshots after they are recorded You can also re record the audio of an audio snapshot one ...

Страница 140: ... audio 1 In the PLAY mode use 왗 and 왘 to scroll through snapshots until the one whose audio you want to re record is displayed 2 Press MENU 3 Select the PLAY tab select Dubbing and then press 왘 4 Use 왖 and 왔 to select Delete and then press SET If you merely want to delete the audio without re recording press MENU here to complete the procedure 5 Press the shutter button to start audio recording 6 ...

Страница 141: ...images Movie images Images created with MOTION PRINT Protected snapshot page 148 Audio that is re recorded or deleted cannot be recovered Make sure you no longer need audio before re recording or deleting it Microphone Playing Back a Voice Recording File Perform the following steps to play back a voice recording file 1 In the PLAY mode use 왗 and 왘 to display the voice recording file a file with on...

Страница 142: ...creen indicators on and off Cancel playback Do this Hold down 왗 or 왘 Press SET Press 왔 and then use 왖 and 왔 Press 왖 DISP Press MENU Displaying Camera Images on a TV Screen You can display recorded images on a TV screen To display camera images on a TV you need a television equipped with a video input terminal USB cradle and the AV cable that comes with the camera 1 Connect one end of the AV cable ...

Страница 143: ...he TV screen Note that the audio output is monaural The camera s monitor screen will go blank during video output Pressing the USB cradle s PHOTO button will activate the Photo Stand feature page 136 and display images on the TV screen Depending on the size of the TV screen recorded images may not fill the entire screen For video output the audio volume level is initially set to maximum Perform vo...

Страница 144: ... select the setting you want and then press SET If you are using a TV designed for use in this area U S Japan and other areas that use the NTSC system Europe and other areas that use the PAL system Select this setting NTSC PAL IMPORTANT Images will not display properly if you select the wrong video system This camera supports the NTSC and PAL video systems only Images will not display properly if ...

Страница 145: ...performed when all files in memory are protected page 149 Deleting an audio snapshot deletes both the image file and the audio file attached to it You cannot use the procedures in this section to delete images from the FAVORITE folder See the procedures on page 152 for details about deleting FAVORITE folder contents Deleting a Single File 1 In the PLAY mode press 왔 2 Use 왗 and 왘 to scroll through ...

Страница 146: ... and 왔 to select All Files Delete and then press SET 3 Use 왖 and 왔 to select Yes To exit the file delete operation without deleting anything select No 4 Press SET to delete all the files The message There are no files appears on the screen after all of the files are deleted ...

Страница 147: ...hown below Example Name of the 100th folder Each folder can hold files numbered up to 9 999 Trying to store the 10 000th file in a folder causes the next serially numbered folder to be created File names are generated as shown below Example Name of the 26th file Extension CIMG0026 JPG Serial number 4 digits The folder and file names described here appear when you view folders and files on a comput...

Страница 148: ...ot be deleted page 145 You can protect files individually or you can protect all files in memory with a single operation IMPORTANT Even if a file is protected it still will be deleted by a memory card format operation page 166 or a built in memory format operation page 162 To protect a single file 1 In the PLAY mode press MENU 2 Select the PLAY tab select Protect and then press 왘 3 Use 왗 and 왘 to ...

Страница 149: ... You can copy scenery shots photos of your family or other special images from a file storage folder page 195 to the FAVORITE folder in built in memory page 195 Images in the FAVORITE folder are not displayed during normal playback so it helps to keep your personal images private as you carry them around FAVORITE folder images are not deleted when you change memory cards so you can always keep the...

Страница 150: ... with the above procedure creates a 320 240 pixel QVGA size image in the FAVORITE folder A file copied into the FAVORITE folder is automatically assigned a file name that is a serial number Though the serial number starts from 0001 and can go as high as 9999 the actual upper end of the range depends on built in memory capacity Remember that the maximum number of images that can be stored in built ...

Страница 151: ... files in the FAVORITE folder 5 After you are finished viewing files press MENU twice to exit File Name IMPORTANT Note that a FAVORITE folder is created in the camera s built in memory only No FAVORITE folder is created on a memory card when you use one If you want to view the contents of the FAVORITE folder on your computer screen you need to remove the memory card from the camera if you are usin...

Страница 152: ...ut deleting anything select Cancel 7 After deleting all of the files you want use 왖 and 왔 to select Cancel and then press SET to exit To delete all files from the FAVORITE folder 1 In the PLAY mode press MENU 2 Select the PLAY tab select Favorites and then press 왘 3 Use 왖 and 왔 to select Show and then press SET 4 Press 왔 5 Use 왖 and 왔 to select All Files Delete and then press SET IMPORTANT You can...

Страница 153: ...nt to configure and then press 왘 4 Use 왖 and 왔 to change the setting and then press SET Select this setting Sound 1 through Sound 5 Off To do this Select a built in sound Turn off the sound To set the confirmation tone volume level 1 Press MENU 2 Select the Set Up tab select Sounds and then press 왘 3 Use 왖 and 왔 to select Operation 4 Use 왗 and 왘 to specify the volume setting you want and then pres...

Страница 154: ...e 142 Specifying an Image for the Startup Screen You can specify an image you recorded as the startup screen image which causes it to appear on the monitor screen whenever you press the power button or REC to turn on the camera The startup screen image does not appear if you press PLAY to turn on the camera 1 Press MENU 2 Select the Set Up tab select Startup and then press 왘 3 Use 왗 and 왘 to displ...

Страница 155: ...opy of that image in the camera s standard image memory The startup image is deleted if you format built in memory page 162 Specifying the File Name Serial Number Generation Method Use the following procedure to specify the method for generating the serial number used for file names page 147 1 Press MENU 2 Select the Set Up tab select File No and then press 왘 3 Use 왖 and 왔 to change the setting an...

Страница 156: ...te settings Otherwise the time and date setting will change automatically when you select another time zone To select your Home Time zone 1 Press MENU 2 Select the Set Up tab select World Time and then press 왘 This displays the current World Time zone 3 Use 왖 and 왔 to select Home and then press 왘 4 Use 왖 and 왔 to select City and then press 왘 5 Use 왖 왔 왗 and 왘 to select the geographical area that c...

Страница 157: ...gle between 12 hour and 24 hour timekeeping 4 When all the settings are the way you want press SET to register them and exit the setting screen Changing the Date Format You can select from among three different formats for display of the date 1 Press MENU 2 Select the Set Up tab select Date Style and then press 왘 3 Use 왖 and 왔 to change the setting and then press SET Example December 24 2005 Selec...

Страница 158: ...s Display the time in your home time zone Display the time in the zone currently selected on the World Time screen 4 Press SET to exit the setting screen To configure World Time settings 1 Press MENU 2 Select the Set Up tab select World Time and then press 왘 3 Use 왖 and 왔 to select World and then press 왘 4 Use 왖 and 왔 to select City and then press 왘 To configure the summer time setting select DST ...

Страница 159: ... press SET 7 When the setting is the way you want press SET to apply it and exit the setting screen Changing the Display Language You can use the following procedure to select one of ten languages as the display language 1 Press MENU 2 Select the Set Up tab select Language and then press 왘 3 Use 왖 왔 왗 and 왘 to change the setting and then press SET ...

Страница 160: ...setting you want and then press SET Select this setting Mass Storage USB DIRECT PRINT PTP PictBridge When connecting to this type of device Computer or USB DIRECT PRINT compatible printer page 174 PictBridge compatible printer page 174 PTP stands for Picture Transfer Protocol Mass Storage USB DIRECT PRINT causes the camera to see the computer as an external storage device Use this setting for norm...

Страница 161: ...ing Power On Power On Off Disable To configure this operation Power turns on when REC or PLAY is pressed but does not turn off Power turns on or off when REC or PLAY is pressed Power does not turn on or off when REC or PLAY is pressed IMPORTANT When Power On Off is selected pressing REC in the REC mode or PLAY in the PLAY mode turns off the camera Pressing REC in the PLAY mode switches to the curr...

Страница 162: ...ttery is not low Battery power going low during formatting can cause improper formatting and creates the risk of camera malfunction Never open the battery cover while the format operation is being performed Doing so creates the risk of camera malfunction 1 Check to make sure there is no memory card loaded in the camera If there is a memory card loaded in the camera remove it page 165 2 Press MENU ...

Страница 163: ... to use it Certain types of cards can slow down processing speeds If you are using a slow memory card you may not be able to record a movie using the HQ image quality setting Because of this you should use a high speed type SD memory card whenever possible Certain types of memory cards take longer to record data which can cause movie frames to be dropped and REC flash on the monitor screen during ...

Страница 164: ...e battery cover closed and then slide it in the direction indicated by the arrow Using a Memory Card IMPORTANT Make sure you turn off the camera before inserting or removing a memory card Be sure to orient the card correctly when inserting it Never try to force a memory card into the slot when you feel resistance To insert a memory card into the camera 1 Slide the battery cover in the direction in...

Страница 165: ...g that is not an SD memory card or MMC MultiMediaCard into the camera s memory card slot Doing so can cause malfunction of the camera Should water or any foreign object ever get into the card slot immediately turn off the camera remove the battery and contact your dealer or nearest CASIO authorized service center Never remove a card from the camera while the operation lamp is flashing green Doing ...

Страница 166: ...y card deletes any data already stored on it IMPORTANT Be sure to use the camera to format a memory card Formatting a memory card on a computer and then using it in the camera can slow down data processing by the camera In the case of an SD card formatting on a computer can result in non conformity with the SD format causing problems with compatibility operation etc Note that data deleted by a mem...

Страница 167: ...card whenever using the camera far away from the home or office We recommend that you format a memory card before using it for the first time after purchasing it or whenever the card you are using seems to be the cause of abnormal images As you record data to and delete data from an SD memory card a number of times it loses its ability to retain data Because of this periodic re formatting of an SD...

Страница 168: ...mplete the monitor screen shows the last file in the folder To copy a specific file from a memory card to built in memory 1 Perform steps 1 through 3 of the procedure under To copy all the files in built in memory to a memory card 2 Use 왖 and 왔 to select Card Built in and then press SET 3 Use 왗 and 왘 to select the file you want to copy 4 Use 왖 and 왔 to select Copy and then press SET This starts th...

Страница 169: ...USING A MEMORY CARD 169 5 Press MENU to exit the copy operation NOTE Files are copied to the folder in built in memory whose name has the largest number ...

Страница 170: ...ot support DPOF or may support different printing protocols In this case use the protocol supported by your print service to specify the images you want to have printed Printing Directly on a Printer Equipped with a Card Slot or a Printer that Supports USB DIRECT PRINT or PictBridge After using the camera s DPOF feature to specify the images you want to print and how many copies of each should be ...

Страница 171: ...out needing to remember file names their locations in memory etc DPOF Settings File Name number of copies date Printing with a Computer Windows Users The camera comes bundled with Photo Loader and Photohands applications which can be installed on a Windows computer for image transfer management and printing For more information see Using the Camera with a Windows Computer pages 180 198 Macintosh U...

Страница 172: ...he number of copies You can specify up to 99 for the number of copies Specify 00 if you do not want to have the image printed 6 To turn on date stamping for the prints press BS so 12 12 1 is displayed 12 12 1 indicates that date stamping is turned on To turn off date stamping for the prints press BS so 12 12 1 is not displayed Repeat steps 4 through 6 if you want to configure other images for prin...

Страница 173: ... to specify the number of copies You can specify up to 99 for the number of copies Specify 00 if you do not want to have the image printed 5 To turn on date stamping for the prints press BS so 12 12 1 is displayed 12 12 1 indicates that date stamping is turned on To turn off date stamping for the prints press BS so 12 12 1 is not displayed 6 After all the settings are the way you want press SET to...

Страница 174: ...may print all images without regard to your DPOF settings or date printing may not be performed Note that some professional print services do not support DPOF printing Check with your service before ordering prints Some printers may have settings that disable date stamp and or DPOF printing See the user documentation that comes with your printer for details about how to enable these features Using...

Страница 175: ...g the bundled Photo Loader application PTP PictBridge simplifies the transfer of image data to the connected device 4 Connect the USB cable that comes bundled with the camera to the USB cradle and a printer Also connect the AC adaptor to the USB cradle and plug the AC adaptor into an electrical outlet If you are using battery power without the AC adaptor make sure that the battery is fully charged...

Страница 176: ...onitor screen 9 Use 왖 and 왔 to select Paper Size and then press 왘 10 Use 왖 and 왔 to select the paper size you want to use for printing and then press SET The following are the print sizes that are available 3 5 5 5 7 4 6 A4 8 5 11 By Printer Selecting By Printer prints using the paper size selected on the printer Available paper size settings depend on the connected printer For full details see th...

Страница 177: ...s that date stamping is turned on 12 On the camera s monitor screen use 왖 and 왔 to select Print and then press SET This starts printing and displays the message Busy Please wait on the monitor screen The message will disappear after a short while even though printing is still being performed Pressing any of the camera s buttons while printing is in progress will cause the message to reappear The p...

Страница 178: ...pecifying date printing with the Photohands software that comes with the camera See page 23 of the Photohands User s Guide for details The Photohands User s Guide is provided as a PDF file on the CD ROM that comes bundled with your camera Specifying date printing when having printing done by a print service Some print services do not support date printing Check with your service for more informati...

Страница 179: ...ng prints IMPORTANT Information about the availability of Exif Print compatible printer models can be obtained from each printer manufacturer B PRINT Image Matching III Images include PRINT Image Matching III data mode setting and other camera setup information A printer that supports PRINT Image Matching III reads this data and adjusts the printed image accordingly so your images come out just th...

Страница 180: ... Macintosh see page 188 Using the Camera with a Windows Computer The following are the general steps for viewing and copying files from a computer running under Windows You can find details about each operation in the procedures that follow below Note that you should also refer to the documentation that comes with your computer for other information about USB connections etc 1 If you are running W...

Страница 181: ...an be used with a computer that supports only USB 1 1 protocol higher speed data transfer becomes possible when USB 2 0 Hi Speed is supported Note that certain computer models connecting through a USB hub and other system conditions can slow down data transfer and even cause operational problems Do not try to establish a connection between the camera and computer before installing the USB driver o...

Страница 182: ...XP 2000 Me Users Installation of the USB driver is not required so jump directly to step 6 2 Set the bundled CD ROM into the CD ROM drive of your computer Use the CD ROM whose contents label shows USB driver 3 On the menu screen that appears click English 4 Click USB driver B and then Install This starts installation Follow the instructions that appear on your computer screen to complete the insta...

Страница 183: ...uter The CD ROM menu will appear again after your computer restarts Click the Exit button on the CD ROM menu to exit the menu and then remove the CD ROM from your computer 6 Connect the bundled AC adaptor to the DC IN 5 3V connector of the USB cradle and then plug it in to a household power outlet If you are using battery power without the AC adaptor make sure that the battery is fully charged Not...

Страница 184: ...peration is not possible if connections are not correct 8 Press the camera s power button to turn it on and then press its MENU button 9 Select the Set Up tab select USB and then press 왘 10 Use 왖 and 왔 to select Mass Storage USB DIRECT PRINT and then press SET 11 Turn off the camera 7 Connect the USB cable that comes bundled with the camera to the USB cradle and your computer s USB port USB port C...

Страница 185: ...ay a Removable Disk dialog box If your operating system does close the dialog box 13 Press the USB cradle s USB button This will cause your computer to create a hardware profile for camera s built in memory or the memory card loaded in the camera You do not need to install the USB driver every time After you install it once your computer will recognize the camera s built in memory or its memory ca...

Страница 186: ...195 NOTE If you open a rotated image on your computer the original unrotated version will appear page 137 This is true both for a rotated image opened from camera memory and for a rotated image that has been copied to your computer s hard disk 19 Depending on your operating system perform one of the following procedures to save the files if you want Windows 2000 Me 98SE 98 1 In the camera s file m...

Страница 187: ... to display images on the camera or it may cause large error in the number of images value displayed by the camera Always copy images to your computer before performing any edit delete move or rename operation 20 Depending on the version of Windows you are running use one of the following procedures to terminate the USB connection Windows XP 98SE 98 Users After pressing the USB cradle s USB button...

Страница 188: ...g and copying files from a Macintosh You can find details about each operation in the procedures that follow below Note that you should also refer to the documentation that comes with your Macintosh for other information about USB connections etc IMPORTANT Movie files cannot be played back on a Macintosh This camera does not support operation on a computer running Mac OS 8 6 or lower or Mac OS X 1...

Страница 189: ...er speed data transfer becomes possible when USB 2 0 Hi Speed is supported Note that certain computer models connecting through a USB hub and other system conditions can slow down data transfer and even cause operational problems 1 Connect the bundled AC adaptor to the DC IN 5 3V connector of the USB cradle and then plug it in to a household power outlet If you are using battery power without the ...

Страница 190: ...are when connecting the USB cable to the USB cradle or your computer USB ports and cable plugs are shaped for proper positioning Plug the USB cable plugs into the ports securely as far as they will go Proper operation is not possible if connections are not correct USB port Connector A USB cable bundled USB port Connector B DC IN 5 3V DC IN 5 3V ...

Страница 191: ... Press the USB cradle s USB button Pressing the USB button enters the USB mode which causes the USB cradle s USB lamp to light green page 222 9 Your Macintosh will see the camera s file memory as a drive The appearance of the drive icon depends on the Mac OS version you are using Your Macintosh will see the camera s file memory as a drive whenever you establish a USB connection between the camera ...

Страница 192: ...he DCIM folder to the folder to which you want to copy it IMPORTANT Never use your computer to edit delete move or rename images stored in the camera s file memory Doing so can cause problems with the image management data used by the camera which may make it impossible to display images on the camera or it may cause large error in the number of images value displayed by the camera Always copy ima...

Страница 193: ...n cause data to become corrupted Using a Memory Card to Transfer Images to a Computer The procedures in this section describe how to transfer images from the camera to your computer using a memory card Using a Computer with a Built in SD Memory Card Slot Insert the SD memory card directly into the slot Using a Computer with a Built in PC Card Slot Use a commercially available PC card adaptor for a...

Страница 194: ... PC card adaptor for details about how to use them Memory Data Images recorded with this camera and other data are stored in memory using DCF Design rule for Camera File system protocol DCF protocol is designed to make it easier to exchange image and other data between digital cameras and other devices DCF Protocol DCF devices digital cameras printers etc can exchange images with each other DCF pr...

Страница 195: ...SHOT folder US500001 JPE Movie user setup file US500002 JPE Movie user setup file These folders are created in built in memory only Folder and File Contents DCIM folder Folder that stores all of the digital camera files Storage folder Folder for storing files created by the digital camera Image file File that contains an image recorded with the digital camera File Name Extension JPG Movie file Fil...

Страница 196: ...uilt in memory only Files that contain Snapshot BEST SHOT user setups Movie BEST SHOT folder Built in memory only Folder that contains Movie BEST SHOT user setup files Movie user setup file Built in memory only Files that contain Movie BEST SHOT user setups Image Files Supported by the Camera Image files recorded with this camera DCF protocol image files Certain DCF functions may not be supported ...

Страница 197: ... together You can change the name of the DCIM folder on your computer Changing the name to a date is a good way to keep track of multiple DCIM folders However if you even want to copy the folders back to the camera s file memory be sure you change the name of the DCIM folder back to DCIM first The camera does not recognize any folder name other than DCIM Memory Folders and files must be stored in ...

Страница 198: ...omes bundled with the camera contains the applications described below Installation of these applications is optional and you should install only the ones you want to use Purpose USB connection to a computer for image transfer Management of images transferred to a computer Software Name USB driver Type B Photo Loader 2 3 DirectX 9 0c Supported Windows Versions XP 2000 Me 98SE 98 XP 2000 Me 98SE 98...

Страница 199: ...ec page 207 If you cannot connect to the Internet install Windows Media Player 9 page 208 If you are running Windows 2000 or 98SE with a DirectX version that is lower than 9 0c install DirectX 9 0c page 204 If you can connect to the Internet connect to the Internet for automatic installation for the applicable codec page 207 If you cannot connect to the Internet install the Windows 98 WMP6 4 codec...

Страница 200: ...ing handled USB driver Type B OS 98SE 98 In the case of Windows XP 2000 or Me connect the camera to the computer using the bundled USB cradle You do not need to install the USB driver from the bundled CD ROM Correct operation is not guaranteed on a computer that has been upgraded from Windows 95 or 3 1 Photo Loader 2 3 OS XP 2000 Me 98SE 98 Memory At least 16MB HD At least 7MB Other Internet Explo...

Страница 201: ...gher Windows Media Player 9 OS XP 2000 Me 98SE CPU 233 MHz Intel Pentium II AMD etc Memory 64MB HD 100MB Other Sound card 800 600 or greater display resolution Internet Explorer 5 01 or higher If you are running Windows 98 install the Windows 98 WMP6 4 codec from the CD ROM Ulead Movie Wizard SE VCD OS XP 2000 CPU Pentium III 800MHz Memory 256MB HD 250MB Other 1024 768 or higher display resolution...

Страница 202: ...tware and user documentation for various languages Check the CD ROM menu screen to see if applications and user documentation are available for a particular language Getting Started Start up your computer and insert the CD ROM into its CD ROM drive This will automatically launch the menu application which displays a menu screen on your computer The menu application may not start up automatically o...

Страница 203: ...or before installing it onto another computer be sure to read the Read me file for information about retaining existing libraries Installing Photo Loader 1 Click the Install button for Photo Loader 2 Follow the instructions that appear on your computer screen IMPORTANT Be sure to follow the instructions carefully and completely If you make a mistake when installing Photo Loader you may not be able...

Страница 204: ...grams Accessories System Tools and then System Information 2 On the Tools menu of the window that appears select DirectX Diagnostic Tool 3 On the System tab check to make sure that the version shown for the DirectX Version item is 9 0 or higher 4 Click Exit to exit DirectX Diagnostic Tool If your PC already has DirectX 9 0 or higher installed you do not need to install DirectX 9 0c from the bundle...

Страница 205: ...ROM includes the software and user documentation for various languages Check the CD ROM menu screen to see if applications and user documentation are available for a particular language Getting Started Start up your computer and insert the CD ROM into its CD ROM drive This will automatically launch the menu application which displays a menu screen on your computer The menu application may not star...

Страница 206: ...e Read me file for Photohands before installing it The Read me file contains information you need to know when installing the application 1 Click the Read me button for Photohands Installing Photohands 1 Click the Install button for Photohands 2 Follow the instructions that appear on your computer screen ...

Страница 207: ...ur PC already has MPEG 4 codec installed it will start playing the movie as soon as you click it Note the following important precautions when playing back a movie using Windows Media Player 9 When using a high speed type SD memory card Use Windows Media Player as is without changing its basic settings When using an SD memory card that is not a high speed type Change Windows Media Player settings ...

Страница 208: ...pens navigate to the CD ROM and double click menu exe to launch the menu application Selecting a Language First select a language Note that some software is not available in all languages 1 On the menu screen click the tab for the language you want To install the codec on a PC that cannot connect to the Internet If your PC cannot connect to the Internet install Windows Media Player 9 from the CD R...

Страница 209: ... 98SE you need to install DirectX 9 0c For information about determining the version of DirectX on your PC see page 204 Note the following important precautions when playing back a movie using Windows Media Player 9 When using a high speed type SD memory card Use Windows Media Player as is without changing its basic settings When using an SD memory card that is not a high speed type Change Windows...

Страница 210: ...above certain settings and other installed software may interfere with proper playback of movies Editing a Movie In order to edit movies on your PC you need to install Ulead Movie Wizard SE VCD from the bundled CD ROM Use the CD ROM whose contents label shows Ulead Movie Wizard SE VCD IMPORTANT Operation of Ulead Movie Wizard SE VCD is not supported under Windows Me 98SE or 98 NOTE The Ulead Movie...

Страница 211: ...ting a Language First select a language Note that some software is not available in all languages 1 On the menu screen click the tab for the language you want Viewing the Contents of the Read me File You should always read the Read me file for Ulead Movie Wizard SE VCD before installing it The Read me file contains information you need to know when installing the application 1 Click the Read me bu...

Страница 212: ... already have Adobe Reader installed you can install it from the bundled CD ROM User Registration You can perform user registration over the Internet To do so of course you need to be able to connect to the Internet with your computer 1 Click the Register button This starts up your Web browser and accesses the user registration website Follow the instructions that appear on your computer screen to...

Страница 213: ... want to use Purpose USB connection to a Macintosh for image transfer Managing of Images on a Macintosh Viewing of user documentation PDF files For the Macintosh Photo Loader 1 1 Mac OS Versions OS 9 OS X OS 9 OS X OS 9 OS X Required Operation Use the USB cradle to establish a connection between the camera and your Macintosh USB driver is not required page 188 Install Photo Loader 1 1 page 215 Use...

Страница 214: ...images and the sizes of the images being handled Photo Loader 1 1 OS OS 9 Memory 32MB HD At least 3MB USB connection is supported on a Macintosh running OS 9 or X Operation is supported using the standard USB driver that comes with the operating system so all you need to do is connect the camera to your Macintosh using the USB cable IMPORTANT For details about Macintosh minimum system requirements...

Страница 215: ...ons in the readme file to install Photo Loader IMPORTANT If you are upgrading to the new version of Photo Loader from a previous version and you want to use library management data and HTML files created using the old version of Photo Loader be sure to read the Important file in the Photo Loader folder Follow the instructions in the file to use your existing library management files Failure to fol...

Страница 216: ...e Manual folder 2 Open the Digital Camera folder and then open the folder for the language whose user s guide you want to view 3 Open the file named camera_xx pdf xx is the language code Example camera_e pdf is for English To view the Photo Loader user s guide 1 On the CD ROM open the Manual folder 2 Open the Photo Loader folder and then open the English folder 3 Open PhotoLoader_english To regist...

Страница 217: ... Off 10 sec 2 sec X3 Off Spot Multi On Off Auto Off Focus EV Shift White Balance ISO Self timer Off On Off On Off On Off On Off Focus Continuous Self timer AF Area AF Assist Light Anti Shake L R Key Quick Shutter Audio Snap Grid Digital Zoom On Off On Off BEST SHOT On Off Flash On Off Focus On Off White Balance On Off ISO On Off AF Area On Off Metering On Off Self timer On Off Flash Intensity On O...

Страница 218: ...Off Disable Mass Storage USB DIRECT PRINT PTP PictBridge NTSC PAL Format Cancel Reset Cancel Set Up Tab Menu Quality Tab Menu Size Quality Snapshots Quality Movies EV Shift White Balance ISO Metering Filter Sharpness Saturation Contrast Flash Intensity Flash Assist 2560 1920 2560 1712 3 2 2304 1728 2048 1536 1600 1200 640 480 Fine Normal Economy HQ Normal LP 2 0 1 7 1 3 1 0 0 7 0 3 0 0 0 3 0 7 1 0...

Страница 219: ...terval Effect Cancel 9 frames 1 frame Cancel Cut Before Cut Between Cut After Cancel Show Save Cancel Select images All images Cancel On All Files On Cancel Rotate Cancel 1600 1200 1280 960 640 480 Cancel Built in Card Card Built in Cancel Set Up Tab Menu The contents of the PLAY mode set up tab menu are identical to those of the REC mode set up tab menu ...

Страница 220: ... to 0 seconds Cannot charge flash Meaning Green Lit Lit Pattern 3 Lit Pattern 2 Pattern 1 Red Lit Pattern 1 Amber Pattern 3 Indicator Lamp Reference The camera has two indicator lamps an operation lamp and an AF assist light self timer lamp These lamps light and flash to indicate the current operational status of the camera There are three lamp flash patterns Pattern 1 flashes once per second Patt...

Страница 221: ...cause recorded images to be lost Operation Lamp AF assist light self timer lamp Red Meaning Green Pattern 3 Pattern 3 Red Pattern 2 Lit Pattern 3 Amber Memory card problem Memory card is unformatted BEST SHOT setup cannot be registered Memory card is locked Cannot create folder Memory is full Write error Low battery alert Formatting card Powering down ...

Страница 222: ...harging Charging complete Charge standby Charge error USB connection Accessing memory Meaning PLAY Mode Operation Lamp Green Lit Pattern 3 Red Pattern 2 Lit Pattern 3 Red Operational Power on recording enabled One of the following operations is being performed delete DPOF image protect copy format power down image resizing image trimming after recording MOTION PRINT movie editing Memory card probl...

Страница 223: ...2 Charge the battery page 33 If the battery goes dead soon after being charged it means the battery has reached the end of its life and needs to be replaced Purchase a separately available NP 20 rechargeable lithium ion battery 1 Turn power back on 2 Charge the battery page 33 1 Press REC to enter the REC mode 2 Wait until the flash unit finishes charging 3 Transfer files you want to keep to your ...

Страница 224: ... 1 The lens is dirty 2 The subject is not located in the center of the focus frame when you compose the image 3 The subject you are shooting is a type that is not compatible with Auto Focus operation page 72 4 You are moving the camera The image is not focused properly 1 flash off is selected as the flash mode 2 The battery is dead 3 A scene that selects flash off as the flash mode is selected in ...

Страница 225: ...ertical band to appear in the monitor screen image The subject is outside the shooting range of the camera Sensitivity is increased automatically for dark subjects Greater sensitivity increases the chance of digital noise 1 Focus the image page 77 2 Use Auto Focus for scenery and portrait shots 3 Use the Macro mode for close ups 1 When the battery indicator shows charge the battery as soon as poss...

Страница 226: ...the camera was connected to another device USB communication is in progress 1 Camera is not set securely on the USB cradle 2 USB cable is not connected securely 3 USB driver is not installed 4 Camera is turned off Position the camera so sunlight does not shine directly into the lens This camera cannot display non DCF images recorded onto a memory card using another digital camera Remove the batter...

Страница 227: ...re installing the USB driver from the bundled CD ROM or if you have another type of driver installed This will make it impossible for the computer to recognize the digital camera when it is connected If this happens you will need to re install the camera s USB driver For information about how to re install the USB driver see the USB driver s Read me file on the CD ROM that comes bundled with the c...

Страница 228: ...ting try transferring recoverable files to a computer or some other storage device Check connections File could not be saved because battery is low Folder cannot be created LENS ERROR Load paper Memory Full No Favorites file You are attempting to connect the camera to a printer while the camera s USB settings are not compatible with the USB system of the printer page 160 You are attempting to conn...

Страница 229: ...inting Configure the required DPOF settings page 172 The image or movie whose setup you are trying to save is not supported by BEST SHOT Printing Error Record Error Replenish ink SYSTEM ERROR The card is locked There are no files There are no printing images Set up DPOF There is no image to register This card is not formatted This file cannot be played This function cannot be used This function is...

Страница 230: ...conomy Fine Normal Economy Fine Normal Economy Fine Normal Economy Fine Normal Economy Fine Normal Economy Approximate Image File Size 3 0MB 2 0MB 1 0MB 2 85MB 1 9MB 950KB 1 95MB 1 53MB 800KB 1 64MB 1 23MB 630KB 1 05MB 710KB 370KB 190KB 140KB 90KB Built in memory 8 3MB 2 shots 3 shots 7 shots 2 shots 4 shots 7 shots 4 shots 5 shots 9 shots 4 shots 6 shots 11 shots 7 shots 10 shots 20 shots 38 shot...

Страница 231: ...f images that can be stored on a memory card of a different capacity multiply the capacities in the table by the appropriate value Delete Single file all files with protection Effective Pixels 5 0 million Imaging Element 1 2 5 inch square pixel color CCD Total pixels 5 25 million Lens Focal Distance Lenses F2 7 W to 5 2 T f 6 2 W to 18 6mm T equivalent to approximately 38 W to 114mm T for 35mm fil...

Страница 232: ...mer 10 seconds 2 seconds Triple Self timer Built in Flash Flash Modes Auto Flash ON OFF Red eye reduction Flash Range Wide Angle Optical Zoom 0 4 to 2 8 meters 1 3 to 9 2 Telephoto Optical Zoom 0 4 to 1 4 meters 1 5 to 4 6 ISO Sensitivity Auto Depends on zoom factor Recording Functions Snapshot audio snapshot macro self timer Continuous shutter movie with audio Normal Movie Short Movie Past Movie ...

Страница 233: ...e They do not guarantee that you will be able to achieve this level of operation Low temperatures shorten battery life Approximate Battery Life 200 shots 100 minutes 410 shots 100 minutes 160 minutes 80 minutes 160 minutes Operation Number of Shots CIPA Standard 1 Operating Time Number of Shots Continuous Recording 2 Operating Time Continuous Snapshot Playback 3 Continuous Movie Recording 4 Contin...

Страница 234: ...onditions Temperature 23 C 73 F Monitor screen On Flash Off Image recorded every 15 seconds alternating full wide angle and full telephoto zoom 3 Continuous Snapshot Playback Conditions Temperature 23 C 73 F Scroll one image about every 10 seconds 4 Approximate time for continuous movie recording without using zoom 5 Voice recording times are based on continuous recording Power Consumption 3 7V DC...

Страница 235: ... excluding projections and cable Weight AD C51G Approximately 90 g 3 2 oz AD C52G Approximately 87 g 3 1 oz Special AC Adaptor Plug in Type AD C51J or AD C52J Power Requirement 100 to 240V AC 50 60Hz 83mA Output 5 3V DC 650mA Dimensions AD C51J 48 W 16 H 69 D mm 1 9 W 0 6 H 2 7 D excluding projections and cable AD C52J 50 W 18 H 70 D mm 2 0 W 0 7 H 2 8 D excluding projections and cable Weight AD C...

Отзывы: