background image

Palm-size PC User’s Guide

74

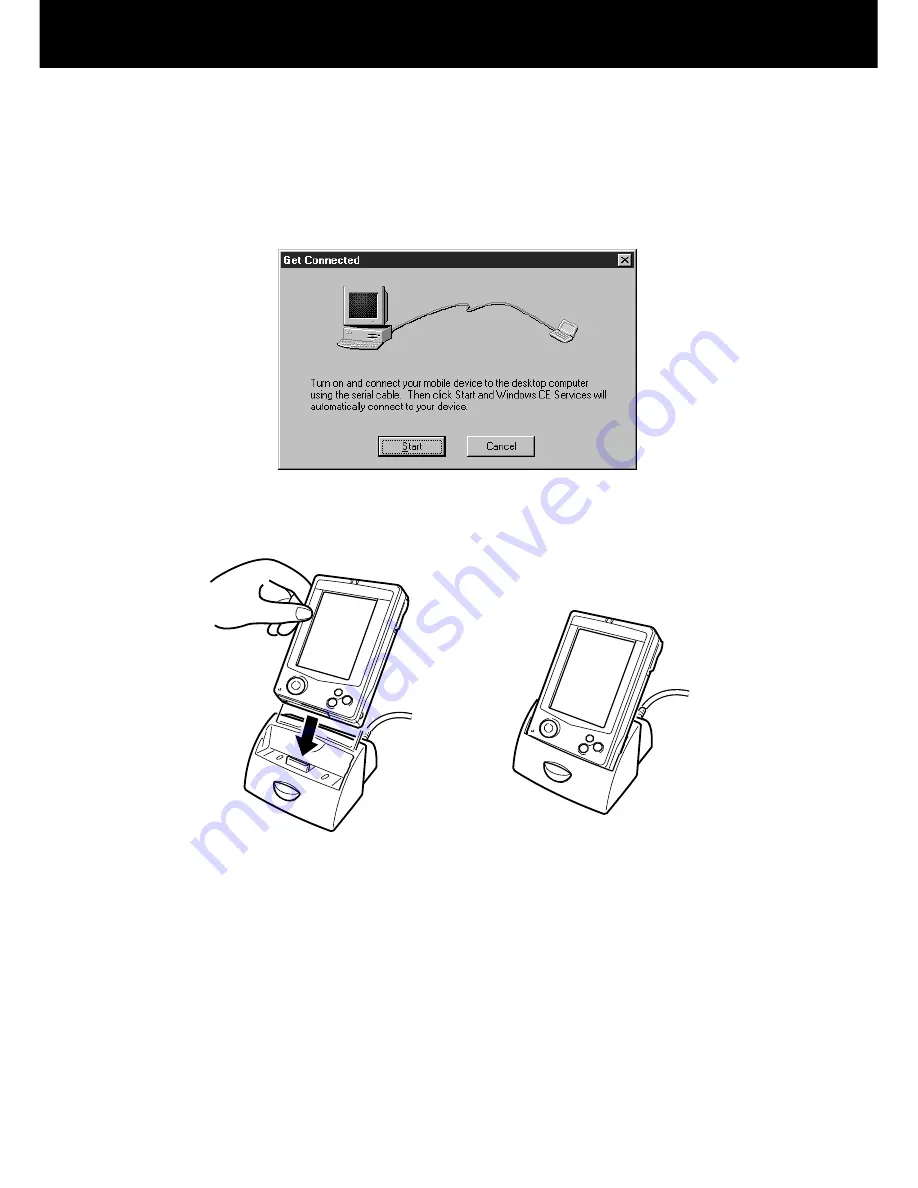
3. On the dialog that appears asking whether you want to restart your computer, click

Finish.

• The dialog shown below appears after your computer restarts.
• With some computers, you may not need to restart. In such a case, click Next to

display the dialog shown below.

4. Turn off your Palm-size PC and place it on its cradle. Make sure the Palm-size PC

seats securely onto the cradle.

Содержание Cassiopeia E-100

Страница 1: ...rdware Manual in addition to this Palm size PC User s Guide Be sure to read the Hardware Manual first Before using your Palm size PC for the first time carefully read the Safety Precautions in the Hardware Manual Keep this Palm size PC User s Guide on hand for reference whenever using your Palm size PC E ...

Страница 2: ...responsibility for any damage or loss resulting from the use of this manual CASIO COMPUTER CO LTD assumes no responsibility for any loss or claims by third parties which may arise through the use of this product CASIO COMPUTER CO LTD assumes no responsibility for any damage or loss caused by deletion of data as a result of malfunction repairs or battery replacement Be sure to back up all important...

Страница 3: ...ter 2 Tutorial 18 Recording a Message with Voice Recorder 18 Adding a Contacts Record 19 Creating a Calendar Appointment 21 Entering a Reminder in Tasks 23 Creating a Note with Note Taker 26 Viewing the Active Desktop 29 What s Next 30 Chapter 3 Voice Recorder and Note Taker 31 Using Voice Recorder 31 Controlling Voice Recorder Operations with Buttons 31 Controlling Voice Recorder Operations with ...

Страница 4: ...top Computer 67 Establishing a Dial Up Connection 68 Closing a Connection 71 Chapter 6 Windows CE Services and Channels 72 Windows CE Services 72 Installing Windows CE Services 72 Optional Infrared Communication Driver Component 77 Using the Mobile Devices Window 78 Changing Communications Settings 79 Synchronization 80 Checking Synchronization Details 82 How Data is Synchronized 82 Resolving Sync...

Страница 5: ...Appendix A Handwritten Character Recognizer 109 Input Panel Areas 110 Symbols 111 Character Writing Help 111 Options 112 Natural Character Set 112 Simplified Uppercase Character Set 117 Appendix B Tips and Troubleshooting 123 Tips 123 Conserving Battery power 123 Protecting Important Data 124 Other Tips 125 Troubleshooting 126 Dial up Connection 126 Infrared Communications 126 Display 127 Screen c...

Страница 6: ...r While driving home from work you suddenly remember two or three important phone calls you need to make the first thing tomorrow While stopped at a red light you reach for your Palm size PC and use Voice Recorder to record a reminder for later playback You re meeting friends for dinner and a movie tonight You use Internet Explorer 4 0 on your desktop computer to get the latest movie information w...

Страница 7: ...tton or tool where the stylus is located slide the stylus from the button or tool and then lift it from the Palm size PC screen Windows CE Services Help Topics On the Mobile Devices window of your desktop computer click Help and then Windows CE Services Help Topics The Windows CE home page http www microsoft com windowsce ppc Release notes on your desktop computer On your desktop computer click St...

Страница 8: ...opics See the separate Quick Start Guide and Chapter 6 of this User s Guide for information on installing Windows CE Services In this User s Guide the term desktop computer includes both desktop computers and laptop computers The modem card described in this User s Guide is intended for use in the United States and Canada only ...

Страница 9: ...ize your Palm size PC Chapter 2 Tutorial Hands on experience entering data and performing other operations on your Palm size PC Chapter 3 Voice Recorder and Note Taker Introduction to using the Voice Recorder and Note Taker software Chapter 4 Pocket Outlook Introduction to the Calendar Contacts Tasks and Inbox programs that make up Pocket Outlook This chapter also explains how to synchronize data ...

Страница 10: ...ize PC Buttons The illustration below shows the buttons on your Palm size PC Exit button Action control Program buttons Cursor button Program Buttons Pressing a button starts up a program The first time you start up your Palm size PC Voice Recorder Calendar Contacts and Menu are assigned to these buttons automatically Pressing a program button when power is off turns on power and starts up the sof...

Страница 11: ...s on the online help screens Rotate Up Rotate Down Rotating the Action control up or down is similar to pressing the cursor up or down key on a desktop computer keyboard Action control up and down operations are indicated as and on the online help screens Cursor Button Use this button to move the cursor up down left and right on the screen Note Some buttons also perform specific functions within a...

Страница 12: ...ouch screen once to perform the operation that is equivalent to clicking on a desktop computer Double tap Lightly tap the touch screen twice in quick succession to perform the operation that is equivalent to double clicking on a desktop computer Drag Hold the stylus against the touch screen as you drag it to another location to perform the operation that is equivalent to dragging on a desktop comp...

Страница 13: ...sing its program button With your Palm size PC you do not need to quit a program after you are finished using it You can simply select another program Start Menu Important To help ensure stable system operations your Palm size PC does not like to have too many programs running at the same time Because of this programs may be shut down automatically in order to conserve available memory Be sure to ...

Страница 14: ...ecords voice memos for later playback Calculator Performs basic calculations Menu A handy menu of buttons that provide easy access to Palm size PC programs Connections Establishes a desktop computer or Internet connection over a cable or dial up connection ActiveSync Initiates synchronization with a desktop computer PC Link Establishes a connection with your personal computer Solitaire A popular c...

Страница 15: ...rams to the program buttons To assign programs to the program buttons 1 On your Palm size PC tap Start Settings and then Buttons 2 Use the Button Properties dialog that appears to assign programs to the program buttons Important Do not assign a program installed on a CompactFlash card to a program button Only assign programs that are installed in Palm size PC main memory Note Programs that are pre...

Страница 16: ...ve Desktop as the cover for your Palm size PC Active Desktop Owner data Calendar data Task data Desktop button You can display the desktop at any time by tapping the Desktop button in the lower right corner of the screen To change the contents of the desktop tap Start Settings Display and then select Display Active Desktop Display Properties Dialog ...

Страница 17: ...ethods page 12 4 Status icons Double tap an icon to display information about the status of your Palm size PC 5 Desktop button Tap to display the Active Desktop Note A battery icon appears in the status icon area when battery power is low See Icon Lists on page 129 for more information about icons Messages also appear on the screen to warn you when battery power is low You can check the current ba...

Страница 18: ...rt it up 2 Programs Menu Tap here to display a sub menu of CASIO programs programs for data communication etc 3 Settings Menu Tap here to display a sub menu of Palm size PC settings See Customizing Your Palm size PC on page 15 4 Find Tap here to display a dialog that lets you search for data in Palm size PC memory 5 Help Tap here to display Palm size PC online help ...

Страница 19: ...bar and menu bar or you can have both on the display at the same time Tap here to toggle between the toolbar and menu bar Drag this handle left and right to display part of the toolbar and part of the menu bar at the same time If you drag down on the bottom of the toolbar the menu bar will appear underneath it so you can view both bars at the same time Drag the bottom of the menu bar back up again...

Страница 20: ...n our Palm size PC To select the input method tap the Input Method arrow and then select one of the methods from the menu that appears Typing with the Keyboard To type with the on screen keyboard tap the Input Method arrow and select Keyboard Next use the stylus to tap the keyboard keys Characters appear as you type them You can also set up the keyboard to suit your own particular needs Tap Start ...

Страница 21: ...e numbers here Certain letters need to be written in a particular way in order for them to be recognized Tapping Help displays an online demonstration of character writing You can also find character information in Appendix A at the back of this User s Guide Note Drag the stylus across the panel from right to left to delete a character Drag from left to right to enter a space As you type or write ...

Страница 22: ...ticular item or file in the list view and change to a detailed view of its contents Tapping on a column heading sorts the items in the list on that column Each time you tap a heading the sort order changes between ascending and descending In Calendar Contacts and Tasks you can assign records to particular categories and then select the category whose data you want to appear in the list view Detail...

Страница 23: ...r in the list view See the online help and manuals that come with your Palm size PC for more information about the different views and filtering capabilities of each program Customizing Your Palm size PC You can tailor the settings of your Palm size PC to suit your particular needs Tap Start and Settings and then tap the setting you want to change in the menu that appears ...

Страница 24: ...es use to recognize your Palm size PC and for making settings for connection to a desktop computer Dialing For specifying the dial method to be used for a dial up connection Display For specifying the background for the Active Desktop Input Panel For specifying the input panel input methods Owner For entering and editing owner data which appears on the Active Desktop whenever your Palm size PC is ...

Страница 25: ... adjusting the double tap speed System For adjusting memory allocation between storage memory and program memory Note You can allocate up to 16MB for storage memory Taskbar For specifying which programs and items appear on the Taskbar Volume Sounds For making volume settings and for turning sounds on and off World Clock For setting the date and time for your location and a second location Note See...

Страница 26: ...chapter and look at only the procedures you are interested in For more information about how to use each program start up the program tap Start and then tap Help to display online help Note If you haven t already done so be sure to reach Chapter 1 to familiarize yourself with Palm size PC basic operation typing and writing text etc Recording a Message with Voice Recorder Voice Recorder is the easi...

Страница 27: ...ck Pressing the Action control again resumes playback from where you stopped it The recording you just make is shown in the file list named Recording 1 or something similar To change its name tap it in the file list so it is highlighted and then tap Type the name you want into the Properties dialog that appears Adding a Contacts Record Contacts lets you keep track of phone numbers addresses and ot...

Страница 28: ...rst You can enter three types of data with Contacts business personal and memo 3 Enter the name company work address work number e mail address and other data for the contact To move between fields either press the Action control and the right cursor button at the same time or use the stylus to tap the field you want to jump to 4 If you want to enter personal data tap 5 Enter the home phone number...

Страница 29: ...C s Calendar program is just the thing for keeping track of appointments meetings and other important events To create a Calendar appointment 1 Press the Calendar button on the front of your Palm size PC or tap Start and then Calendar 2 Tap the date L button to display the calendar ...

Страница 30: ...ect the appropriate description from the list that appears If you cannot find the description you want in this list tap the Description L button again and go to the next step 5 Tap the Input Method button and select the input method you want to use 6 Enter the reminder of the description using the input method you selected See Typing and Writing on your Palm size PC on page 12 of this User s Guide...

Страница 31: ...Calendar screen Entering a Reminder in Tasks The Tasks program helps to effectively things you have to do each day To enter a reminder in Tasks 1 Tap Start and then Tasks Tap here to enter a new task 2 Use the on screen keyboard or handwriting recognition to enter the title of the task ...

Страница 32: ...the list To assign a category to a task 1 On the task list double tap the task to which you want to assign a category This displays a dialog that shows the details of the task 2 Tap the button and then check the box next to the category or categories you want to assign to the task You can check more than one category ...

Страница 33: ...nly the tasks that are assigned the currently selected category are shown in the task list Selecting All Items shows all items regardless of category To assign a priority to a task 1 On the same screen for assigning a category to a task page 24 tap the Priority L button Select a priority from the list ...

Страница 34: ... digital note pad with you wherever you go Note Taker lets you type your notes on the spot and even edit data To create a note with Note Taker 1 Tap Start and then Note Taker If this is your first Note Taker note the above step displays a blank input screen If you already have Note Taker notes stored in memory a list of notes appears first and you have to tap to display the input screen ...

Страница 35: ...rst characters of text in the note To change the name or to move your note to a particular folder highlight the note in the list Next tap File and then Properties Use the dialog that appears to make the changes you want To enter text into a note Tapping the input panel button to display the input panel clears the horizontal lines from the screen and causes the cursor to appear You can type text fr...

Страница 36: ... write the letters you want directly on the screen You can write letters just as you would with a pencil and paper You can also zoom in and out on the note to change its size Scale 100 Important Freehand letters cannot be converted later to typed text To draw graphics in a note Use the stylus to draw graphics on the screen just as you would with a pencil and paper If your figure extends across mor...

Страница 37: ...iewing the Active Desktop The Active Desktop of your Palm size PC shows you upcoming appointments and active tasks at a glance To display the desktop tap the Desktop button on the Taskbar This is the Active Desktop The initial default contents for the Active Desktop are owner data upcoming appointments from Calendar and active tasks from Tasks ...

Страница 38: ...of just some of the many things your Palm size PC can do for you Here are some suggestions of places where you can find other important information See Chapter 3 and Chapter 4 for more information on Palm size PC programs Or you can get more information from Palm size PC online help See Chapter 6 about how you can link up with a desktop computer to synchronize data See Chapter 5 to find out how to...

Страница 39: ...k when you need it You can perform record and playback operations one handed which means you can operate Voice Recorder while doing something else Controlling Voice Recorder Operations with Buttons The following are the buttons that control Voice Recorder record and playback operations Exit button Action control Voice recorder button To start recording Hold down the voice recorder button to record...

Страница 40: ...ess the Action control to play back the recording whose name is highlighted on the recording list To pause playback Press the Action control during playback to pause Slider stops at the location where playback was paused To resume paused playback Press the Action control again to resume playback that is paused To stop playback While playback is either in progress or paused press the Exit button to...

Страница 41: ...oint where you release the Action control Note Fast forward is disabled while playing a PCM recording page 35 To rewind during playback While playback is in progress rotate and hold Action control upwards to rewind Normal playback resumes from the point where you release the Action control Controlling Voice Recorder Operations with On screen Buttons and Menu Commands You can also control Voice Rec...

Страница 42: ...paused 8 Fast Forward button Tap to fast forward the recording 9 Rewind button Tap to rewind the recording 0 Slider This slider shows the current playback location You can change to another location by dragging the slider left and right File List The file list shows all the recordings contained in the currently selected folder You can sort the recording list contents by tapping the column headers ...

Страница 43: ...Use this box to move the recording to another folder Change the recording name here If you are using a memory card use this box to specify whether the file should be stored in Palm size PC main memory or on the memory card Recording Formats Voice Recorder normally records data in TrueSpeech which requires a relatively small file A 10 second TrueSpeech recording uses only about 10 Kbytes of memory ...

Страница 44: ...hough Stereo can be selected in the Attributes box of the Recording Format dialog when PCM is selected as the recording format playback is always monaural To record to a memory card 1 In Voice Recorder tap Tools and then Options 2 On the General tab of the dialog that appears check the Save to storage card checkbox The Save to storage card is dimmed if your Palm size PC does not have a memory card...

Страница 45: ...ker lets you edit and format the contents of a note quickly and easily To start up Note Taker tap Start and then Note Taker Creating a New Note Tap to display the new note screen Tapping the L button displays a list of templates from which you can choose the one you want Inputting Text into a Note You can enter text into a note by typing with the on screen keyboard or with the character recognizer...

Страница 46: ...put position You can change to input of freehand letters and graphics by tapping to hide the input panel Freehand Letters and Graphics Use the stylus to draw the letters and graphics you want directly on the screen If your figure extends across more than three horizontal lines it is surrounded by a dotted line frame which identifies it as a graphic ...

Страница 47: ...n Editing and Formatting a Note You can edit text you entered using the keyboard or the character recognizer and you can also edit freehand graphics and letters To select text or a figure for editing hide the input panel tap the Select button and then drag the stylus over the text or figure Note Instead of tapping Select you can also hold down the Action control while dragging the stylus across th...

Страница 48: ... the note is inside a folder the note is given the folder name followed by a sequential number Notes stored in a folder names Sales for example would be named Sales1 Sales2 etc If there is no text in the note and the note is not inside a folder the note is given the name Note followed by a sequential number To change the name of a note to move the note into a folder or to change the file format of...

Страница 49: ...to keep track of your notes is to give them easy to understand names and store them in folders For example you could create a folder named Project A and place all relevant notes in that folder Selecting a folder in the note list causes all its notes to appear in the list ...

Страница 50: ...er It also lets you use your Palm size PC to dial up an Internet service provider to send and receive e mail See Chapter 5 of this User s Guide for more information about dial up connections You can start up any of the Microsoft Pocket Outlook programs by tapping Start and then tapping the program you want to run in the Start menu Note The section provides an overview of each of the programs that ...

Страница 51: ...or hide more data Tap the selected appointment to edit it Double tap an appointment to display its appointment card Appointment Card Note You can display a new appointment card by holding down the Calendar program button on the front of your Palm size PC for a few seconds Enter a date or tap the L buttons to display a calendar for date selection Saves the appointment Enter additional notes about t...

Страница 52: ... who receive the announcement are sent to your Inbox If your Inbox is set up to receive meeting announcements icons that indicate their responses appear next to each name on the appointment card When you receive a meeting announcement your responses are sent back to the meeting organizer Meetings you agree to attend are automatically added to your Palm size PC Calendar Contacts Managing Business a...

Страница 53: ...ard contents Tap to specify a category Tap to display personal data Tap to display business data Tasks Keeping Track of Things You Need to Do Use Tasks to keep track of things you need to do You can check a task after you complete it and overdue tasks appear in bold You can assign a priority and categories to each task and even set an alarm to remind of particularly importing tasks Tasks also are ...

Страница 54: ...the list A checkmark indicates a task is complete Task Card Tap this button and then tap the description box to the right to write a freehand memo Check this box to set a reminder alarm Click the button to set the alarm time Displays the category list in the description box Note All tasks must have a Due date specified You cannot create a task with a Starts date only ...

Страница 55: ...nchronize incoming and outgoing messages with Microsoft Exchange or Microsoft Outlook running on your desktop computer Or you can transfer individual messages between your Palm size PC and desktop computer You can send and receive e mail using a dial up connection to a service provider or your company s server page 58 Service provider Palm size PC Desktop computer ...

Страница 56: ... Palm size PC it is deleted from your desktop computer the next time you synchronize Messages in the Outbox folder on your Palm size PC are transferred to the Outbox folder on your desktop computer These messages are then sent with the next e mail send operation from Exchange or Outlook on your desktop computer Features available on your desktop computer such as scheduling meetings and selective d...

Страница 57: ...er are not linked so you can modify or delete them on one location without affecting the messages in the other location You can also use this method to move messages to your desktop computer that you received on your Palm size PC from other services To transfer messages with Windows CE Inbox Transfer click Tools in either Exchange or Outlook and then click Windows CE Inbox Transfer Use the dialog ...

Страница 58: ... Manual for more information about the type of CompactFlash modem you need Your Palm size PC does not support connection to any Internet service provider ISP that requires use of special software or programs Your Palm size PC supports dial up connection with an Internet service provider ISP that uses a POP3 mail server and SMTP mail gateway You can use multiple mail services for your mail You need...

Страница 59: ...s can be left blank Tap here to display a list of connections you created under To make Palm size PC dial up connection settings on page 61 Select the one you want to use 7 Tap Finish to save your settings Note In step 6 of the above procedure enter a mail address in the Return Address box if you want replies to your e mail sent to an address that is different from the one you send from Normally y...

Страница 60: ...nnects Inbox picks up any unread mail addressed to you from your service s computer and sends any unsent messages that are waiting in the Outbox folder Received Messages Inbox is initially set up to receive messages up to 100 lines long anything after the 100th line is cut off Not attachments are downloaded and original messages remain on the mail server To receive selected messages in their entir...

Страница 61: ... you synchronize select the message or messages on the Inbox tap Service and then tap Retrieve Full Copy See Palm size PC online help for more information about service properties Reading Received Messages Messages received from your mail service provider are picked up and placed in the Inbox whenever you use Inbox to log into your provider s server The following shows the typical appearance of th...

Страница 62: ...eans 1KB of a 2KB message was downloaded to the Palm size PC from the server To view the contents of a mail message double tap it in the Inbox Note You can use Service Properties to specify whether or not the connector should be terminated automatically following a mail send or receive operation See online help for more information ...

Страница 63: ...essage Tap to display a blank message screen Enter the text of your message here Tapping displays an address book from which you can select the e mail address you want Tap this button when you want to input addresses for CC carbon copy and BCC blind carbon copy addresses Tap the scroll button to return to the above screen When your message is the way you want it tap to place it in the Outbox folde...

Страница 64: ...name in the Inbox Next tap and then tap Reply to Sender Enter your reply here The address of the person who sent the original message is automatically entered as the recipient of your reply Text of the original message When your message is the way you want it tap to place it in the Outbox folder ...

Страница 65: ...etween your Palm size PC and desktop computer Windows CE Services is also useful for backing up Palm size PC data and performing other useful tasks This chapter explains how to install and use Windows CE Services It also provides information about how to use Channels Chapter 7 Data Backup and File Transfer In addition to synchronizing data between your Palm size PC and desktop computer Windows CE ...

Страница 66: ...required settings for a dial up connection It also contains information about the types of computers you can connect to with a dial up connection Remote Computers Your Palm size PC can establish a dial up connection with the types of remote computers described below Internet Service Provider You can set up an account with an Internet service provider ISP for sending and receiving e mail Informatio...

Страница 67: ... need to set up your Palm size PC for this type of connection should be provided by the system administrator of the corporate network Palm size PC Corporate server Remote Desktop Computer on a Corporate Network In this configuration the desktop computer must be connected to your corporate network and network connections must be enabled If you are going to perform remote synchronization you must fi...

Страница 68: ...r s Guide for information about setting up a desktop computer for remote synchronization Palm size PC Dial Up Connection Settings Use Windows CE Remote Networking to make the setting for dial up connections Before you start making settings do the following 1 Make sure you have the following information on hand The phone number you need to dial Name servers information primary DNS Baud rate and oth...

Страница 69: ...nicating with a Computer 61 To make Palm size PC dial up connection settings 1 On the Start menu tap Programs Communication and then Connections 2 To create a new connection double tap the Make New Connection icon ...

Страница 70: ... 62 3 Enter a name for the connection select Dial Up Connection and then tap Next to advance to the Make New Dial Up Connection dialog 4 Tap the Select a modem box to open a list of available modems Select the one you are using ...

Страница 71: ...ialing up Call Options Depending on the type of line you are connected to you may need to uncheck this option The default setting here is 120 seconds Depending on the modem card you are using you may have need to change this setting See the ReadMe file on the Windows CE CD ROM that comes with your Palm size PC for more information 6 After making the Device Properties settings you want tap OK to cl...

Страница 72: ...P IP Settings button to display the TCP IP Settings dialog Make the settings shown below General Name Servers 8 After making the TCP IP Settings you want tap OK to close the dialog and return to the New Dial Up Connection dialog Then tap Next ...

Страница 73: ... the way you want it tap Finish to return to the initial Connection window The Connection window now contains the new connection you just created Note You have to use the above procedure to create a connection for each remote server service provider corporate network or desktop computer you plan to dial up ...

Страница 74: ...location you want and dialing is performed with all the necessary prefixes Let s say you have the following number specified for your dial up connection Area Code 567 Phone Number 123 4567 You can set up dialing properties to add the area code whenever you dial from home and drop the area code but append a nine at the beginning to get an outside line whenever you dial from the office Dialing from ...

Страница 75: ...etwork to which the computer is connected The following points apply in either case Before establishing a dial up connection you must first establish partnership between your Palm size PC and the desktop computer The desktop computer must be turned on with Schedule Exchange or Outlook running with your user profile In the lower right corner of the Mobile Devices window the connection status must s...

Страница 76: ...Establishing a Dial Up Connection After making all the required settings you are ready to try establishing a dial up connection with your Palm size PC Note A CompactFlash modem card makes it possible for you connect to a standard analog telephone line See the separate Hardware Manual for more information about using it We recommend that you use the AC adapter to power your Palm size PC whenever us...

Страница 77: ...cedure under To make Palm size PC dial up connection settings on page 61 2 Tap the connection to display the following dialog Enter the user name and password Check the Save Password option if you don t want to input your password every time 3 Check to make sure that the phone number is correct If the phone number is not correct refer to the procedure under To make Palm size PC dial up connection ...

Страница 78: ... establish a dial up connection directly from Inbox See How Mail is Sent and Received by Inbox on page 52 for more information To establish a dial up connection with a desktop computer for synchronization 1 Tap Start Programs Communications and then ActiveSync This list shows all connections you created with the procedure under To make Palm size PC dial up connection settings on page 61 This box s...

Страница 79: ...PC dial up connection settings to correct it 4 Tap Connect to connect A dialog appears telling you the connection is being established The dialog closes and synchronization starts automatically when the connection is established The icon on the Taskbar indicates that a connection currently exists Closing a Connection Double tap the icon on the Taskbar On the dialog that appears tap Disconnect to c...

Страница 80: ...ed in Chapter 7 Windows CE Services The following describes how to install and use Windows CE Services Installing Windows CE Services This section explains how to install Windows CE Services on your desktop computer and how to establish partnership with your Palm size PC Before Beginning Installation Note the following points before beginning installation Installation requires you to restart your ...

Страница 81: ...ot support data exchange or synchronization with a handheld PC running Windows CE 1 0 Windows CE Services and H PC Explorer for Windows CE 1 0 Handheld PCs cannot be installed on the same computer To install Windows CE Services 1 Insert the Windows CE CD ROM that comes with your Palm size PC into your computer s CD ROM drive This causes the Microsoft Windows CE Services Setup window shown below to...

Страница 82: ...mputer click Finish The dialog shown below appears after your computer restarts With some computers you may not need to restart In such a case click Next to display the dialog shown below 4 Turn off your Palm size PC and place it on its cradle Make sure the Palm size PC seats securely onto the cradle ...

Страница 83: ...puter you will need to enter the user name and password you provided earlier in the installation procedure into your Palm size PC If the message Cannot find Palm size PC appears click Cancel to quit this procedure and make the required communication settings manually as described under Changing Communications Settings on page 79 6 The dialog shown below appears after Windows CE Services finishes m...

Страница 84: ... is 8 After you finish making the settings you want click Next Use this dialog to specify what data you want synchronized Note that you later can change the settings you make in steps 7 and 8 using the procedure under Changing Communications Settings on page 79 9 Click Finish This starts a synchronization operation and sets up a partnership between your Palm size PC and desktop computer ...

Страница 85: ...vice Palm size PCs running Windows CE 2 0 and handheld PCs You can also set up partnership between two desktop computers such as your home computer and work computer Optional Infrared Communication Driver Component The Windows CE CD ROM contains an optional infrared communication driver component You must install this component on your desktop computer if you want to communicate with your Palm siz...

Страница 86: ...ip The name of each icon is the name you give the Palm size PC during installation The Mobile Devices windows lets you do the following After clicking a Palm size PC icon to select it select ActiveSync Options on the Tools to make settings for synchronization See Changing ActiveSync Options Settings on page 85 for more information Double click a Palm size PC icon to open the Explorer window Use th...

Страница 87: ...PC Make sure these resources are available to Windows CE Services Other programs cannot be using these resources while your Palm size PC and desktop computer are connected Make sure the baud rate settings of your desktop computer and Palm size PC are the same To check the above communications settings open the Mobile Devices folder click File and then Communications On the dialog that appears clic...

Страница 88: ...o or modifications of data you make on one computer are reflected in the data of the other computer Any deletion of data from one computer causes the same data to be deleted from the other computer Synchronization is performed according to the settings you make in step 7 on page 76 With Continuous which is the initial default setting or On Connect synchronization starts as soon as you place your P...

Страница 89: ...zation click the Tools menu on the Mobile Devices window and then click Synchronize Now The progress of the synchronization is indicated in the lower right of the Mobile Devices window Synchronization progress indication Note Depending on the volume of data that needs to be synchronized synchronization can take anywhere from one minute to a number of minutes ...

Страница 90: ...t was done during the synchronization operation by clicking Tools and then ActiveSync Status ActiveSync Status Window How Data is Synchronized This section is an overview of how data is synchronized between your Palm size PC and desktop computer For more information about synchronizing for specific items see Windows CE Services online help Under initial default settings only Contacts Calendar and ...

Страница 91: ...r file and other files you create are stored on your Palm size PC in a folder named My Documents You can view these files from your desktop computer by double clicking the icon for your Palm size PC in the Mobile Devices window If file synchronization is enabled Changing ActiveSync Options Settings page 85 Palm size PC files are automatically synchronized with files in the folder named Palm size P...

Страница 92: ...ither manual or automatic resolution of synchronization conflicts Manual Resolution With this option Windows CE Services displays an alert message whenever it detects a synchronization conflict You get the option of whether or not to apply a pre defined method to resolve the conflict Automatic Resolution This option automatically resolves all conflicts by selecting the data either on your Palm siz...

Страница 93: ...computer To change ActiveSync Options settings 1 On your desktop computer double click the Mobile Devices icon to open the Mobile Devices window 2 Click the icon of your Palm size PC to select it 3 On the Tools menu click ActiveSync Options to display the dialog shown below ActiveSync Options Dialog Click here to display a dialog for making additional settings for the item selected in the Synchron...

Страница 94: ...icking a setting in the dialog with the question mark cursor displays an explanation about that setting 4 Use the dialog to make the settings you want See Windows CE Services online help for information about each setting Clicking the Advanced button displays a dialog for resolving synchronization conflicts See Resolving Synchronization Conflicts on page 84 5 After everything is the way you want c...

Страница 95: ...e Then when you synchronize the latest information is automatically transferred to your Palm size PC for viewing Channels and their automatic updates are managed on your desktop computer by Internet Explorer 4 0 or later You must have Internet Explorer 4 0 or later running on your desktop computer to subscribe to Channels Microsoft maintains a special Web site to help you get started using Channel...

Страница 96: ... for more information Viewing Channel Information The channel icon appears in the status area of the Taskbar whenever there is new Channel information available Channel icon Double tap the icon to switch to Channels Viewing Channel Information on the Active Desktop You can set up your Active Desktop to display specific channel content for quick reference To display Channel content in the Active De...

Страница 97: ...ograms that are in Palm size PC memory To back up Palm size PC data On the Mobile Devices window click on the toolbar or click Tools and then Back Up Now To make settings that tell the Palm size PC what it should do when backing up data click Tools and then Back Up Restore to display the Back Up Restore Properties dialog When you restore Palm size PC data all data currently in Palm size PC memory ...

Страница 98: ...o copy a file 1 On your desktop computer open the Mobile Devices window 2 Double click your Palm size PC icon to open the Explorer window 3 Open the My Documents folder which contains all the files in Palm size PC memory 4 Now you can drag and drop files between your desktop computer and the My Documents folder ...

Страница 99: ...esigned to run under the Microsoft Windows CE Operating System Windows CE Normally you run the program s installer on your desktop computer to install the program on the Palm size PC If the program does not have an installer use the copy procedure below to copy it manually to the Palm size PC Note however that you should carefully read the documentation that comes with the software you are install...

Страница 100: ...ter being installed using the above procedure Be sure to read all documentation and any ReadMe files that come with the program for information about what you need to do to install it correctly To remove a program from Palm size PC 1 On your Palm size PC tap Start Settings and then Remove Programs 2 Select program you want to remove and then tap Remove Note You cannot remove the programs that come...

Страница 101: ...ther Windows CE device In Contacts for example you can send up to 25 cards at a time to another Windows CE device In Voice Recorder and Note Taker you can send individual files or notes Note Taker Infrared Send Menu To transfer data with infrared 1 Align the infrared port of your Palm size PC with the infrared port of the other Windows CE device Infrared port ...

Страница 102: ... data you want to send Select the items you want to send and then tap File Send To and then Infrared Recipient 3 On the receiving unit start up the same program and then tap File and then Receive The displays of both units show a message indicating that data transfer is being performed Both units play a sound and display a message when transfer is complete ...

Страница 103: ...ion or open a file with a tap of your stylus Menu also lets you create submenus and assign them to main menu buttons Tapping a submenu button opens the submenu which contains six more application and file buttons This means you can group your applications and files to make your Palm size PC operations more organized and efficient Main Menu Submenu The initial default for the main menu is all of th...

Страница 104: ...e program button to start up Menu and display is initial screen If your Palm size PC is turned off pressing the program button also turns on power To start up Menu using a menu program 1 Turn on your Palm size PC 2 Tap Start Programs and then Menu Using the Main Menu Tap an application button to launch the application Tap a file button to start the associated application and open the file Applicat...

Страница 105: ...u button operations On the main menu rotate the Action control downwards once to select the button in the upper left corner of the menu Next rotate the Action control up and down to select buttons on the menu Press the Action control to perform the operation assigned to the button that is selected on the screen Pressing the Action control while a submenu button is selected displays the submenu Act...

Страница 106: ...n you want to assign to the button from the list of Start menu applications on the dialog To select an application not shown in the dialog list tap Browse to open the Browse dialog 5 When the name of the application you want is highlighted in the file list area tap OK to assign it to the button and close the Browse dialog 6 If you want to change the button s icon tap Change Icon and perform the pr...

Страница 107: ...dialog 5 Tap the icon you want to assign to the button 6 After the icon is the way you want tap OK to return to the Define dialog 7 Tap OK to return to the button selection screen 8 Tap x to return to the main menu To clear the settings of a button 1 On the main menu tap to display the button selection screen 2 Tap the button whose settings you want to clear to select it indicated by a frame aroun...

Страница 108: ...ation assigned to it This opens the New dialog 3 Tap the Submenu button to display the Submenu Settings dialog 4 Enter the name you want to give to the submenu button into the Submenu Name box 5 Tap x to return to the button selection screen which now shows your new submenu button 6 Tap x to return to the main menu Note You can perform the above procedure without inputting a name in step 4 but doi...

Страница 109: ...ection screen which now shows the submenu button with its new icon 7 Tap x to return to the main menu To assign applications to buttons inside submenus The procedures you should use to assign applications to change settings of delete and move settings of buttons on a submenu are the same as those for the main menu buttons Note the following points however when working with submenu buttons You cann...

Страница 110: ...dify Same as Edit Delete Same as Edit Cut Same as Edit Paste Description Displays the button selection screen Returns from the button selection screen to the main menu Displays version information Command Define Close About Menu Description Displays the New dialog Displays the Define dialog When a submenu button is selected displays the submenu button selection screen Deletes the settings of the s...

Страница 111: ...nd built in applications Database Data Database data is Calendar Contacts Tasks and Inbox data Time Required for Backup Depending on the volume of data you are backing up or restoring the backup operation can take anywhere from about 10 seconds to a number of minutes To back up 4MB of data for example takes three or four minutes To check how much data is on your system tap Start Settings and then ...

Страница 112: ... warning message appears and the backup or restore operation is cancelled Before starting a backup or restore operation charge the battery pack or load new batteries Do not perform any button or screen operations on the Palm size PC while a backup or restore operation is in progress Do not touch the Palm size PC at all until the backup or restore operation is complete Files and other data are auto...

Страница 113: ... Tap Backup now This causes the dialog shown below to appear 6 Tap Yes to start the backup or No to close the dialog without backing up anything An hourglass icon on the screen indicates that the backup operation is being performed The message Backup complete appears on the display after the backup operation is complete 7 After backup is complete tap OK to quit Card Backup Tool Note If the backup ...

Страница 114: ... card Any files or registry data in Palm size PC memory that is not on the memory card is left as is Calendar Contacts Tasks and Inbox data in Palm size PC data is all overwritten with the corresponding data from the memory card To return Palm size PC to the exact status it was when you backed up the data perform a full reset before restoring the data See the separate Hardware Manual for informati...

Страница 115: ...g shown below to appear 6 Tap Yes to start the restore operation or No to close the dialog without restoring anything An hourglass icon on the screen indicates that the restore operation is being performed The message Restore complete appears on the display after the restore operation is complete 7 After the restore operation is complete tap OK to quit Card Backup Tool 8 Reset your Palm size PC ag...

Страница 116: ...owing procedure to delete the backup files you created using Card Backup Tool Delete a file when you no longer need it when you want to free up space on a memory card etc To delete a backup file 1 Insert the memory card that contains the backup file you want to delete into the CompactFlash card slot of the Palm size PC 2 Tap Start Programs Utility and then Card Backup This starts up Card Backup To...

Страница 117: ...cognizer It also provides tables showing how and where to write characters for each of the two character sets the Natural Character Set and the Simplified Uppercase Character Set To activate the character recognizer Tap the Input Method arrow on the Taskbar and then tap Jot Character Recognizer to select it as your input method Select the input method here Tap here to view available input methods ...

Страница 118: ...r of the letter areas abc or ABC of the input area To add a space for example draw a horizontal line from left to right To backspace draw a line from right to left See the tables starting from page 112 for more information Use the number area 123 of the input panel to input numbers Write numbers here Drag the pointer left or right to change the sizes of the writing areas You can also write common ...

Страница 119: ... tap the Symb button again to return to the main input panel Tap here for the symbol panel See the tables starting from page 112 for more information Character Writing Help The character recognizer software recognizes a number of alternate ways of writing a character If you are having a problem with a particular character you can use Help to see an animated demonstration of how to write it To disp...

Страница 120: ...good choice when you want to write faster See Simplified Uppercase Character Set on page 117 for more information Or you can select this character set in the Options dialog and then tap the Help button in the input panel Natural Character Set The tables in this section show how to write Natural Character Set letters numbers punctuation marks editing marks and symbols Alternative writing methods ar...

Страница 121: ...unctuation Marks Mark Stroke Options Mark Stroke Options period comma apostrophe question exclamation ampersand at double quote tab space backspace Letter Stroke Options Letter Stroke Options a b c d e f g h i j k l m n o p q r s t u v w x y z ...

Страница 122: ...ers Number Stroke Options Number Stroke Options 0 1 2 3 4 5 6 7 8 9 Number Area Punctuation Marks Mark Stroke Options Mark Stroke Options period comma dash tilde backspace Mark Stroke Options Mark Stroke Options forward delete cut copy paste undo carriage return ...

Страница 123: ...a Editing Marks Mark Stroke Options Mark Stroke Options cut copy paste undo tab Accented Letters Write the letter in the letter area and the accent in the number area Accent Mark Stroke Options Accent Mark Stroke Options à á â ã ä å ...

Страница 124: ...Palm size PC User s Guide 116 Symbol Panel Symbols Symbol Stroke Options Symbol Stroke Options Symbol Stroke Options Æ æ Ç ç ª º º 1 2 3 4 2 3 ˆ ...

Страница 125: ...ible for you to write faster The tables in this section show how to write Simplified Uppercase Character Set letters numbers punctuation marks editing marks and symbols Alternative writing methods are shown for each character A dot indicates where a stroke begins and a stroke that does not have a dot can be written in either direction Stroke sequence is numbered where appropriate ƒ S s ˆ ç p P Đ Ø...

Страница 126: ...H I J Letter Stroke Options Letter Stroke Options Letter Stroke Options K L M N O P Q R S T U V W X Y Z Ç æ ß Letter Area Editing Marks Mark Stroke Options Mark Stroke Options space back delete backspace forward delete cut copy paste undo carriage return ...

Страница 127: ...r Area Punctuation Marks Number Stroke Options Number Stroke Options 0 1 2 3 4 5 6 7 8 9 Number Area Editing Marks Mark Stroke Options Mark Stroke Options undo cut copy paste carriage return dash Mark Stroke Options Mark Stroke Options ...

Страница 128: ...the accent in the number area Accent Mark Stroke Options Accent Mark Stroke Options à á â ã ä å Mark Stroke Options Mark Stroke Options period comma apostrophe dash underscore TAB Symbol Panel Punctuation Marks Use the punctuation area punct of the symbol panel to enter punctuation marks ...

Страница 129: ... Reference 121 Symbol Panel Symbols Use the symbol area symb of the symbol panel to enter symbols Symbol Stroke Options Symbol Stroke Options Symbol Stroke Options 1 1 2 3 4 2 3 Æ æ Ç ç ª º p P Đ Ø ø ß µ º ˆ ...

Страница 130: ...Palm size PC User s Guide 122 Symbol Stroke Options Symbol Stroke Options Symbol Stroke Options Œ œ ƒ S s ...

Страница 131: ...ower drain operations When using a dial up connection When connected to a desktop computer When using a CompactFlash card or other peripheral Shorten the auto power off trigger time Under initial default settings your Palm size PC automatically turns off power if you do not perform any operation for about three minutes You can conserve battery power by shortening this time Tap Start Settings and t...

Страница 132: ...the screen Tap Start Programs Utility and then Brightness On the dialog that appears tap the Auto Dim tab Following the instructions that appear on the screen to make auto dimming settings Protecting Important Data You can protect your data in two different ways The first is using a password to keep important data confidential The second way is to back up data on your desktop computer in case of P...

Страница 133: ...l also comes bundled with your Palm size PC With this software you can quickly and easily back up Palm size PC onto a CompactFlash card Other Tips Showing your name to the receiver of your e mail On the Service menu of the Inbox tap Properties and input your name and e mail address into the Return address box using the following format YOUR NAME xxx xxx xx Addressee mail address Normally you only ...

Страница 134: ...roblem with the telephone line Make sure the modem is connected to an analog telephone line It will not work if it is connected to a digital line Make sure the number you are dialing is correct See To make Palm size PC dial up connection settings on page 61 for more information Unreliable connection Try charging Palm size PC battery or use the AC adapter for power If the telephone line you are usi...

Страница 135: ...creen under direct sunlight can cause it to temporarily darken This condition should clear up naturally after a short time Adjust display contrast While holding down the Exit button press the bottom of the cursor button to decrease contrast Increase screen brightness Press the Exit button and then press the right side of the cursor key to increase screen brightness Screen characters are too small ...

Страница 136: ...Palm size PC operation When using Windows CE Services cannot overwrite a file on the Palm size PC because it is read only Use Windows CE Services to delete the file from Palm size PC memory and try again Error message appears while you are using Card Backup Tool Take the actions advised by the message Palm size PC time setting is wrong Check to make sure the time setting of the desktop computer to...

Страница 137: ...ix explain the meanings of the icons that appear in the status area of your Palm size PC screen Taskbar Battery Icons Icon Meaning Backup battery is low Main battery is low AC adapter is connected Connection Icons Icon Meaning Dial up connection Direct cable connection ...

Страница 138: ... Palm size PC is connected to your desktop computer Icon Meaning Palm size PC or other Windows CE device is connected Waiting for Palm size PC to connect No Palm size PC or other Windows CE device is allowed Synchronization error Items that require synchronization have been found Synchronizing animated arrows Synchronization items are up to date ...

Страница 139: ...unications port 75 Connect 70 Connections 6 Contacts 6 42 44 Corporate Network 59 cradle 74 Cursor Button 3 Customizing 15 D Desktop button 8 detailed view 14 Device Properties 63 Dial Up Connections 58 Closing 71 Establishing 68 Settings 60 Dialing 16 patterns 66 Properties 66 Disconnect 71 Display 16 Double tap 4 Drag 4 E E mail 47 Exchange 42 Exit Button 3 Explorer window 89 90 F File conversio...

Страница 140: ...tons 2 Programs 5 95 Programs Menu 10 Properties 79 R record 31 recorder button 18 31 Regional Settings 17 Remote Computer 67 Remote Computers 58 Remove Programs 17 Reply to Sender 56 Replying to a Message 56 Restoring Data 89 Retrieve Full Copy 52 Return Address 51 S Schedule 72 Scheduling a Meeting 44 Settings Menu 10 Software 91 Installing 91 Removing 92 Solitaire 6 Start button 9 Start menu 9 ...

Страница 141: ...MO9907 000003B PN411183 001 CASIO COMPUTER CO LTD 6 2 Hon machi 1 chome Shibuya ku Tokyo 151 8543 Japan ...

Отзывы: