background image

Playing on the Keyboard

EN-34

1.

Press 

HOME

.

This displays the Home Screen.

2.

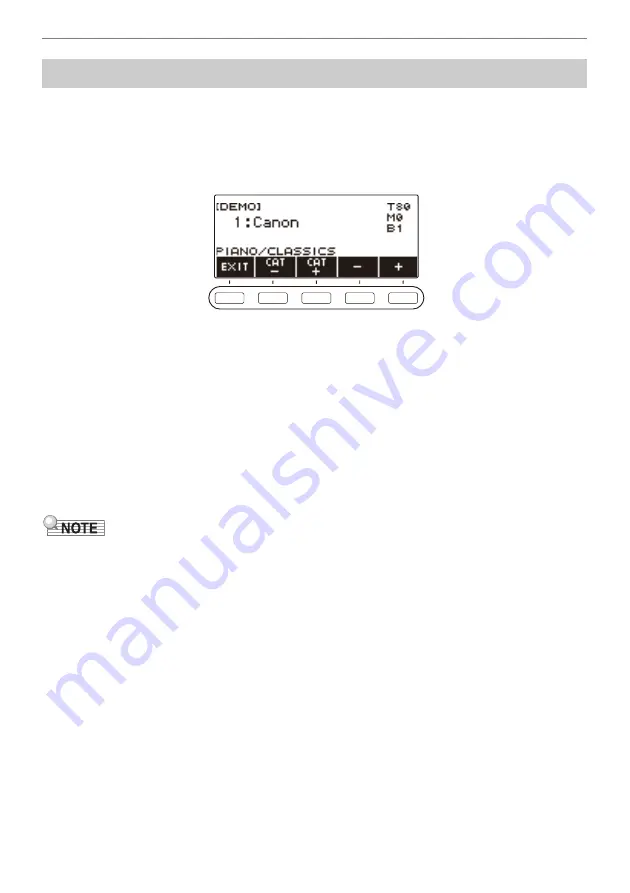
Press DEMO.

This displays the demo screen and starts demo song play.

After playback of one song finishes, playback of the next song starts automatically. Playback 
returns to the first song after playback of the final song is complete.
The DEMO function plays SONG function song 9 “CANON (PACHELBEL)” first. After that, it 
plays SONG function songs 1 through 8, and then 10 through 110.

For a list of song titles, see the “

Song List

” (page 

EN-185

).

The tone of the currently playing demo song is assigned to the keyboard during playback.

3.

To select a song for demo play, rotate the dial or use – and +.

If you want to select a category, use CAT–/CAT+.

4.

To stop playback, press EXIT or 

a

.

This stops playback and exits the demo screen.

Depending on Home Customization settings, the DEMO button may not be shown on the display.

You can also display the demo screen from the menu screen.

Keyboard Lighting is disabled during demo play.

Listening to Demo Play

Содержание Casiotone LK-S450

Страница 1: ...g a Musical Instrument Tone Changing the Pitch in Semitone Units Transpose Fine Tuning Tuning Sustaining Notes After Keyboard Keys Are Released Saving and Recalling a Setup MY SETUP Playing a Built in...

Страница 2: ...er and from the CASIO website https support casio com global en emi manual LK S450 Any reproduction of the contents of this manual either in part or its entirety is prohibited Except for your own pers...

Страница 3: ...ard EN 25 Turning Power On or Off EN 25 Adjusting the Volume Level EN 28 Using the Metronome EN 29 Changing the Depth of Microphone Reverb MIC Reverb EN 33 Listening to Demo Play EN 34 Controlling the...

Страница 4: ...the Challenge Mode to Check Your Results EN 92 Looping Part of a Song as a Lesson Loop Lesson EN 93 Disabling Lesson Fingering Voice Guide EN 94 Disabling Note Sound Guide EN 95 Disabling Performance...

Страница 5: ...Screen Home Customization EN 142 Changing the Base Display EN 143 Changing the Function of Each 5 buttons EN 144 Preventing Playback Stop when HOME is Pressed PANIC function EN 145 Configuring Setting...

Страница 6: ...EN 180 Product Specifications EN 182 Song List EN 185 Tone List EN 187 Rhythm List EN 200 Drum Assignment List EN 203 Versatile Tone Map EN 208 Home Customization 5 buttons Function List EN 210 Finge...

Страница 7: ...s P Power button EN 25 VOLUME knob EN 28 HOME button EN 17 MENU button EN 20 LESSON button EN 86 SURROUND button EN 46 5 buttons EN 17 LCD Dial EN 20 TONE button EN 35 RHYTHM button EN 98 SONG button...

Страница 8: ...the right of the symbol are reference page numbers USB TO HOST port EN 163 PHONES OUTPUT jack EN 12 EN 168 Power terminal DC 9 5V EN 8 USB TO DEVICE port EN 14 AUDIO IN jack EN 169 PEDAL jack EN 13 M...

Страница 9: ...Digital Keyboard power before connecting or disconnecting the AC adaptor The AC adaptor becomes warm to the touch after very long use This is normal and does not indicate malfunction To prevent break...

Страница 10: ...nformation about using eneloop batteries or their specified charger be sure to read the user documentation and precautions that come with each item and use them only as directed Be sure to replace bat...

Страница 11: ...This displays the menu screen 3 Use U and I to select the 5 buttons menu page EN 17 that includes SETTING 4 Press SETTING This displays the setting screen 5 Use U and I to select Battery 6 Rotate the...

Страница 12: ...attery Replacement Required Low battery power may cause notes to become distorted or other problems You can conserve battery power by using headphones and by reducing the volume level Continued use wi...

Страница 13: ...ed while you are listening over headphones Do not listen to output over headphones at very high volume levels for long periods Doing so creates the risk of hearing damage The headphones you use must h...

Страница 14: ...to the MIC IN jack Before connecting rotate the MIC VOLUME knob to its lowest setting Before connecting a microphone make sure that the Digital Keyboard and microphone are turned off It takes a few s...

Страница 15: ...Wireless MIDI audio adaptor The Wireless MIDI audio adaptor does not come with this Digital Keyboard When connecting with a Bluetooth capable external device refer to Sounding a Bluetooth Audio Capab...

Страница 16: ...Digital Keyboard Do not pick up the Digital Keyboard by the strap alone Doing so creates the risk of the Digital Keyboard detaching from the strap and falling The recessed area on the bottom of the Di...

Страница 17: ...ation about how to adjust display contrast see Configuring Settings page EN 146 Operations Common to All Modes Display Screen Contents Setting name Battery icon Recording status Tempo Setting Measure...

Страница 18: ...can customize the Home Screen to suit your specific needs For details see Customizing the Home Screen Home Customization page EN 142 Operations assigned to the 5 buttons along the bottom of the displa...

Страница 19: ...nd at the same time Long pressing U or I when changing to another item or page scrolls through items or pages at high speed You can specify the required button long press time Note that you cannot cha...

Страница 20: ...This displays the setting screen 4 Use U and I to select Button Long Press Time 5 Rotate the dial or use and to change the button long press time value 6 To exit the setting operation press EXIT Sett...

Страница 21: ...o select the 5 buttons menu that includes the function you want to select To return to the previous screen or exit the setting operation press EXIT Menu Item List Dial Operations Selecting a Function...

Страница 22: ...h the notes of your performance built in song playback etc You can disable Keyboard Lighting if you want 1 Press MENU This displays the menu screen 2 Use U and I to select the 5 buttons menu that incl...

Страница 23: ...isplay will scroll horizontally and a numeric page indicator such as 1 11 will appear on the display A file with a name that begins with or blank space cannot be saved 1 Use U and I to move the cursor...

Страница 24: ...BACK Repeat steps 1 and 2 as required The characters shown in the table below are supported for USB flash drive file names The characters shown in the table below are supported for file names on a FA...

Страница 25: ...message Cancel appears in the following cases If the current user data or file name has not been changed If the user data or file name does not contain any characters 0 character count To exit charact...

Страница 26: ...ting MY SETUP power on recall Auto Power Off Power On Alert Battery type Display contrast Button long press time Pressing the P Power to turn off power actually puts the Digital Keyboard into a standb...

Страница 27: ...e a song is playing and while the APP function is being used Disabling Auto Power Off You can disable Auto Power Off to ensure that power does not turn off automatically during a concert etc 1 Press M...

Страница 28: ...Playing on the Keyboard EN 27 4 Use U and I to select Auto Power Off 5 Rotate the dial or use and to select Off 6 To exit the setting operation press EXIT...

Страница 29: ...disable Power On Alert to ensure that keyboard keys do not light during a concert etc 1 Press MENU This displays the menu screen 2 Use U and I to select the 5 buttons menu that includes SETTING 3 Pres...

Страница 30: ...at to help keep you on tempo You can also set a tempo that is suitable for your practice 1 Press HOME This displays the Home Screen 2 Press METRONOME This displays the metronome screen 3 Press START T...

Страница 31: ...USE to be displayed momentarily Depending on Home Customization settings the METRONOME button may not be shown on the display You can also display the metronome screen from the menu screen Use the pr...

Страница 32: ...Press METRONOME This displays the metronome screen 3 Rotate the dial to change the beat value After you rotate the dial once to select a value you can change the value further using and Selecting Off...

Страница 33: ...creen 4 Rotate the dial to adjust the volume level You can specify a volume level value from 0 to 127 After you rotate the dial once to select a value you can change the selection further using and To...

Страница 34: ...e U and I to select MIC Reverb 5 Rotate the dial or use and to change the reverb value You can specify a reverb value in the range of 0 to 127 To return the setting to its initial default press and at...

Страница 35: ...function songs 1 through 8 and then 10 through 110 For a list of song titles see the Song List page EN 185 The tone of the currently playing demo song is assigned to the keyboard during playback 3 To...

Страница 36: ...ne number and tone name 2 Rotate the dial to select a tone For tone information see the Tone List page EN 187 After you rotate the dial once to select a tone you can change the selection further using...

Страница 37: ...e settings are described in the table below Depending on Home Customization settings the TOUCH button may not be shown on the display You can also access touch response settings from the tone screen P...

Страница 38: ...sponse is Disabled Touch off Velocity 1 Press HOME This displays the Home Screen 2 Long press TOUCH This displays the setting screen which shows setting items for touch off velocity 3 Rotate the dial...

Страница 39: ...g and To return the setting to its initial default press and at the same time To go back to the previous screen press BACK 5 To exit the setting operation press EXIT Using a Pedal Changing Pedal Funct...

Страница 40: ...indicating that the pedal effect is no longer applied to the UPPER1 part 5 To apply the pedal effect to the UPPER1 part press UPPER1 again In the same way you can stop the pedal effect from being appl...

Страница 41: ...ed longer when keyboard keys are released 1 Press TONE This displays the tone screen 2 Press SUS This displays SUS 3 Press and release keyboard keys The notes are sustained for a relatively long time...

Страница 42: ...If required press UPPER1 UPPER2 and LOWER to select the part whose setting you want to configure 4 Rotate the dial to change the setting You can set a sustain time within the range of 0 to 9 After yo...

Страница 43: ...MENU and then SUSTAIN For details about parts see Layering and Splitting Tones page EN 47 You can use the procedure below to add reverb to the notes you play 1 Press MENU This displays the menu scree...

Страница 44: ...election further using and To return the setting to its initial default press and at the same time To go back to the previous screen press BACK 5 To exit the setting operation press EXIT Reverb Type D...

Страница 45: ...setting Available settings are shown in the table below Changing the Relationship of Keyboard and Song Reverb Effects Setting Display Text Description Synchronize SYNC When a reverb setting is configu...

Страница 46: ...vailable chorus type settings are shown in the table below After you rotate the dial once to select a chorus type you can change the selection further using and To return the setting to its initial de...

Страница 47: ...s causes the SURROUND LED to light You can also enable surround from the setting screen 2 To disable surround press SURROUND again This causes the SURROUND LED to go out The surround effect is not app...

Страница 48: ...R2 part If the keyboard is split between two tones the low range part is called the LOWER part Sounding a single tone across the entire keyboard page EN 35 With this configuration only the UPPER1 part...

Страница 49: ...e to the left side pages EN 49 EN 50 With this configuration the UPPER1 UPPER2 and LOWER parts are all used Layer On Split On Changing the tone setting affects the UPPER2 part when layer is turned on...

Страница 50: ...ation see the Tone List page EN 187 After you rotate the dial once to select a tone you can change the selection further using and To return to the first tone in the Tone List press and at the same ti...

Страница 51: ...tion see the Tone List page EN 187 After you rotate the dial once to select a tone you can change the selection further using and To return to the first tone in the Tone List press and at the same tim...

Страница 52: ...1 Press TONE This displays the tone screen 2 Long press SPLIT This displays the setting screen which shows setting items for the split point 3 Rotate the dial or use and to specify the split point 4...

Страница 53: ...PER1 part 4 Press UPPER1 UPPER2 LOWER or RHYTHM as required to select the item whose volume level you want to adjust 5 Rotate the dial to change the setting value This displays the screen You can spec...

Страница 54: ...ys the octave shift screen which shows setting items for the upper octave shift 3 Rotate the dial to change the shift amount You can specify a value in the range of 3 to 3 octaves After you rotate the...

Страница 55: ...further change the shift amount using the and To return the setting to its initial default press and at the same time To go back to the previous screen press BACK 5 To exit the setting operation pres...

Страница 56: ...er musical instrument 1 Press MENU This displays the menu screen 2 Use U and I to select the 5 buttons menu that includes SETTING 3 Press SETTING This displays the setting screen 4 Use U and I to sele...

Страница 57: ...Use U and I to select the 5 buttons menu that includes SETTING 3 Press SETTING This displays the setting screen 4 Use U and I to select Tuning 5 Rotate the dial or use and to adjust the tuning You ca...

Страница 58: ...hat is more suitable for playing Indian music Arabic music classical music etc You can select from among 17 preset scale tunings Changing the Scale Tuning 1 Press MENU This displays the menu screen 2...

Страница 59: ...o go back to the previous screen press BACK 5 To exit the setting operation press EXIT Setting Displayed Setting Name Scale Tuning Name Equal Equal temperament Pure Major Just major intonation Pure Mi...

Страница 60: ...CALE This displays the scale tuning screen 4 Press ROOT 5 Rotate the dial to change the setting You can specify a base note in the range of C to B After you rotate the dial once to select a setting yo...

Страница 61: ...select the 5 buttons menu that includes SCALE 3 Press SCALE This displays the scale tuning screen 4 Press AC SCALE This displays AC SCALE and reflects the scale setting in rhythm accompaniment as well...

Страница 62: ...ential between high and low notes 1 Press MENU This displays the menu screen 2 Use U and I to select the 5 buttons menu that includes SCALE 3 Press SCALE This displays the scale tuning screen 4 Press...

Страница 63: ...available equalizer settings 5 To exit the setting operation press EXIT Using the Equalizer Setting Display Text Description Standard Standard Standard setting Loudness Loudness Boosts all ranges Tre...

Страница 64: ...ys the MY SETUP screen You can also display the MY SETUP screen from the Home Screen Depending on Home Customization settings the MY SETUP button may not be shown on the display 3 Rotate the dial to s...

Страница 65: ...of the main setting TONE RHYTHM SONG you are using also appears 5 Press YES This saves the current setup to MY SETUP To cancel press NO This returns to the MY SETUP screen at the beginning of the pro...

Страница 66: ...Reverb Chorus Equalizer Scale tuning type Scale tuning base note Accompaniment scale Piano Stretch Tuning Tuning Metronome beat Metronome volume level Tempo Tempo tap start MIC Reverb AUDIO IN center...

Страница 67: ...up number you want to recall 4 Press LOAD This displays Sure and the main setting s name TONE RHYTHM SONG LESSON KARAOKE saved to the setup 5 Press YES This recalls the saved settings To cancel press...

Страница 68: ...he MY SETUP screen 3 Rotate the dial to select the setup number you want to recall at startup 4 Press AT PW ON This specifies that the MY SETUP number you selected in step 3 of this procedure should b...

Страница 69: ...tup number you want to rename 4 Use I to select the 5 buttons menu that includes RENAME 5 Press RENAME 6 Edit the data name For information about viewing and editing text see Inputting Characters page...

Страница 70: ...the rename operation A MY SETUP name can have up to 12 characters 1 Press MENU This displays the menu screen 2 Press MY SETUP This displays the MY SETUP screen 3 Rotate the dial to select the setup n...

Страница 71: ...ress CLEAR This displays Sure You can also delete a MY SETUP by long pressing MENU 6 Press YES This deletes the currently selected MY SETUP To cancel press NO 7 When Complete appears on the display pr...

Страница 72: ...tion press HOME or long press TONE 1 Press SONG This displays the song screen 2 Rotate the dial to select a song This displays the category name of the selected song For a list of song titles see the...

Страница 73: ...board reverb type to be automatically matched to the recommended reverb type setting of the song you choose select NOT AFFECT for the reverb setting See Changing the Relationship of Keyboard and Song...

Страница 74: ...speed for your practice 1 Press SONG This displays the song screen 2 Rotate the dial to select the song whose tempo you want to change 3 Press TEMPO This displays the tempo screen 4 Rotate the dial o...

Страница 75: ...U and I to select the 5 buttons menu that includes SETTING 3 Press SETTING This displays the setting screen 4 Use U and I to select Song Volume 5 Rotate the dial or use and to change the SONG volume...

Страница 76: ...e Digital Keyboard s USB TO DEVICE port When you perform a USB flash drive operation or turn on the Digital Keyboard while a USB flash drive is plugged in the Digital Keyboard initially needs to perfo...

Страница 77: ...d in file name sequence The first MIDI file file name sequence is assigned song number 369 Certain songs can take time to load During a load operation the message LOADING is displayed along with a pro...

Страница 78: ...d automatically changes to the recommended tone setting for the song If there is a tone change within a song enabling Tone Sync causes the keyboard tone also to change automatically when the playback...

Страница 79: ...Part Off Setting Display Name Description Normal Normal playback Keyboard Lighting shows play of both hand parts Right hand part off RIGHT OFF Inserts one blank measure at the beginning of the song a...

Страница 80: ...und for any rests in the measure after that When COUNT or PRE COUNT is selected for Tone recordings Rhythm recordings or Multi track recordings a blank measure is not inserted as the first measure Whe...

Страница 81: ...n be loaded Supported formats for SMF songs are 0 and 1 1 Press SONG This displays the song screen 2 Rotate the dial to select an SMF user song 3 Press BACK 4 Press CHANNEL This displays channel setti...

Страница 82: ...en 2 Rotate the dial to select the user song you want to delete 3 Long press MENU This displays Sure 4 Press YES This deletes the user song To cancel press NO 5 When Complete appears on the display pr...

Страница 83: ...Keyboard to adjust the microphone volume 1 Press MENU This displays the menu screen 2 Use U and I to select the 5 buttons menu that includes KARAOKE 3 Press KARAOKE This displays the karaoke screen Y...

Страница 84: ...or karaoke This displays the screen After you rotate the dial once to select a song you can change the selection further using and If you want to select a category use CAT CAT To go back to the previo...

Страница 85: ...xit the Karaoke function press HOME or long press TONE You can use built in songs user songs and USB memory songs for the karaoke function Keyboard Lighting is disabled while karaoke playback is in pr...

Страница 86: ...This displays the karaoke screen 4 Rotate the dial to select an SMF user song 5 Press BACK 6 Press CHANNEL This displays the screen 7 Rotate the dial or use and to set a channel for the karaoke part...

Страница 87: ...ound Guide that sounds during lessons For information about how to disable guidance see Disabling Lesson Fingering Voice Guide page EN 94 and Disabling Note Sound Guide page EN 95 1 Press LESSON This...

Страница 88: ...layback stands by until you do If you press keys before the corresponding key lighting accompaniment will speed up to adjust the timing 1 Press LESSON This displays the lesson screen 2 Rotate the dial...

Страница 89: ...the rests at the beginning before the pickup If a chord name appears on the display while you have left hand or both hands selected as the playing hand the play this chord next indicator is displayed...

Страница 90: ...g Keyboard Lighting shows you the timing when you need to press keyboard keys WATCH Play while watching the keys that light The next key you need to press flashes to guide you If you do not play the c...

Страница 91: ...ou want by long pressing SONG 6 Press a This starts the currently selected lesson and displays the current measure and beat numbers Inserts one measure at the beginning and sounds a pre count In the c...

Страница 92: ...levels Fingering Guide does not sound during Both Hand Lessons If you press FF REW or AB or display another screen other than the lesson screen during a lesson no performance evaluation is displayed f...

Страница 93: ...hand BOTH both hands 5 You can enable tone sync if you want by long pressing SONG 6 Press a This starts Challenge Mode play The current measure and beat numbers are shown on the display Inserts one me...

Страница 94: ...p Lesson press AB again This causes AB to appear on the display indicating that the end of the measure where you pressed AB is the end point of the loop Loop lesson starts automatically The loop conti...

Страница 95: ...the song being used for a lesson after creating a loop causes the loop to be cleared Use the procedure below to disable Lesson Fingering Voice Guide 1 Press MENU This displays the menu screen 2 Use U...

Страница 96: ...MENU This displays the menu screen 2 Use U and I to select the 5 buttons menu that includes SETTING 3 Press SETTING This displays the setting screen 4 Use U and I to select Note Sound Guide 5 Rotate t...

Страница 97: ...esson 1 Press MENU This displays the menu screen 2 Use U and I to select the 5 buttons menu that includes SETTING 3 Press SETTING This displays the setting screen 4 Use U and I to select Lesson Evalua...

Страница 98: ...s Harmony other instruments You can have only the rhythm part play or you can have all three parts play at the same time The rhythm part is the foundation of each Auto Accompaniment Your Digital Keybo...

Страница 99: ...e selected rhythm For information about rhythm types see the Rhythm List page EN 200 After you rotate the dial once to select an option you can change the selection further using and If you want to se...

Страница 100: ...d name 2 Rotate the dial to select the name of the rhythm whose tempo you want to change 3 Press TEMPO This displays the tempo screen 4 Rotate the dial or use and to change the tempo value You can spe...

Страница 101: ...TTING 3 Press SETTING This displays the setting screen 4 Use U and I to select Rhythm Volume 5 Rotate the dial or use and to change the rhythm volume level You can specify a volume value from 0 to 127...

Страница 102: ...ate the dial to select a tone For tone information see the Tone List page EN 187 After you rotate the dial once to select an option you can change the selection further using and To return the setting...

Страница 103: ...he dial to select the name of the rhythm whose setting you want to configure 3 Long press RHYTHM This momentarily displays RECOMMENDED which indicates the recommended rhythm settings are configured 1...

Страница 104: ...of the rhythm whose setting you want to configure 3 Press TEMPO This displays TAP START above one of the 5 buttons 4 Press TAP START This displays TAP START 5 Tap the TAP TEMPO button at least twice...

Страница 105: ...pattern to add a bit of variation to your performances 1 Press RHYTHM This displays the currently selected rhythm number and name 2 Rotate the dial to select the name of the rhythm whose setting you...

Страница 106: ...hile a rhythm is playing the rhythm changes to the intro from the next measure 4 To change the rhythm pattern that is played after the intro from the basic pattern V1 to the variation pattern V2 press...

Страница 107: ...is displays E The ending plays from the next measure and then the rhythm stops Pressing VARIATION while an ending is playing interrupts the ending play up to the current measure and then plays the cur...

Страница 108: ...l in phrase that matches the current rhythm pattern V1 or V2 The phrase continues to the end of the measure and FILL is displayed at the bottom of the screen while the fill in is playing To extend the...

Страница 109: ...display indicating that the accompaniment keyboard is enabled for accompaniment play 4 Press a to start the rhythm 5 Play a chord on the accompaniment keyboard This sounds the bass harmony and other...

Страница 110: ...D ASSIST FULL RANGE CHORD 1 Press MENU This displays the menu screen 2 Use U and I to select the 5 buttons menu that includes SETTING 3 Press SETTING This displays the setting screen 4 Use U and I to...

Страница 111: ...e chord name play exactly the same chord C C Major Minor Chords Press the key that corresponds to the major chord while also pressing one other accompaniment area key to the right Cm C Minor Seventh C...

Страница 112: ...omponent notes of the chord on the keyboard This mode allows input of fraction chords with the lowest keyboard note as the base note FINGERED ASSIST In addition to FINGERED 1 input you can also use th...

Страница 113: ...the rhythm you want to synchro start with 3 Press SYNC START This enters the synchro start standby state with SYN ST flashing on the display in time with the currently set tempo 4 Play a chord on the...

Страница 114: ...p with 3 Long press ACCMP This displays SYN SP which indicates Synchro Stop is enabled 4 Press ACCMP to enable chord input 5 Press SYNC START to enter synchro start playback standby 6 Hold down a chor...

Страница 115: ...This displays the menu screen 2 Use U and I to select the 5 buttons menu that includes SETTING 3 Press SETTING This displays the setting screen 4 Use U and I to select Rhythm Controller Type 5 Rotate...

Страница 116: ...Switching Between the Basic Pattern and Variation Pattern 1 Press a to start rhythm play This plays the V1 rhythm While rhythm play is stopped pressing VAR1 plays V1 while pressing VAR2 plays V2 Press...

Страница 117: ...en plays the current rhythm pattern V1 or V2 If you press INTRO while a rhythm is playing the rhythm changes to the intro from the beginning of the next measure and I appears on the display Ending 1 W...

Страница 118: ...isplays the setting screen 4 Use U and I to select Rhythm Auto Set 5 Rotate the dial or use and to select Off To enable auto setting select On for this setting 6 To exit the setting operation press EX...

Страница 119: ...rhythm see USB Flash Drive Operations on page EN 155 1 Press RHYTHM This displays the currently selected rhythm number and name 2 Rotate the dial to select the user rhythm you want to delete 3 Long p...

Страница 120: ...ight to show the form of the displayed chord 4 To check the sound of the chord form press SOUND 5 Rotate the dial to select a chord type This displays the screen For information about chord types see...

Страница 121: ...Press CHORD BOOK This displays the chord book screen and keyboard keys light to show the form of the displayed chord 4 Press ROOT This displays the root note of the chord 5 Rotate the dial to select a...

Страница 122: ...eyboard keys light to show the form of the displayed chord 4 Press INVERT and then select the inversion you want The table below shows the inversion types you can select Chord inversions differ accord...

Страница 123: ...rding A Multi track Recording consists of a single system track to which a performance that uses layer split and rhythm function can be recorded and five solo tracks for recording with the UPPER1 part...

Страница 124: ...hythm time signature setting For information about changing the beat setting to be used for recording see Changing the Beat Setting for Recording page EN 125 4 Play something on the keyboard This disp...

Страница 125: ...an ongoing record operation press HOME Exiting an ongoing record operation causes any data recording during the operation to be deleted If you want to avoid inadvertently exiting recording standby or...

Страница 126: ...ss RECORD This displays a record settings screen 5 Rotate the dial to change the beat value For the beat setting you can select Off or a value of 1 to 16 After you rotate the dial once to select a val...

Страница 127: ...5 Press COUNT and then select a count operation Each press of COUNT changes the setting 6 To exit the setting operation press BACK Sounding a Count While Recording Setting Displayed Setting Name Descr...

Страница 128: ...UNT to select the settings you want If you are creating a Part off Recording you cannot select Off as the count setting 5 Press a 6 Press a or RECORD to exit the recording operation After recording is...

Страница 129: ...ct the Easy Recording you want to delete 3 Press CLEAR This displays Sure You can also delete an Easy Recording by long pressing MENU 4 Press YES This deletes the Easy Recording To cancel press NO 5 W...

Страница 130: ...ess RECORD This enters record standby 4 Long press RECORD This displays a record settings screen 5 Press REC TRACK 6 Rotate the dial to select the record destination track After you rotate the dial on...

Страница 131: ...can play along with the playback If you want to record your performance from the beginning without a preparation measure start playing without pressing REC START 8 Press RECORD to exit the recording...

Страница 132: ...m Recording you want to copy as a multi track recording 3 Press MTR COPY This displays Sure 4 Press YES This copies the data to a blank Multi track Recording number To cancel press NO 5 When Complete...

Страница 133: ...reen 2 Rotate the dial to select the Multi track Recording you want to mute 3 Press TRACK MUTE This displays the track mute setting screen 4 Use U and I to select the 5 buttons menu that includes the...

Страница 134: ...the number of the track you want to mute The track that corresponds to the button you press is muted which is indicated by a broken line under its track number To unmute a track press its track numbe...

Страница 135: ...This displays the parameter selection screen 4 To adjust the volume level press VOLUME To adjust the pan press PAN This displays the track selection screen 5 Use U and I to select the 5 buttons menu t...

Страница 136: ...justed volume and pan value ranges are 0 to 127 and 64 to 63 respectively These settings cannot be adjusted outside of these ranges After you rotate the dial once to adjust you can adjust further usin...

Страница 137: ...is displays the song screen 2 Rotate the dial to select the Multi track Recording you want to copy 3 Press MANAGE This displays the Multi track Recording management screen 4 Press SONG COPY This displ...

Страница 138: ...eyboard Play EN 137 6 Press SELECT This displays Sure 7 Press YES This copies the multi track recording To cancel press NO 8 When Complete appears on the display press OK This completes the multi trac...

Страница 139: ...track Recording management screen 4 Press SONG CLEAR This displays Sure 5 Press YES This deletes the multi track recording To cancel press NO 6 When Complete appears on the display press OK This comp...

Страница 140: ...E This displays the Multi track Recording management screen 4 Press TRACK COPY This displays the solo track copy source selection screen 5 Rotate the dial or use and to select the copy source 6 Press...

Страница 141: ...0 When Complete appears on the display press OK This exits the solo track copy operation 1 Press SONG This displays the song screen 2 Rotate the dial to select the Multi track Recording whose track yo...

Страница 142: ...isplays the track delete selection screen 5 Rotate the dial or use and to select a track 6 Press SELECT This displays Sure 7 Press YES This deletes the track To cancel press NO 8 When Complete appears...

Страница 143: ...ack do not stop when you press the HOME Saving Customize contents in MY SETUP keeps them from being deleted when the Digital Keyboard is turned off You also can configure Digital Keyboard settings so...

Страница 144: ...hich shows Base Display items 4 Rotate the dial to change the Base Display Screens you can select are shown in the table below After you rotate the dial once to select a setting you can change the set...

Страница 145: ...en 5 Use U and I to select the button whose function you want to change 6 Rotate the dial or use and to change the function For information about the functions that can be assigned to the 5 buttons se...

Страница 146: ...want 1 Press MENU This displays the menu screen 2 Use U and I to select the 5 buttons menu that includes HOME CSTM 3 Press HOME CSTM This displays the Home Customization screen which shows base scree...

Страница 147: ...Use U and I to select the 5 buttons menu that includes SETTING 3 Press SETTING This displays the setting screen 4 Use the U and I buttons to select a setting item 5 Rotate the dial or use and to chan...

Страница 148: ...0 Split point Can be used to change the range of the lower keyboard and or the accompaniment keyboard Split Point C2 to C7 Initial Default F 3 Rhythm auto setting Can be used to disable automatic sett...

Страница 149: ...ER2 play MIDI Out Ch Upper2 Off 1 to 16 Initial Default 2 MIDI OUT Channel LOWER Can be used to change the channel of MIDI messages that are MIDI output by LOWER play MIDI Out Ch Lower Off 1 to 16 Ini...

Страница 150: ...itial Default On Battery type Can be used to specify the type of batteries being used Battery Alkaline Ni MH Initial Default Alkaline Display Contrast Can be used to adjust display contrast LCD Contra...

Страница 151: ...TTING 3 Press SETTING This displays the setting screen 4 Use U and I to select All Initialize 5 Press ENTER This displays Sure 6 Press YES After initialization is complete the message Complete appears...

Страница 152: ...ta is being written to or loaded from it Doing so can corrupt the data on the USB flash drive and damage the USB TO DEVICE port Never insert anything besides a CASIO specified device or a USB flash dr...

Страница 153: ...mounting process is being performed MOUNTING is shown on the display while a mounting process is in progress Do not attempt to perform any operation on the Digital Keyboard while a mounting process is...

Страница 154: ...ll data currently stored on it Before formatting a USB flash drive make sure it does not have any valuable data stored on it The format operation performed by this Digital Keyboard is a quick format I...

Страница 155: ...includes FORMAT 6 Press FORMAT This displays Sure 7 Press YES This formats the USB flash drive To cancel press NO 8 When Complete appears on the display press OK This exits the formatting operation Fo...

Страница 156: ...rt the data shown in the table below from a USB flash drive into Digital Keyboard memory rename it and delete it Even if a file name has one of the extensions shown in the table above you may not be a...

Страница 157: ...pressed the SONG button press the button that corresponds to the type of song data you want to save If you pressed the TONE button or RHYTHM button as the data type next select the file type and then...

Страница 158: ...ive s MUSICDAT folder 11 Press the YES to save the file This saves the file to the USB flash drive To cancel press NO 12 When Complete appears on the display press OK When saving Multi track Recording...

Страница 159: ...hat corresponds to the type of song data you want to load 7 Rotate the dial or use and to select the file you want to load This displays the file name extension of the selected file 8 Press SELECT If...

Страница 160: ...Using a USB Flash Drive EN 159 12 When Complete appears on the display press OK...

Страница 161: ...en 5 Press DELETE 6 Touch the data type of the data you want to delete If you pressed SONG press the button that corresponds to the song type you want to delete 7 Rotate the dial or use and to select...

Страница 162: ...rename If you pressed SONG press the button that corresponds to the song data you want to rename 8 Rotate the dial or use and to select the file you want to rename This displays the file name extensio...

Страница 163: ...sh Drive EN 162 13 When Complete appears on the display press OK Changing the letters in a file name from upper case to lower case or vice versa does not count as a name change Change the file name to...

Страница 164: ...board Using the Digital Keyboard sound source to sound music data played using an app on the smart device Configure the settings of your smart device Airplane Mode etc to enable data communication Dow...

Страница 165: ...e smart device 2 Use a commercially available USB cable to connect the smart device port to the Digital Keyboard s USB TO HOST port After connecting the smart device to the Digital Keyboard use the sm...

Страница 166: ...entation of the app Do not perform any Digital Keyboard operation while it is in the process of connecting with the smart device app With a Bluetooth connection your communication environment or the c...

Страница 167: ...install the driver Supported Operating Systems Windows 8 1 1 Windows 10 2 macOS OS X Mac OS X 10 7 10 8 10 9 10 10 10 11 10 12 10 13 10 14 10 15 11 0 1 Windows 8 1 32 bit versions 64 bit versions 2 W...

Страница 168: ...ly be installed on your computer 4 Start up commercially available music software on your computer 5 Use the settings of your computer s commercially available music software to select CASIO USB MIDI...

Страница 169: ...s supplied by you Use a connecting cord that has a stereo mini plug on one end for connection to this Digital Keyboard and a plug that matches the configuration of the input jack of external device on...

Страница 170: ...the volume level of the notes you are playing on the keyboard adjust the volume balance of the Digital Keyboard See Changing the Volume Balance Between Keyboard Play and Rhythm Play Balance on page E...

Страница 171: ...e volume balance of the Digital Keyboard See Changing the Volume Balance Between Keyboard Play and Rhythm Play Balance on page EN 52 Setting the volume level of the external device too high can cause...

Страница 172: ...under the Bluetooth icon while the Digital Keyboard is Bluetooth audio paired with another device To stop Bluetooth audio pairing press CANCEL 8 Use the setting screen of the Bluetooth capable audio d...

Страница 173: ...tooth audio capable device For information about how to change this Digital Keyboard s Bluetooth settings see Turning Off Bluetooth page EN 176 Information about the last Bluetooth audio capable devic...

Страница 174: ...pairing registration on the Bluetooth audio capable device For information about how to do this refer to the user documentation of each Bluetooth audio device 1 Long press the P Power button to turn o...

Страница 175: ...EG CLEAR This displays Sure 8 Press YES This deletes the Bluetooth audio pairing registration To cancel press the NO button 9 When Complete appears on the display press OK This exits the Bluetooth aud...

Страница 176: ...ble MIDI device to select WU BT10 MIDI and connect with the Digital Keyboard Connecting with a Bluetooth MIDI capable device causes MIDI to appear on the display Do not perform any Digital Keyboard op...

Страница 177: ...elect the 5 buttons menu that includes BLUETOOTH 3 Press BLUETOOTH This displays the Bluetooth screen 4 Press BT This turns off Bluetooth which causes BT and the Bluetooth icon to disappear from the d...

Страница 178: ...eries with new ones page EN 9 Or use AC adapter power page EN 8 Screen contents are visible only from a fixed angle This is due to the Digital Keyboard s production limitations It does not indicate ma...

Страница 179: ...ain page EN 25 to initialize settings Notes keep sounding without stopping Try turning the Digital Keyboard off and then back on again page EN 25 to initialize settings Replace the batteries with new...

Страница 180: ...age EN 42 Try turning the Digital Keyboard off and then back on again page EN 25 to initialize settings Operation Tone rhythm and other settings revert to their initial defaults whenever I turn on the...

Страница 181: ...is protected by anti virus software Use a USB flash drive that is not protected by anti virus software No File There is no loadable or playable file in the MUSICDAT folder Move the file you want to l...

Страница 182: ...sion that is supported by the Digital Keyboard Unformatted The USB flash drive format is not compatible with the Digital Keyboard Use a computer to format the USB flash drive to a format that is compa...

Страница 183: ...s Tempo 20 to 255 Song Bank Built in Songs 160 User Songs 200 1 Part Off Left hand right hand both hands Lesson Lesson Type 3 steps LISTEN WATCH REMEMBER EASY Mode Challenge Mode Lesson part Left hand...

Страница 184: ...O IN jack Stereo mini jack 3 5 mm Input impedance 10 k Input sensitivity 200 mV USB TO HOST port micro B USB TO DEVICE port Type A PEDAL jack Standard jack 6 3 mm pedal sustain sostenuto soft start st...

Страница 185: ...1 Do not allow the electrical load output to exceed the label rating 12 Make sure the surrounding area is dry before plugging into a power source 13 Make sure the product is oriented correctly 14 Unpl...

Страница 186: ...AN PATROL 39 FR HLICHER LANDMANN 40 LA VIOLETTE 41 SPINNERLIED 42 LA CHEVALERESQUE 43 SONATINE op 20 no 1 1st Mov 44 SONATA K 545 1st Mov 45 GAVOTTE FROM FRANZ SISCHE SUITE 46 JESUS BLEIBET MEINE FREU...

Страница 187: ...OWN JUG 96 HOUSE OF THE RISING SUN 97 SHE WORE A YELLOW RIBBON 98 YANKEE DOODLE 99 MY OLD KENTUCKY HOME 100 SZLA DZIEWECZKA 101 WALTZING MATILDA 102 ON THE BRIDGE OF AVIGNON 103 I VE BEEN WORKING ON T...

Страница 188: ...18 HARPSICHORD 1 6 1 0 0 19 HARPSICHORD 2 6 32 0 0 20 COUPLED HARPSICHORD 6 33 0 0 ELEC PIANO 21 GALAXIA EP 5 32 0 0 22 DYNAMIC EP 4 32 0 0 23 LUCENT EP 5 33 0 0 24 ELEC PIANO 1 4 1 0 0 25 ELEC PIANO...

Страница 189: ...ORGAN 1 18 1 0 0 71 ROCK ORGAN 2 18 2 0 0 72 CLICK ORGAN 17 37 0 0 73 70 S ORGAN 17 36 0 0 74 ORGAN PAD 16 6 0 0 75 PIPE ORGAN 1 19 32 0 0 76 PIPE ORGAN 2 19 33 0 0 77 PIPE ORGAN 3 19 2 0 0 78 CHAPEL...

Страница 190: ...28 2 0 0 118 OVERDRIVE MUTE GT 28 5 0 0 119 PHASER MUTE GUITAR 28 3 0 0 120 AMBIENT MUTE GUITAR 28 4 0 0 121 HUM BLUES GUITAR 29 5 0 0 122 OVERDRIVE GUITAR 1 29 1 0 0 123 OVERDRIVE GUITAR 2 29 2 0 0 1...

Страница 191: ...FINGER SLAP BASS 2 36 4 0 1 167 FINGER SLAP BASS 3 36 35 0 1 168 SYNTH BASS 2 38 6 0 1 169 SYNTH BASS 3 38 1 0 1 170 SYNTH BASS 4 38 2 0 1 171 SYNTH BASS 5 39 1 0 1 172 SYNTH BASS 6 39 2 0 1 173 SYNTH...

Страница 192: ...35 0 0 216 BRASS VELO GLISSANDO 61 36 0 0 217 SYNTH BRASS 2 62 33 0 0 218 SYNTH BRASS 3 62 1 0 0 219 SYNTH BRASS 4 62 34 0 0 220 WARM SYNTH BRASS 62 35 0 0 221 ANALOG SYNTH BRASS 62 36 0 0 222 80 S SY...

Страница 193: ...33 0 0 SYNTH 265 SUPER SAW LEAD 1 81 16 0 0 266 SUPER SAW LEAD 2 81 17 0 0 267 TRANCE POLY LEAD 81 18 0 0 268 TRANCE PLUCK 81 38 0 0 269 PROGRESSIVE PLUCK 81 39 0 0 270 SAW PLUCK 81 40 0 0 271 DIRTY P...

Страница 194: ...12 SQUARE PULSE LEAD 80 34 0 0 313 SINE LEAD 80 2 0 0 314 SYNTH SEQUENCE 80 8 0 0 315 SEQUENCE SAW 81 15 0 0 316 SEQUENCE SINE 80 7 0 0 317 8BIT ARPEGGIO 80 9 0 0 318 8BIT WAVE 80 35 0 0 319 SAW ARPEG...

Страница 195: ...100 1 0 0 360 BRIGHT BELL PAD 100 2 0 0 361 SPACE PAD 103 1 0 0 362 EDM PAD 88 3 0 0 363 CHOIR AAHS 52 1 0 0 364 STRINGS VOICE 52 33 0 0 365 SLOW CHOIR 52 32 0 0 366 VOICE DOO 53 32 0 0 367 VOICE UUH...

Страница 196: ...U 4 110 42 0 0 409 YANG QIN 1 15 2 0 0 410 YANG QIN 2 15 3 0 0 411 YANG QIN 3 15 34 0 0 412 ZHENG 1 107 8 0 0 413 ZHENG 2 107 40 0 0 414 PI PA 1 105 8 0 0 415 PI PA 2 105 9 0 0 416 PI PA 3 105 40 0 0...

Страница 197: ...60 GM ORGAN 3 18 0 0 0 461 GM PIPE ORGAN 19 0 0 0 462 GM REED ORGAN 20 0 0 0 463 GM ACCORDION 21 0 0 0 464 GM HARMONICA 22 0 0 0 465 GM BANDONEON 23 0 0 0 466 GM NYLON STR GUITAR 24 0 0 0 467 GM STEEL...

Страница 198: ...508 GM TENOR SAX 66 0 0 0 509 GM BARITONE SAX 67 0 0 0 510 GM OBOE 68 0 0 0 511 GM ENGLISH HORN 69 0 0 0 512 GM BASSOON 70 0 0 0 513 GM CLARINET 71 0 0 0 514 GM PICCOLO 72 0 0 0 515 GM FLUTE 73 0 0 0...

Страница 199: ...GM MELODIC TOM 117 0 0 0 560 GM SYNTH DRUM 118 0 0 0 561 GM REVERSE CYMBAL 119 0 0 0 562 GM GT FRET NOISE 120 0 0 0 563 GM BREATH NOISE 121 0 0 0 564 GM SEASHORE 122 0 0 0 565 GM BIRD 123 0 0 0 566 GM...

Страница 200: ...203 585 ROCK SET 17 120 0 0 586 ELECTRONIC SET 24 120 0 0 587 DRUM MACHINE SET 1 25 120 0 0 588 DRUM MACHINE SET 2 30 120 0 0 589 DRUM MACHINE SET 3 33 120 0 0 590 JAZZ SET 32 120 0 0 591 BRUSH SET 40...

Страница 201: ...B FUNK 35 CHART DANCE 36 70 s DISCO POP 37 DANCE POP 38 HIP HOP 39 DISCO POP 40 TRANCE 41 MODERN R B JAZZ 42 STEADY JAZZ 43 PIANO JAZZ WALTZ 44 ORCHESTRA SWING 1 45 MODERN BIG BAND 46 FAST BIG BAND 47...

Страница 202: ...URA TABLA 133 DADRA TANPURA TABLA No Rhythm Name 134 TEEN TAAL TANPURA TABLA 135 RUPAK TANPURA TABLA 136 DEEPCHANDI TANPURA TABLA CHINESE 137 GUANGDONG 138 JIANGNAN 139 BEIJING 140 DONGBEIYANGGE 141 J...

Страница 203: ...184 EP BALLAD 1 185 EP BALLAD 2 186 BLUES BALLAD 187 JAZZ COMBO 1 188 JAZZ COMBO 2 189 RAGTIME 190 BOOGIE WOOGIE 191 PIANO ROCK ROLL 192 ARPEGGIO 1 193 ARPEGGIO 2 194 ARPEGGIO 3 195 PIANO MARCH 1 196...

Страница 204: ...ard3 Kick 1 Standard2 Side Stick Standard3 Snare 1 Standard3 Snare 2 Standard3 Low Tom 2 Standard3 Closed Hi Hat Standard3 Low Tom 1 Standard3 Pedal Hi Hat Standard3 Mid Tom 2 Standard3 Open Hi Hat St...

Страница 205: ...DM1 Low Tom 2 Dance4 Closed Hi Hat 3 DM1 Low Tom 1 Dance4 Closed Hi Hat 4 DM1 Mid Tom 2 Dance4 Open Hi Hat 2 DM1 Mid Tom 1 DM1 High Tom 2 DM1 Crash Cymbal DM1 High Tom 1 DM1 Ride Cymbal Standard3 Chin...

Страница 206: ...Standard3 Chinese Cymbal Standard3 Ride Bell Standard3 Splash Cymbal Standard3 Crash Cymbal 2 Standard3 Ride Cymbal 2 High Whistle 2 Low Whistle 2 Standard2 Sticks Power Kick 2 Power Kick 1 Standard2...

Страница 207: ...are 1 mp Jazz Snare 1 mf Jazz Rim Standard2 Sticks Jazz Kick 2 Jazz Kick 1 Jazz Side Stick Jazz Snare 1 Jazz Snare 2 Jazz Low Tom 2 Room Closed Hi Hat Jazz Low Tom 1 Room Pedal Hi Hat Jazz Mid Tom 2 R...

Страница 208: ...Nam Thavil Ki Thavil Kun Thavil Jou Thavil Kirara Kanjira Ta Kanjira Di Kanjira Don Kanjira Don BendShort Standard2 Sticks Standard3 Kick 2 Standard3 Kick 1 Standard2 Side Stick Standard3 Snare 1 Sta...

Страница 209: ...Normal mf 61 75 Ghost Note 76 90 Mute 91 105 Hammering 106 120 Glissando 121 127 Open Harmonics C7 1 127 Strum 1 C 7 1 127 Strum 2 D7 1 127 Strum 3 D 7 1 127 Strum 4 E7 1 127 Strum 5 F7 1 127 Strum 6...

Страница 210: ...C 9 1 127 Fret Noise2 D9 1 127 Fret Noise3 D 9 1 127 Fret Noise4 E9 1 127 Fret Noise5 F9 1 127 Fret Noise6 F 9 1 127 Fret Noise7 G9 1 127 Fret Noise8 181 VERSATILE ELECTRIC BASS 1 C1 B6 1 60 Normal m...

Страница 211: ...Item Bluetooth Bluetooth on Menu Menu Item Media Media on Menu Menu Item Setting Setting on Menu Menu Item Demo Demo on Menu TONE TONE Tone Upper1 Tone Upper1 Upper2 Tone Upper2 Lower Tone Lower Split...

Страница 212: ...comp Chord mode Rhythm Chord Mode Volume Rhythm Volume SYSTEM EFFECT SYSTEM EFFECT Reverb type Reverb Chorus type Chorus MIDI MIDI MIDI OUT channel Upper1 MIDI Out Ch Upper1 Upper2 MIDI Out Ch Upper2...

Страница 213: ...not supported in some cases 4 These fingerings are special fingerings for Digital Keyboard chord input and so they are not suitable for normal keyboard play Fingering Guide 4 4 4 4 4 4 4 C Cm Cdim Cau...

Страница 214: ...when the lowest note fingered is a certain distance from the neighboring note the chord is interpreted as a fraction chord Unlike FINGERED 1 2 and FINGERED ON BASS FULL RANGE CHORD requires pressing...

Страница 215: ...2 Chord Type Since the chord input range is limited this model may not support some of the chords shown above Chord Example List 2 1 M m dim aug sus4 sus2 7 m7 M7 m7D5 7D5 7sus4 add9 madd9 mM7 dim7 69...

Страница 216: ...1 Root 2 Chord Type Since the chord input range is limited this model may not support some of the chords shown above 2 1 M m dim aug sus4 sus2 7 m7 M7 m7D5 7D5 7sus4 add9 madd9 mM7 dim7 69 6 m6 A BD...

Страница 217: ...67 71 72 73 74 76 77 78 84 91 93 94 100 101 Bank select Modulation Portamento Time Data entry LSB MSB Volume Pan Expression Hold 1 Portamento Switch Sostenuto Soft pedal Filter resonance Release time...

Страница 218: ...MA2104 A...

Отзывы: